Crochet Pig In A Granny Square Blanket Pattern


How to Crochet a Classic Granny Square is an essential guide for anyone wanting to master one of the most iconic and versatile crochet patterns.
The How to Crochet a Classic Granny Square tutorial provides step-by-step instructions, tips, and creative ideas for using this timeless pattern in blankets, pillows, bags, and more.
Whether you are a beginner or an experienced crocheter, understanding the classic granny square opens doors to endless possibilities in your crochet projects.
The How to Crochet a Classic Granny Square pattern is not only functional but also a way to explore color, texture, and design. With its simple structure of clusters, chains, and corners, it allows crafters to combine multiple squares into larger pieces with ease.
Learning this pattern builds confidence in handling yarn, maintaining stitch consistency, and understanding the geometry of crochet shapes. By following this tutorial, you will gain the skills to create beautiful and professional-looking granny squares.
One of the most appealing aspects of the How to Crochet a Classic Granny Square tutorial is its adaptability. You can experiment with colors, yarn types, and sizes to customize your projects. From a tiny coaster to a large afghan blanket, the granny square offers endless creative potential. Understanding the fundamental techniques provided in this tutorial ensures that your granny squares are even, uniform, and visually pleasing.
To begin your How to Crochet a Classic Granny Square project, you will need specific materials. Choose high-quality yarn, ideally medium-weight acrylic or cotton, which is easy to work with and maintains shape. Multiple colors can be used to create vibrant, multi-colored squares.
A crochet hook appropriate for the chosen yarn weight is essential. The tutorial recommends a size that allows for smooth stitches without making them too tight or too loose. A comfortable grip will help maintain stitch consistency throughout the project.
Other necessary tools include scissors, yarn needles for weaving in ends, and stitch markers if desired. These help maintain precision and simplify finishing. The How to Crochet a Classic Granny Square tutorial emphasizes keeping tools organized to avoid interruptions during crafting.
Optional materials include blocking mats and pins. Blocking helps the granny squares maintain their shape and size, ensuring uniformity when joining multiple squares into a larger piece.
The tutorial also highlights the importance of understanding basic crochet terminology, such as chains, slip stitches, and double crochets. Mastering these foundational stitches is crucial for completing the classic granny square accurately.
Finally, maintaining your yarn tension and workspace setup is essential. Even tension and a comfortable workspace contribute to a smoother, more enjoyable experience when following the How to Crochet a Classic Granny Square tutorial.
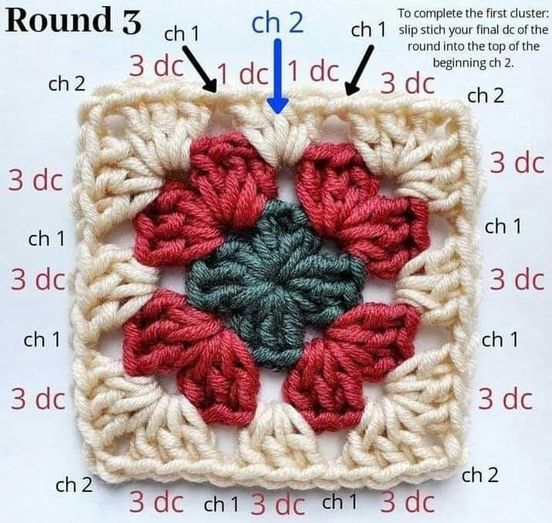
The How to Crochet a Classic Granny Square begins with creating a foundation ring, often using a magic ring or a chain loop. This small circular base anchors the first round of stitches.
In the first round, clusters of double crochet stitches are worked into the ring. Each cluster is separated by chain spaces, which later form the corners of the square. Consistency in stitch height and tension is key to achieving an even square.
The second round expands the square by creating additional clusters in each corner chain space from the previous round. This is where the square begins to take shape, and understanding corner formation is essential for maintaining a perfect square geometry.
Subsequent rounds follow a similar pattern: clusters are worked into chain spaces, and corners are formed at each square corner. The How to Crochet a Classic Granny Square tutorial emphasizes checking the square’s symmetry after each round and adjusting as needed.
Joining colors is an optional step. You can change yarn at the beginning of a new round to create stripes or patterns. The tutorial provides tips for smooth color transitions to ensure the granny square looks neat and professional.
Finally, finishing involves weaving in all loose ends with a yarn needle and blocking the square if desired. Blocking ensures that all granny squares maintain uniform size and edges, especially important when assembling multiple squares for larger projects.
The How to Crochet a Classic Granny Square tutorial encourages personalization. Color choices allow you to create unique patterns, from subtle gradients to bold, contrasting squares.
Varying the size of granny squares can also change the final project’s look. Small squares are ideal for detailed projects like bags or coasters, while larger squares work well for blankets or throws.
Experimenting with yarn textures adds dimension. Combining smooth, fluffy, or textured yarns can create interesting visual and tactile effects in your granny squares.
Adding decorative stitches within or around the square can further enhance its appearance. Edging, picot stitches, or crocheted borders give your squares a distinct and polished look.
Mixing traditional and modern color palettes allows you to adapt the classic granny square to contemporary or vintage-inspired projects. This versatility is one of the reasons the granny square remains a favorite among crocheters.
Finally, joining techniques offer further customization. You can join squares as you go, use slip stitches, or sew them together for different looks and finishes. The How to Crochet a Classic Granny Square tutorial provides options for joining, depending on your project.
Maintaining even tension is critical in the How to Crochet a Classic Granny Square tutorial. Uneven stitches can distort the square and affect overall symmetry.
Skipping chain spaces in corners can cause the square to ripple or pucker. Always double-check that corners are formed correctly.
Changing yarn colors incorrectly can result in loose ends or gaps. Following the tutorial’s color transition tips ensures clean, professional-looking squares.
Miscounting stitches can disrupt the pattern. The tutorial advises counting clusters at the end of each round to confirm accuracy.
Not blocking the finished square may result in uneven edges or inconsistent sizes. Blocking after completion helps maintain uniformity, especially when combining multiple squares.
Rushing through rounds can lead to mistakes. Patience is emphasized throughout the How to Crochet a Classic Granny Square tutorial to ensure a polished final product.
Finally, neglecting to weave in ends properly can cause unraveling over time. Proper finishing ensures longevity and durability of your granny squares.
Q1: Is this tutorial suitable for beginners?
Yes, the How to Crochet a Classic Granny Square tutorial provides detailed steps, making it beginner-friendly while offering tips for experienced crocheters.
Q2: What yarn is best for granny squares?
Medium-weight acrylic or cotton yarn is recommended for durability and ease of handling. Multiple colors can be used for vibrant designs.
Q3: Can I make granny squares in different sizes?
Absolutely. Adjusting rounds and stitch counts allows you to create squares of any size for various projects.
Q4: How do I join multiple granny squares?
You can join squares using slip stitches, whip stitching, or by crocheting them together as you go. The tutorial provides several joining options.
Q5: Should I block my granny squares?
Yes, blocking ensures uniform size, smooth edges, and overall professional appearance.
Q6: Can I customize the colors or add decorative stitches?
Yes, color choices, textures, and additional decorative stitches allow for full customization of your granny squares.
The How to Crochet a Classic Granny Square tutorial is a foundational guide for crocheters of all levels. From mastering the basic stitch clusters to customizing colors and shapes, this tutorial provides the knowledge needed to create versatile and beautiful granny squares.
By practicing patience, maintaining consistency, and exploring creative options, you can produce professional-looking squares suitable for blankets, pillows, garments, and more. Share your results, provide feedback, and inspire others to embrace the timeless charm of the classic granny square.


