Crochet Pig In A Granny Square Blanket Pattern


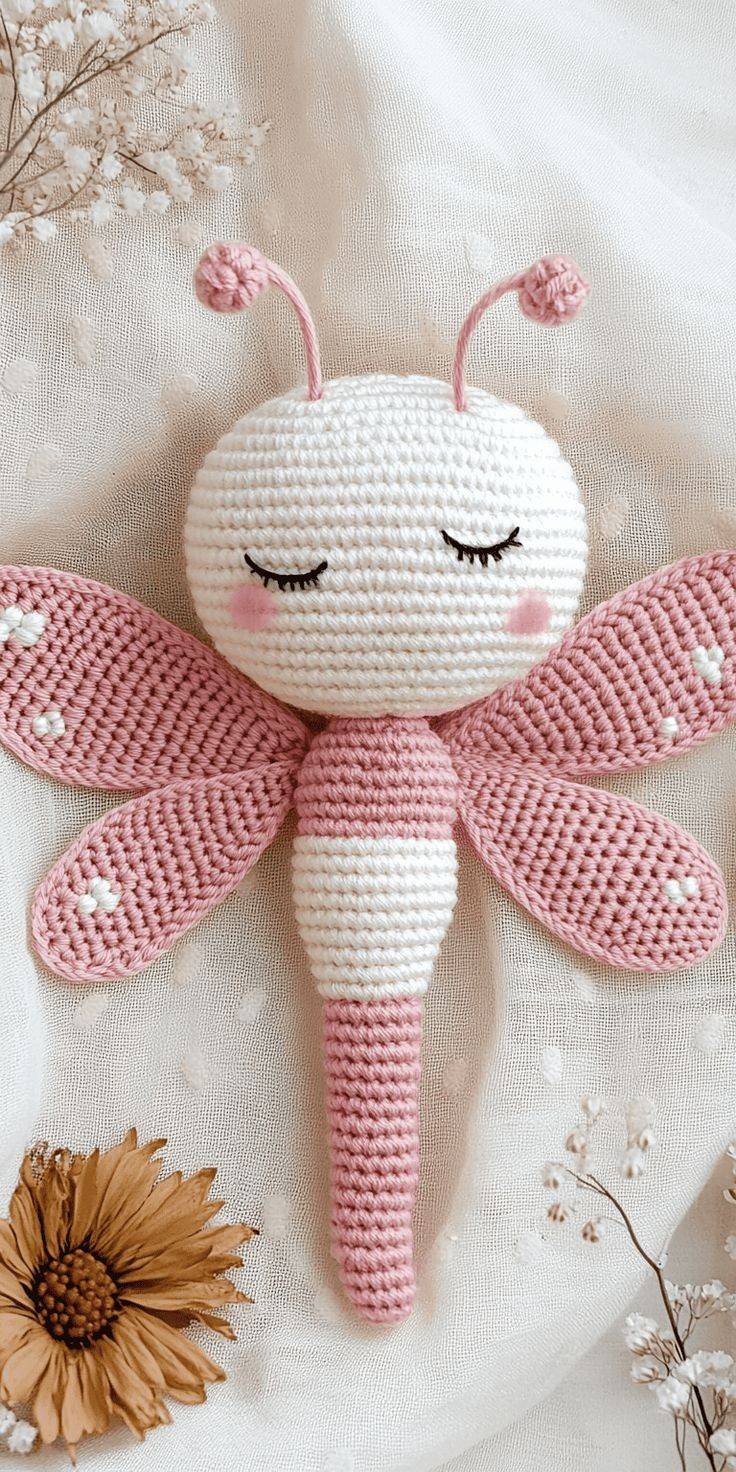
Crocheting is a beautiful craft that allows you to create intricate designs with simple tools, and one of the most charming and unique designs you can make is a crochet dragonfly.
Crochet DragonFly Tutorial – A Complete Guide for Beginners and Beyond will walk you through every step needed to create your very own dragonfly, whether you’re a beginner or someone who’s looking to enhance their crochet skills.
This guide will explain the necessary tools, materials, basic techniques, and step-by-step instructions to create a stunning crochet dragonfly. The beauty of crochet is in the details, and dragonflies, with their delicate wings and vibrant colors, offer a perfect opportunity to showcase your talent.
In this article, we will break down the crochet dragonfly pattern into digestible sections to make it easy for you to follow.
Whether you’re new to crochet or you’re more experienced and looking for a new challenge, this tutorial is designed for all skill levels. By the end of this guide, you will have a charming crochet dragonfly to display or gift to someone special. Let’s dive in!
Before we start, let’s take a quick look at the materials and basic techniques you’ll need. Don’t worry if you’re a beginner – we’ll explain everything in a way that makes sense, step-by-step. Crocheting a dragonfly is an excellent project for practicing basic crochet stitches and shaping techniques, so whether you want to create a keychain, wall hanging, or a beautiful decorative piece, you will learn essential skills along the way.
To get started with your crochet dragonfly project, it’s important to gather all the necessary materials. You don’t need a lot of tools, but the right ones will make your project much easier and more enjoyable.
Yarn: For your crochet dragonfly, you’ll need yarn in a variety of colors. You’ll typically use a light or medium weight yarn, such as worsted weight yarn. The colors you choose are up to you, but it’s common to select bright colors for the body and wings. Bright blues, greens, and purples are often popular for dragonfly wings.
Crochet Hook: The size of your crochet hook will depend on the yarn you’re using. For worsted weight yarn, a size G-6 (4mm) crochet hook is typically used. However, you may adjust the hook size if you prefer a tighter or looser stitch.
Stitch Markers: These are helpful for keeping track of rounds, especially when you’re working in the round, as you will be for most of the crochet dragonfly’s body and wings.
Yarn Needle: A yarn needle is necessary for weaving in the ends once you’ve finished your dragonfly. It will also come in handy for sewing together the body parts and wings.
Scissors: A sharp pair of scissors will be essential for cutting your yarn.
Before you start the project, it’s a good idea to familiarize yourself with a few basic crochet stitches. These are the fundamental building blocks that will be used in the crochet dragonfly tutorial.
These stitches will be used throughout the tutorial, and if you’re unfamiliar with any of them, there are plenty of online resources and videos available to help you master these basic techniques. For now, let’s get started with the first step in creating your very own crochet dragonfly!
The body of the crochet dragonfly is typically worked in rounds using the single crochet (sc) stitch. The body is long, tapered, and cylindrical, so it’s important to keep your stitches even as you work.
To start, make a magic ring, which is a technique that allows you to create a tightly closed center to your crochet circle. You will then work in the round, increasing in stitches to create the length of the dragonfly’s body.
Step 1: Begin by making a magic ring and working six single crochet stitches into the ring.
Step 2: Join the round with a slip stitch. This will form the base of your dragonfly’s body.
Step 3: Continue working in rounds, increasing each round until the body reaches the desired length.
Remember to use your stitch markers to help keep track of your rounds. You will also want to choose a color that contrasts well with the wings, as the body of the dragonfly needs to stand out but not overpower the delicate wings.
Once you’ve completed the body, you can fasten off the yarn and weave in any loose ends. Now it’s time to focus on the wings!
The wings are the most intricate part of a crochet dragonfly, and they require a little more attention to detail. For this, we will be using a combination of the double crochet stitch and chain stitches to form the airy, delicate wings of the dragonfly.
The wings are typically worked in two sections: the upper wings and the lower wings.
Upper Wings:
Step 1: Start by creating a foundation chain of 6-8 stitches, depending on how wide you want the wings.
Step 2: Work a series of double crochet (dc) stitches into each chain, gradually increasing the stitch count as you reach the top of the wing. You will work the last row in decreasing stitches to create the tapered shape of the wing.
Step 3: Repeat the same process for the second upper wing.
Lower Wings:
For the lower wings, repeat the same process, but make them slightly smaller than the upper wings to maintain the characteristic dragonfly shape.
Once both sets of wings are complete, you can attach them to the body of the dragonfly using your yarn needle.
1. What’s the best yarn for making a crochet dragonfly?
The best yarn for a crochet dragonfly is light or medium-weight yarn, such as worsted weight yarn. For a more delicate appearance, you could use sport weight yarn. It’s also important to choose colors that contrast nicely and reflect the natural colors of a dragonfly.
2. Can I use a different stitch for the wings?
Yes, you can experiment with different stitches for the wings. Some people prefer to use a combination of treble crochet (tr) or half double crochet (hdc) for the wings to create a more textured effect.
3. How long does it take to crochet a dragonfly?
The time it takes to crochet a dragonfly varies depending on your skill level and the complexity of the design. For beginners, it may take a couple of hours, while more experienced crocheters might complete it in under an hour.
4. Can I make a smaller or larger dragonfly?
Yes, you can adjust the size by changing the type of yarn and hook size. A thinner yarn and smaller hook will result in a smaller dragonfly, while thicker yarn and a larger hook will give you a bigger dragonfly.
5. How do I attach the wings to the body?
To attach the wings, simply use a yarn needle to sew the upper and lower wings to the body of the dragonfly. Make sure to secure them tightly to ensure the wings don’t flop over.
6. Can I use this crochet pattern for other projects?
Yes, you can adapt the crochet dragonfly pattern for other projects like keychains, brooches, or decorative pieces. The same technique can be used to create a variety of dragonfly-inspired designs.
In this Crochet DragonFly Tutorial – A Complete Guide for Beginners and Beyond, we’ve covered everything you need to create a beautiful crochet dragonfly, from the materials required to the techniques you’ll use.
Whether you’re just beginning your crochet journey or looking for a fun project to tackle, this tutorial will give you the knowledge and confidence to bring your dragonfly to life. By following these simple steps, you can create a stunning dragonfly to add to your collection or give as a gift to a friend.


