
Ballerina pencil case with zipper Pattern


How to Make a Large Craft Storage Tote Bag with Multiple Pockets is the ultimate guide for crafters who want to organize their supplies in a stylish and functional way.
This tutorial will teach you step by step how to create a spacious tote bag that not only holds all your materials but also keeps them neatly organized.
With the right fabrics, tools, and techniques, you can make a durable tote that becomes an essential companion for any craft project. Whether you are into sewing, knitting, painting, or scrapbooking, this craft storage tote bag is designed to make your life easier and more organized.
A well-designed craft storage tote bag with multiple pockets is more than just a bag. It’s a portable workspace that keeps tools, materials, and accessories within easy reach.
By following this tutorial, you will learn how to design a bag with various compartments that suit your personal crafting needs. From external pockets for items you frequently use to internal pockets for smaller tools and delicate materials, this bag ensures everything has its place. The key to a successful tote bag is careful planning, accurate measurements, and precise sewing, all of which are covered in this guide.
Creating a large craft storage tote bag also allows for personal expression through fabric choice, colors, and decorative elements. You can use canvas, denim, or cotton blends to match your style, while reinforcing the structure with interfacing to ensure longevity. This tutorial emphasizes both practicality and aesthetics, helping you make a bag that is not only functional but also visually appealing. You’ll discover tips for adding extra stability, reinforcing seams, and finishing edges neatly, so your bag stands up to daily use without compromising style.
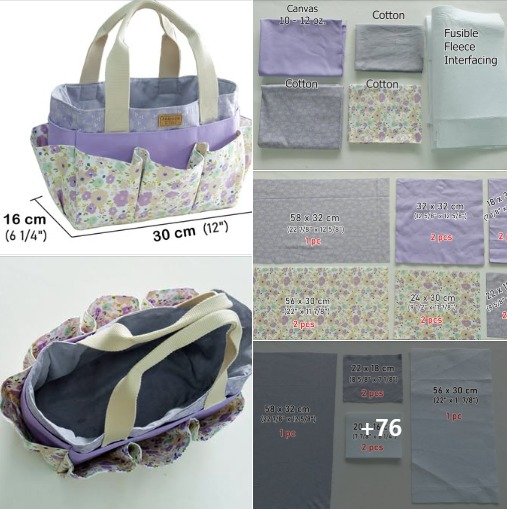
Before sewing, it is crucial to plan the structure of your craft storage tote bag. Determine the overall dimensions based on the types of supplies you intend to carry. A good size for a large tote is approximately 18 inches wide, 12 inches tall, and 6 inches deep. These dimensions allow for ample storage while remaining portable.
Consider how many pockets you want and their placement. External pockets are perfect for items you need quickly, like scissors, pens, and paintbrushes, while internal pockets are ideal for smaller or fragile supplies such as beads, threads, or needles. Sketching a layout will help you visualize the design and make adjustments before cutting your fabric.
Selecting fabrics is a critical step. Use sturdy materials such as canvas, denim, or heavy cotton for the exterior to withstand weight and wear. A coordinating lighter fabric for the lining adds a polished finish and makes it easier to spot items inside the bag. Fusible interfacing strengthens the bag structure without adding bulk.
Decide if you want optional closures such as zippers, Velcro, or magnetic snaps for the pockets. These can keep contents secure and prevent items from falling out. Including closures in your plan early ensures that the assembly process will be smooth and your tote remains functional.
Handles are another important consideration. Choose strong webbing, leather straps, or reinforced fabric handles. They should be comfortable to hold and securely stitched to support the bag’s weight when filled. Planning handle placement and length will help balance the bag and prevent strain on the seams.
Finally, think about personalization. Adding decorative stitching, embroidery, or appliqué can make your craft storage tote bag unique. Even simple choices like contrasting thread or patterned lining can elevate the bag from a practical tool to a statement piece for your crafting area.
Once you have planned your bag, it’s time to cut the fabric. Cut two pieces for the front and back of the bag, one rectangle for the bottom, and two side panels if you are including gussets for added depth. Remember to add 1-inch seam allowances on all sides.
Cut the pocket pieces according to your layout. For multiple small pockets, consider cutting a larger piece and dividing it into sections with stitched lines. Hem the top edges of each pocket by folding them under and pressing before sewing, which prevents fraying and creates a neat finish.
Interfacing should be applied to all exterior pieces to give structure to the bag. Use medium or heavy-weight fusible interfacing, following the manufacturer’s instructions for heat and time. For pockets, lighter interfacing provides shape without making them stiff.
Handles should be cut to your desired length, typically 24 inches each for a large tote. If using fabric for handles, fold and stitch them to create reinforced straps. Webbing handles are already sturdy but may benefit from extra stitching at attachment points.
Before assembly, pre-plan the pocket placement on the exterior. Pin or clip them in place temporarily, ensuring spacing is even and pockets are aligned properly. This step will save time and prevent errors when sewing the pieces together.
Finally, if any pockets require closures such as zippers or Velcro, attach these before adding the pockets to the bag. Doing so now ensures accuracy and avoids difficult sewing later in the process.
Start by attaching the pockets to the exterior front and back pieces. Stitch around the sides and bottom of each pocket, leaving the top open. Divide large pockets into sections by sewing vertical lines, creating compartments for smaller items. Reinforce edges if the pocket will hold heavier items.
Assemble the bag by sewing the front and back pieces to the side panels and bottom, right sides together. Use a strong, consistent stitch to ensure durability. Pay extra attention to stress points where handles will attach, reinforcing with additional stitching.
Attach the handles by pinning them evenly along the top edge of the bag. Sew in a rectangle or “X” pattern for added strength. Test the handle placement for comfort and balance before finishing.
Next, prepare the lining by sewing the pieces together in the same shape as the exterior, leaving a small gap at the bottom for turning the bag right side out. Insert the lining into the bag with right sides facing each other, and stitch around the top edge.
Turn the bag right side out through the gap in the lining. Close the gap by hand or machine stitching, pressing seams for a clean finish. Topstitch around the top edge for added durability and a polished look.
Finally, add optional finishing touches such as reinforced bottom inserts, decorative stitching, or embellishments. These small details enhance functionality, aesthetics, and longevity.
Customizing your craft storage tote bag with multiple pockets allows you to tailor it to your personal needs. Add extra internal compartments for beads, buttons, or threads to keep small items organized. Adjustable or removable dividers can create flexible storage options.
Decorative stitching and embroidery add personality while reinforcing seams. Contrasting thread, patterned fabrics, or appliqué can transform your tote into a visually striking piece. Consider labeling pockets to quickly identify contents, which is especially useful if you carry a large variety of supplies.
If desired, attach closures like zippers, Velcro, or magnetic snaps to keep pocket contents secure. This feature is particularly helpful when transporting your tote to classes, workshops, or craft fairs.
Adding reinforced handles or a shoulder strap improves usability. Ensure the stitching is strong and handles are positioned for balance. Comfortable handles encourage carrying the tote even when fully loaded.
Consider using a light-colored lining to make items easier to find. Dark linings may hide smaller supplies, creating frustration when searching for specific tools.
Finally, share your completed tote bag with fellow crafters. Feedback, tips, and inspiration from others can help you refine your design, try new techniques, and create even more functional and stylish craft storage solutions.
Q1: Can beginners make this tote bag?
Yes, with careful planning and attention to detail, beginners can follow this tutorial. Take your time with measurements, cutting, and sewing.
Q2: What fabrics are best for a durable tote?
Canvas, denim, and heavy cotton are recommended for strength and longevity. Lighter fabrics can be used for lining.
Q3: How many pockets can I add?
There’s no limit! Design the tote according to your storage needs, balancing functionality with aesthetics.
Q4: Should I use interfacing?
Yes, interfacing adds structure and ensures the bag maintains its shape, especially when carrying heavier items.
Q5: Can I customize pocket closures?
Absolutely. Zippers, Velcro, and magnetic snaps can be used for security, while open pockets provide easy access.
Q6: How do I clean the tote bag?
Machine wash on a gentle cycle with mild detergent, or hand wash. Air dry or use low heat to maintain fabric integrity.
Q7: Can I add decorative elements?
Yes, embroidery, appliqué, or decorative stitching can personalize your tote while reinforcing seams.
Making a large craft storage tote bag with multiple pockets is a practical and creative project for crafters of all levels. By carefully planning your design, selecting durable fabrics, and following step-by-step assembly instructions, you can create a bag that is both functional and stylish.
The ability to customize pockets, closures, and decorative elements allows for endless possibilities, making your tote uniquely yours. Leave your honest feedback and share suggestions to inspire others in the crafting community while enjoying the satisfaction of a beautifully organized workspace.


