Crochet Pig In A Granny Square Blanket Pattern


The Sleeping Cat Amigurumi Tutorial is a charming guide for creating a small, handcrafted crochet cat that appears peacefully asleep.
Amigurumi, the Japanese art of crocheting stuffed animals and figures, has become popular worldwide due to its creativity, compact size, and adorable results. A sleeping cat amigurumi is perfect as a gift, a decorative piece for your home, or a comforting toy for children.
Creating a sleeping cat amigurumi allows crafters to combine basic crochet techniques with imaginative design. This tutorial is suitable for beginners who know fundamental stitches, but it also provides tips for intermediate and advanced crafters to add personality and intricate details.
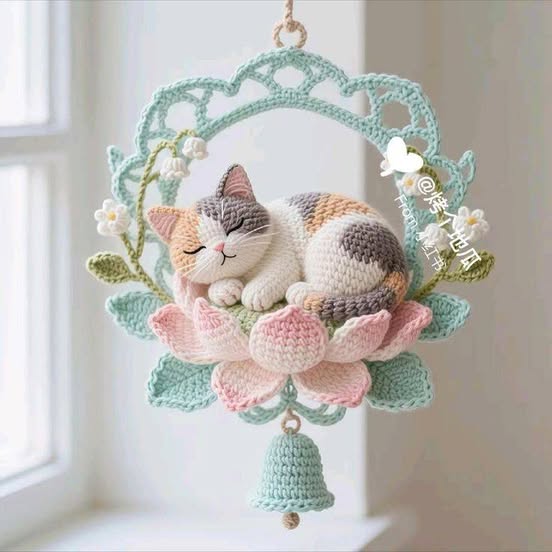
The pattern focuses on creating a relaxed pose, soft curves, and a realistic sleeping appearance, making the final piece visually appealing and tactilely satisfying.
The beauty of a sleeping cat amigurumi lies in its simplicity and versatility. You can customize the cat by choosing different yarn colors, adding stripes or spots, and even adjusting the size to make mini versions for keychains or larger versions for cuddling. This handmade amigurumi is not only cute but also encourages creativity, patience, and attention to detail.
To make your Sleeping Cat Amigurumi, gather the following materials: soft acrylic or cotton yarn, a crochet hook suitable for your yarn (typically 2.5 mm–3.5 mm), a yarn needle, polyester fiberfill for stuffing, stitch markers, and scissors. Safety eyes or embroidery thread can be used to create the eyes, nose, and mouth.
Choose yarn colors that reflect the cat you want to create. Traditional gray, black, or white are classic, but pastel or multicolored yarns give a playful and whimsical effect. Make sure the yarn is soft, especially if the amigurumi is intended for children, and machine-washable yarn is preferable for easy care.
Optional accessories include tiny bows, collars, or small embroidery accents to personalize your sleeping cat amigurumi. Having all tools and materials ready before starting ensures a smooth workflow and allows you to focus on shaping the cat properly.
Start your Sleeping Cat Amigurumi Tutorial by creating the head. Begin with a magic ring and work single crochet stitches in the round, increasing gradually to form a sphere. The head should be slightly larger than the body to emphasize cuteness. Decrease stitches evenly as you finish the top of the head to maintain a smooth, rounded shape.
Next, work on the body. The body is usually slightly elongated and gently curved to create a relaxed sleeping posture. Use single crochet in the round, increasing and decreasing stitches to form the gentle taper at the neck and tail attachment points. Stuff lightly with polyester fiberfill to maintain softness while keeping the shape.
The legs and tail are created separately. Front and hind legs are short and rounded, designed to appear tucked under the cat’s body or slightly outstretched. The tail is flexible and can be curled around the body for added realism. Attach each piece securely using a yarn needle, positioning them to achieve a natural sleeping posture.
Once all parts are attached, add facial features. Embroider closed eyes using black thread for a peaceful expression, and add a tiny pink nose or inner ear details if desired. Optional whiskers can be created using fine thread or fishing line. Lightly adjust stuffing as needed to maintain a smooth, rounded appearance, ensuring the sleeping cat amigurumi looks soft and lifelike.
The Sleeping Cat Amigurumi Tutorial allows for endless customization. You can make kittens or adult-sized cats by adjusting the size of the stitches and number of rounds. Experimenting with yarn colors gives you the ability to create patterned cats, such as tabbies, calicos, or tuxedo cats.
Adding accessories can personalize the amigurumi further. Tiny bows, collars, or embroidered patches give your sleeping cat a unique character. You can even create a mini blanket or pillow for the cat to rest on, enhancing its charm as a display piece or gift.
Consider making sets of sleeping cats in different sizes or colors for a playful collection. These amigurumis are perfect for gifts during holidays, birthdays, or as nursery décor. They can also be made as keychains, bag charms, or desk companions, making the pattern both functional and decorative.
Using different yarn textures is another creative option. Soft fluffy yarn can mimic fur, while smooth cotton creates a neat and structured finish. You can mix yarns for body and accents to achieve unique textures and effects.
Slip stitch (sl st) is often used to join rounds or finish pieces neatly. It creates a seamless look and is commonly used at the end of the tail or ears.
Lastly, knowing how to change colors seamlessly can add character to your SLEEPING CAT Amigurumi. Whether you want stripes or patches, color changes are simple but make a huge visual difference.
To create a professional-looking sleeping cat amigurumi, maintain consistent stitch tension. Uneven tension can distort the cat’s shape, making legs or head disproportionate. Use stitch markers to track rounds, especially when increasing or decreasing for shaping.
Stuffing is key to achieving a soft but defined form. Avoid overstuffing, which can stretch stitches, or under-stuffing, which makes the amigurumi floppy. Attach limbs securely, and pin them in place before sewing to ensure correct positioning.
Blocking lightly can help adjust the cat’s posture and smooth the surface. Embroidery details should be added carefully, especially for safety if the amigurumi is intended for children. Using quality yarn and following instructions closely ensures a durable and charming finished piece.
What is amigurumi?
Amigurumi is the Japanese art of crocheting small, stuffed animals and figures, usually with cute and detailed designs.
Is this tutorial suitable for beginners?
Yes, beginners can follow the Sleeping Cat Amigurumi Tutorial if they know basic stitches like single crochet, increase, and decrease.
What yarn is best?
Soft acrylic or cotton yarn is ideal, offering durability, easy care, and a pleasant texture.
Can I make different sizes?
Yes, adjust the yarn thickness and hook size or increase/decrease rounds to create kittens or larger cats.
How do I make the cat’s sleeping posture realistic?
Shape the body gently, curve the tail, and position the legs tucked under or slightly outstretched. Adjust stuffing for softness and smooth curves.
Can the amigurumi be washed?
Yes, use gentle hand washing with mild detergent and lay flat to dry. Avoid harsh chemicals or hot water to maintain shape.
Can I add accessories?
Absolutely. Small bows, collars, embroidered patches, or miniature blankets enhance the charm of the amigurumi.
How long does it take to make one cat?
Depending on skill level and size, creating a sleeping cat amigurumi can take several hours to a couple of days.
The Sleeping Cat Amigurumi Tutorial is a delightful project that combines creativity, skill, and charm. Creating a handcrafted sleeping cat allows crafters to personalize colors, textures, and details, resulting in a unique and adorable piece.
Whether used as a gift, home decoration, or toy, a sleeping cat amigurumi brings joy and warmth. By customizing size, color, and accessories, you can make a collection of cats with distinct personalities.
Start your Sleeping Cat Amigurumi Tutorial today and enjoy the satisfaction of creating a cute, soft, and handmade piece that will be cherished. Share your experiences, feedback, and ideas to inspire others in the amigurumi community.


