Crochet Pig In A Granny Square Blanket Pattern


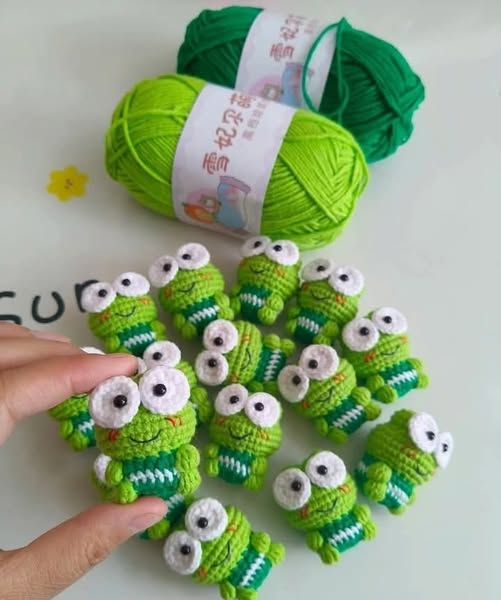
The Crochet Mini Frog – Free Pattern is an adorable and fun project that brings a touch of whimsy to any crochet enthusiast’s collection. Mini frogs are perfect for keychains, small toys, or decorative accents, and using a free pattern makes them accessible to beginners and experienced crafters alike.
This project combines simple crochet stitches with shaping techniques, resulting in a charming, three-dimensional amphibian.
Crocheting mini animals like this frog is an excellent way to develop skills in amigurumi, the Japanese art of crocheting small, stuffed creatures.
The Crochet Mini Frog – Free Pattern teaches important techniques such as increasing, decreasing, working in rounds, and attaching parts securely.
Completing the frog offers both a sense of accomplishment and a cute finished product that can be gifted, displayed, or collected.
Beyond its educational value, this mini frog pattern encourages creativity. You can experiment with colors, embroidery, and embellishments to make each frog unique. Green is traditional, but pastel, neon, or multicolored yarn can produce whimsical variations. The small size makes it a perfect project for using leftover yarn, turning scraps into something fun and practical.
Before starting your Crochet Mini Frog – Free Pattern, it’s essential to gather all necessary materials. You’ll need small amounts of yarn in green for the body, white or cream for the belly, and optional colors for accents like eyes or feet. Cotton or acrylic yarn works best, as they hold shape well for amigurumi projects.
A suitable crochet hook is crucial. Typically, a smaller hook than what the yarn label recommends is used to create tight stitches, preventing the stuffing from showing. For example, a 3.0 mm or 3.5 mm hook works well with worsted-weight yarn.
Other essential tools include a yarn needle for sewing parts together, stitch markers to track rounds, and stuffing such as polyester fiberfill. Safety eyes or embroidery thread can be used to create the frog’s facial features, depending on preference.
Scissors, a row counter, and a measuring tape are helpful for maintaining accuracy and consistency throughout the project. Optional embellishments like beads, sequins, or ribbon can enhance your frog’s appearance.
Finally, preparing a comfortable workspace is important. Good lighting, a comfortable chair, and organizing your tools and yarn before beginning ensures a smooth and enjoyable crocheting experience.
The first step in creating your Crochet Mini Frog – Free Pattern is to crochet the frog’s body. Typically, the body is worked in continuous rounds using single crochet stitches. Start with a magic ring to ensure a tight, neat center.
Next, increase stitches gradually to form the rounded body shape. Pay attention to stitch counts in each round to ensure symmetry. Once the body reaches the desired width, begin decreasing to taper the shape slightly toward the top.
The head is usually part of the body in mini amigurumi frogs. Some patterns may suggest separating the head and body, but for beginners, working in one continuous piece simplifies assembly. Embroider the mouth or attach safety eyes before fully closing the head to make finishing easier.
Arms and legs are crocheted separately, often using small tubular shapes. Start with a magic ring or chain base, then work in rounds. Increase and decrease as instructed to achieve the proper shape. Once completed, sew the limbs securely onto the body using a yarn needle and matching thread.
The frog’s belly can be crocheted in a contrasting color and sewn onto the body or stitched directly in rounds. Small details like toes, spots, or blush can be added with embroidery thread or tiny yarn scraps for added personality.
Finally, stuff the frog lightly with fiberfill, ensuring it retains its shape without overfilling. Assemble all pieces, weave in any loose ends, and make final adjustments to ensure the frog looks symmetrical and balanced. Optional embellishments like tiny crowns, bows, or accessories can make your mini frog even more charming.
One of the best aspects of the Crochet Mini Frog – Free Pattern is its versatility. Color variations allow you to create frogs for different occasions or themes. For example, pastel shades make cute nursery decorations, while bright, bold colors create whimsical, playful designs.
You can also experiment with size. Using thinner yarn and a smaller hook produces a tiny, delicate frog suitable for keychains or charms, while thicker yarn and a larger hook create a sturdier, plush toy. The pattern can be scaled up or down easily by adjusting yarn and hook size proportionally.
Embellishments further personalize your frog. Tiny bows, ribbons, or felt accents can transform a basic frog into a themed character, such as a prince or a holiday decoration. Creative touches make your crochet project unique and memorable.
Texture can also be added through different stitch patterns. Bobbles, surface crochet, or puff stitches mimic skin texture or add decorative spots. Experimenting with these techniques enhances your frog’s tactile appeal and visual interest.
Grouping multiple frogs in a set can create charming displays, mobile decorations, or gifts. Each frog can have a different color, size, or pose, making a delightful collection that showcases your creativity and crochet skills.
Finally, consider functional adaptations. Attach a loop for keychains, add magnets for fridge decorations, or create small bag charms. These functional additions make your mini frog not only cute but also practical.
Crocheting a Mini Frog may seem intricate, but beginners can succeed with some simple tips. Start by mastering basic amigurumi stitches, including single crochet, increasing, and decreasing. Practice these on small swatches before beginning your frog.
Use stitch markers to track the beginning of each round. This helps maintain stitch counts and ensures the frog’s shape develops correctly.
Maintain consistent tension. Too tight stitches can make it difficult to sew limbs, while loose stitches can allow stuffing to show through. A balanced tension ensures a neat finish.
Take time to sew parts securely. The frog’s limbs, eyes, and other details should be firmly attached, especially if intended as a toy for children. Double-stitching stress points increases durability.
Refer to the free pattern frequently. Amigurumi requires precision, and missing a single increase or decrease can affect the overall shape. Check your work regularly against the instructions.
Lastly, have fun and be creative. The beauty of a Crochet Mini Frog is that it allows for personalization. Experiment with colors, expressions, and accessories to create a frog that reflects your personality and style.
What skill level is required?
The pattern is beginner-friendly but requires familiarity with basic crochet stitches and working in rounds.
What yarn is best?
Cotton or acrylic yarn works well. Cotton provides a firmer structure, while acrylic is softer and more forgiving.
Can I use safety eyes?
Yes, safety eyes are recommended for a polished look, but embroidery can be used for baby-friendly frogs.
How do I make the frog stable?
Stuff lightly and sew limbs securely. Reinforce stress points with extra stitching if needed.
Can I customize the frog?
Absolutely. Colors, sizes, and embellishments can be changed to create unique frogs.
Is this suitable as a gift?
Yes, mini frogs make excellent gifts for children, friends, or decorative purposes.
How long does it take to crochet a mini frog?
Depending on skill level, a mini frog can take 1–3 hours.
Can I make multiple frogs for a set?
Yes, making a collection allows for different colors, sizes, or themes, perfect for display or gifting.
The Crochet Mini Frog – Free Pattern is an enjoyable, creative, and rewarding project for crocheters of all levels. From gathering materials and learning the stitches to assembling and customizing your frog, this project combines skill-building with fun. The result is an adorable, three-dimensional frog that can be used as a toy, keychain, decoration, or gift.
Now that you have the instructions, tips, and creative ideas, gather your yarn and hook and start crocheting your mini frog. Share your creations, provide honest feedback, and suggest new variations to inspire fellow crochet enthusiasts.


