Crochet Pig In A Granny Square Blanket Pattern


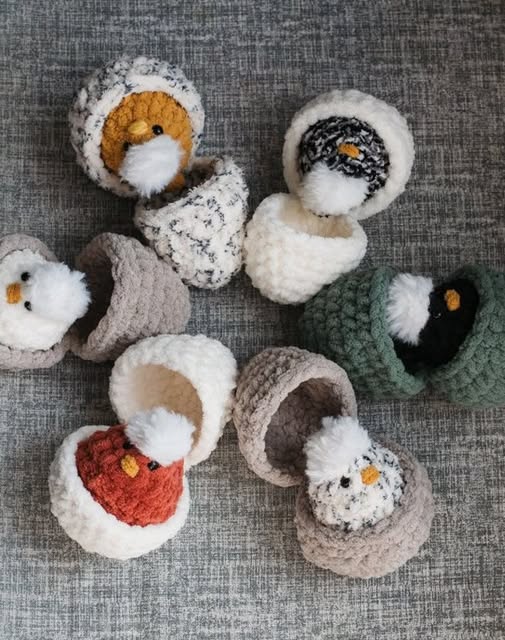
A crochet chick in egg is one of the most adorable amigurumi projects for beginners and experienced crafters alike. This small and charming creation captures the cuteness of a baby chick emerging from its egg, making it a perfect project for Easter, spring decorations, or even as a year-round gift for children.
Unlike larger amigurumi toys, this design is quick to make, does not require much yarn, and is versatile enough to customize with different colors and embellishments.
One of the reasons why the crochet chick in egg has become so popular is its symbolism. The chick breaking out of its egg represents new beginnings, growth, and joy—making it especially meaningful during festive occasions like Easter or baby showers.
Another wonderful aspect of the crochet chick in egg is its practicality. It can be used as a small toy, a cute ornament, or even as part of a decorative centerpiece.
Some crocheters create sets of chicks in different egg colors, while others use them as surprise containers by placing small candies or trinkets inside. The creative possibilities are endless, making this tutorial a great starting point for both fun and functional crochet projects.
Before starting your crochet chick in egg, it’s important to gather the right materials. Amigurumi projects usually require basic tools, which makes this tutorial beginner-friendly and budget-friendly.
The first essential item is yarn. For best results, use cotton or acrylic yarn in yellow for the chick and white (or pastel shades) for the eggshell. You can also add variations with speckled yarn to mimic a real eggshell. If you prefer a softer look, baby yarns or pastel palettes work beautifully.
Next, you’ll need a crochet hook. The size usually depends on your yarn weight, but most crafters choose between 2.5 mm and 3.5 mm hooks for amigurumi to create tight stitches that prevent stuffing from showing. Using a smaller hook than recommended on the yarn label is common for this type of project.
Safety eyes or embroidery thread are needed to give your chick its cute expression. Safety eyes create a polished look, but if the toy is for a baby or small child, embroidered eyes are safer. A small piece of orange or red yarn can be used to create the beak.
Stuffing material is also required to give the chick its shape. Polyester fiberfill is the most popular choice because it is lightweight and holds its form well. Make sure to use just enough stuffing to make the chick plump without overstretching the stitches.
You’ll also need a tapestry needle for sewing the pieces together and weaving in ends. Stitch markers are helpful to keep track of your rounds, especially since amigurumi is usually worked in continuous spirals. Finally, a pair of scissors will complete your toolkit.
Having all these materials prepared in advance makes the crocheting process smooth and enjoyable, allowing you to focus on creating the cutest chick possible.
Making a crochet chick in egg usually involves two main parts: crocheting the chick itself and creating the eggshell. Both parts are simple but require attention to detail to achieve the perfect result.
Start with the chick body. Most patterns begin with a magic ring using yellow yarn. Single crochet stitches are worked in continuous rounds, gradually increasing to form a sphere shape. Once the desired size is reached, rounds of decreases help close the body. Before sealing, insert stuffing to make the body plump.
The next step is adding facial features. Attach safety eyes between two rounds near the top of the chick’s body. For a handmade look, use black embroidery thread to stitch small eyes. Create a small triangle beak with orange yarn and sew it securely. These little features bring the chick’s personality to life.
For the wings, crochet two small oval or semi-circle shapes with yellow yarn. Sew them to the sides of the chick’s body. Wings can be left flat or slightly stuffed, depending on your preference. A tiny tuft of yarn can also be added on top of the head to resemble baby feathers.
Now, let’s move to the eggshell. Begin with white yarn and create a circular base using single crochet increases. This forms the bottom of the shell. Continue working upwards to create the half-egg shape. Some patterns use a jagged edge effect by alternating stitch heights to mimic a cracked egg.
To complete the project, place the chick inside the shell and sew the bottom securely. You can also create a separate top eggshell piece to cover the chick, making it look like the chick is peeking out. This interactive version is especially fun for children.
The combination of simple stitches and creative assembly makes this project enjoyable and rewarding for crafters of all levels.
One of the most exciting parts of making a crochet chick in egg is the opportunity for customization. You can change colors, add details, and create themed variations to make your project unique.
For Easter celebrations, try making multiple chicks in pastel-colored eggshells like pink, blue, or lavender. They can be placed in baskets or given as holiday gifts. Adding a ribbon or small bow on the egg makes them even more festive.
Another idea is to create a “family” of chicks. Make larger and smaller versions by adjusting the yarn weight and hook size. This creates a cute set of mother hen and baby chicks that can be displayed together.
If you want to add more character, embroider eyelashes, rosy cheeks, or even accessories like a tiny hat or scarf. These details make the chick more playful and personal.
For baby showers, chicks in eggs can serve as decorations or party favors. Crocheting them in soft pastel tones makes them perfect for gender-neutral gifts. You could also place small messages or candies inside the eggshell for a sweet surprise.
A more advanced customization is turning the egg into a container. By leaving the top part detachable, the chick can be taken in and out. This adds an interactive element and can even serve as a small toy storage idea.
Finally, consider using eco-friendly yarns like organic cotton if you want your project to be sustainable. These yarns are gentle on the skin and add an extra thoughtful touch when giving your chick as a gift.
Even though a crochet chick in egg is a relatively simple project, there are some useful tips that can make your work look polished and professional.
First, keep your tension consistent. Tight, even stitches create a clean look and prevent stuffing from showing through. If you notice gaps, try using a smaller hook.
Second, always use stitch markers when working in spirals. It’s easy to lose track of your rounds, especially if you are distracted. A marker helps you maintain accuracy and prevents uneven shapes.
When stuffing the chick, use small amounts of fiberfill at a time. Overstuffing can stretch the stitches, while understuffing makes the body floppy. Aim for a firm but soft feel.
Pay attention to sewing the parts together. Attach wings symmetrically and secure facial features firmly. Taking a few extra minutes for placement can make a big difference in the final appearance.
Experiment with different yarn textures. While smooth cotton creates a classic look, fluffy yarns can make the chick look extra soft and cuddly. Just be careful with fluffy yarn if you’re a beginner, as it can be harder to see stitches.
Lastly, practice patience. Crocheting amigurumi is as much about the process as the final product. Enjoy the act of creating something cute and handmade, and don’t worry if your first chick isn’t perfect. Each project will improve with practice.
What is a crochet chick in egg?
It is a small amigurumi project featuring a baby chick crocheted with yarn, usually placed inside a crocheted eggshell.
Is this project suitable for beginners?
Yes, this tutorial is great for beginners since it uses basic stitches like single crochet and simple shaping techniques.
How long does it take to make one?
Depending on skill level, it usually takes 2 to 4 hours to complete one chick in egg.
What type of yarn should I use?
Cotton or acrylic yarn is recommended, but any yarn that holds shape well can work. Pastel or bright colors are popular choices.
Do I need safety eyes for this project?
Safety eyes are optional. You can also embroider eyes with yarn or thread, especially if the toy is for a baby.
Can I wash my crochet chick in egg?
Hand washing is recommended, especially if safety eyes or embellishments are used. Avoid machine washing to prevent damage.
Can I make the egg open and close?
Yes, you can crochet the egg in two parts (top and bottom) and attach a button or Velcro to make it interactive.
Is this project good for gifts?
Absolutely. A crochet chick in egg makes a thoughtful handmade gift for Easter, baby showers, or spring décor.
The crochet chick in egg is a delightful project that combines creativity, charm, and practicality. From selecting the right yarn to adding personal touches, every step is enjoyable and rewarding. Whether you make it for Easter, as a gift, or simply as a fun craft, this little chick brings warmth and joy to anyone who sees it.
Now that you’ve learned the materials, steps, and customization ideas, it’s your turn to create your own crochet chick in egg. I’d love to hear your thoughts, opinions, and suggestions—share your experience and let’s keep the crochet inspiration alive!


