Crochet Pig In A Granny Square Blanket Pattern


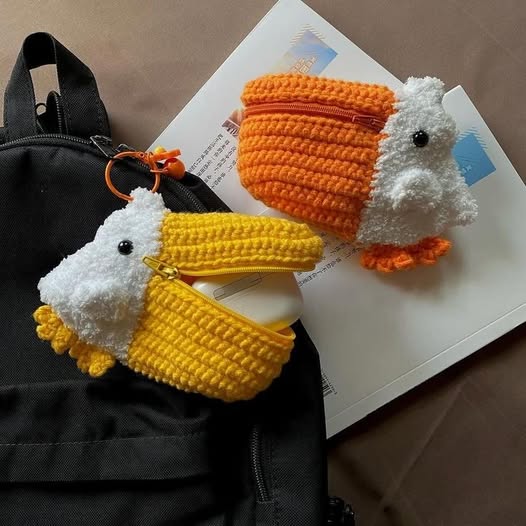
Making a Crochet Pelican Bag – FREE PATTERN is one of the most enjoyable and creative crochet projects you can explore. This bag is not just practical for carrying everyday essentials but also stands out as a unique fashion statement. With its fun pelican-inspired design, it combines functionality with artistry, making it a wonderful addition to any crocheter’s collection.
The charm of the Crochet Pelican Bag – FREE PATTERN lies in its playful look and customizable nature. You can adapt the design to match your style—choosing bold colors, neutral shades, or even textured yarns to create a bag that feels uniquely yours.
Whether you plan to use it as a handbag, a tote for books, or a quirky accessory, this bag balances practicality and creativity beautifully.
What makes this Crochet Pelican Bag – FREE PATTERN even better is that it’s beginner-friendly while still offering enough detail to keep advanced crocheters engaged.
You’ll learn how to build the bag’s body, add straps, and shape the pelican features step by step. By the end, you’ll not only have a functional item but also a whimsical piece of wearable art.
To begin your Crochet Pelican Bag – FREE PATTERN, you’ll need the following materials. For yarn, choose a medium-weight cotton or acrylic blend, as these fibers provide both sturdiness and flexibility. Cotton is especially good because it holds its shape well and is easy to wash.
The recommended crochet hook size is between 4 mm and 5 mm, depending on your tension and the thickness of your yarn. A slightly smaller hook than usual can help achieve tighter stitches, which ensures the bag holds up under weight.
Other essential tools include scissors, a yarn needle for weaving in ends, and stitch markers to keep track of your rows. If you want to reinforce the base of your pelican bag, you may also use a piece of felt or fabric lining.
For the pelican details, you can use contrasting yarn in yellow or orange for the beak and white for the eyes. Small black buttons or safety eyes make excellent finishing touches to bring the pelican face to life. This is what adds personality to your Crochet Pelican Bag – FREE PATTERN.
Lastly, if you plan to carry heavier items, consider using a fabric lining inside the bag. Lining improves durability and helps maintain the shape over time.
Start the Crochet Pelican Bag – FREE PATTERN by making a flat oval base using single crochet stitches. This will form the bottom of your bag. Work in continuous rounds, increasing evenly until the base is the size you want. A sturdy base is essential for balance and strength.
Once the base is complete, continue crocheting without increases to build the body of the bag. You can use simple single crochet stitches or try textured stitches like half-double crochet or moss stitch for a more decorative effect. This step defines the bag’s height, and you can adjust it depending on your preference.
For the pelican-inspired details, crochet a large beak-shaped flap separately using bright yellow or orange yarn. Attach it securely to the front of the bag, making sure it overlaps slightly like a real pelican beak. This playful detail gives the Crochet Pelican Bag – FREE PATTERN its signature look.
Next, create two round white circles for the eyes. Crochet small black circles for the pupils or use safety eyes for a quicker solution. Sew these onto the upper part of the bag, aligning them above the beak to complete the pelican’s face.
For the straps, crochet two long rectangular pieces or use a thick chain stitch reinforced with rows of single crochet. Attach the straps firmly to each side of the bag for even weight distribution. You can make the straps short for a handbag or longer for a shoulder bag.
Finally, weave in all ends, block your bag if needed, and, if desired, add a lining. This ensures that your Crochet Pelican Bag – FREE PATTERN is strong, practical, and ready to use.
One of the best things about the Crochet Pelican Bag – FREE PATTERN is how customizable it is. You can change the colors completely to create different moods—try pastel shades for a cute, playful version or bold contrasts for a more striking look.
Adding embellishments like small embroidered feathers, tassels, or beads can enhance the design. You could even create a family of pelicans by crocheting smaller appliqués and attaching them as decorative elements.
For a summer vibe, use lightweight cotton in bright shades like turquoise or coral. For a winter accessory, opt for neutral colors such as gray or navy, which give the Crochet Pelican Bag – FREE PATTERN a more sophisticated tone.
Another fun customization is experimenting with different stitch patterns for the bag body. Try granny squares, ripple stitches, or bobbles to add texture and depth. Each variation creates a unique look while keeping the pelican theme intact.
You can also alter the bag size to suit different purposes. Make a small clutch-style version for carrying keys and a phone, or go big for a tote-style bag perfect for books or shopping.
Finally, consider adding a zipper or button closure for extra security. This small addition makes your Crochet Pelican Bag – FREE PATTERN not just stylish but also practical for everyday use.
When working on the Crochet Pelican Bag – FREE PATTERN, keep your stitches tight and consistent. Loose stitches may cause the bag to stretch out over time, especially if you carry heavier items.
Always check your gauge before starting. Since the bag needs to hold its shape, it’s better to have a firmer gauge than a looser one. Adjust your hook size accordingly to achieve the right tension.
If you’re adding a lining, measure carefully and hand-sew it into place for a clean finish. The lining prevents small items from poking through stitches and helps the bag last longer.
Take time when attaching the pelican’s face details. Proper placement of the beak and eyes ensures the bag has the right expression and balance. This is the key feature that makes the Crochet Pelican Bag – FREE PATTERN so distinctive.
Care for your bag by hand-washing it gently with mild soap. Lay it flat to dry, reshaping as needed. Avoid machine washing unless you’ve used durable acrylic yarn that can withstand it.
Finally, enjoy the process! Crochet projects like this one are not just about the final product but also about the joy of crafting something playful and functional.
Q: Is the Crochet Pelican Bag – FREE PATTERN beginner-friendly?
A: Yes, it’s suitable for beginners, especially if you know basic stitches like single crochet and how to work in the round.
Q: What yarn works best for this project?
A: Cotton yarn is ideal because it’s sturdy and keeps its shape well. Acrylic can also be used for durability.
Q: Do I need to add a lining?
A: A lining is optional but recommended if you plan to carry heavy items or want extra durability.
Q: Can I resize the bag?
A: Absolutely! Adjust the base size and height to make smaller clutches or larger totes.
Q: How long does it take to make the bag?
A: On average, it takes 6–10 hours depending on skill level, bag size, and detailing.
Q: Can I sell bags made with this pattern?
A: Yes, handmade Crochet Pelican Bags are unique items that make great products for craft fairs or online shops.
The Crochet Pelican Bag – FREE PATTERN is a perfect project for anyone who loves creative crochet designs with practical use. From the playful pelican beak to the functional straps, this bag is both fun to make and stylish to carry.
With endless opportunities for customization, it can be adapted to fit any style, size, or occasion. Try this pattern, enjoy the process, and don’t forget to share your feedback and suggestions to inspire future projects. Handmade crochet bags like this not only highlight your skills but also let your personality shine through every stitch.


