
Ballerina pencil case with zipper Pattern


The Oven Glove Pattern – Step by Step is an essential guide for anyone looking to create practical and stylish kitchen accessories. Whether you are a beginner learning to crochet or an experienced crafter seeking a new project, making your own oven gloves offers both functionality and a creative outlet.
These handmade gloves provide protection from hot pans, while allowing you to add a personal touch to your kitchen décor. The Oven Glove Pattern – Step by Step makes it easy to follow instructions, ensuring that each glove is durable, heat-resistant, and visually appealing.
Creating an oven glove is more than just a craft; it is a way to combine safety, design, and skill. The Oven Glove Pattern – Step by Step encourages crafters to explore different stitches, textures, and patterns.
By choosing different yarns, colors, and embellishments, you can create gloves that are not only protective but also stylish. Many crafters enjoy matching their oven gloves with kitchen towels, aprons, or table linens, creating a cohesive and charming kitchen environment.
Another advantage of following the Oven Glove Pattern – Step by Step is the opportunity to experiment with functional design. This pattern allows you to make gloves in various sizes, from standard adult hands to smaller versions for children. You can also customize the thickness, stitch density, and lining to ensure maximum heat resistance. The step-by-step approach makes it simple to achieve consistent results, even if it is your first time making a kitchen accessory.
To complete the Oven Glove Pattern – Step by Step, gather the appropriate materials to ensure durability and heat resistance. You will need high-quality cotton yarn, as cotton is naturally heat-resistant and easy to wash. Avoid acrylic yarn for the main layers, as it can melt under high temperatures.
You will also need a crochet hook appropriate for your yarn weight, usually ranging from 3.5mm to 5mm. Other essential tools include scissors, stitch markers, and a yarn needle for weaving in ends. Optional items include a quilted or insulated lining for extra protection, and decorative buttons or appliqués for aesthetic appeal. Preparing all materials in advance will streamline the process and guarantee a polished final product.
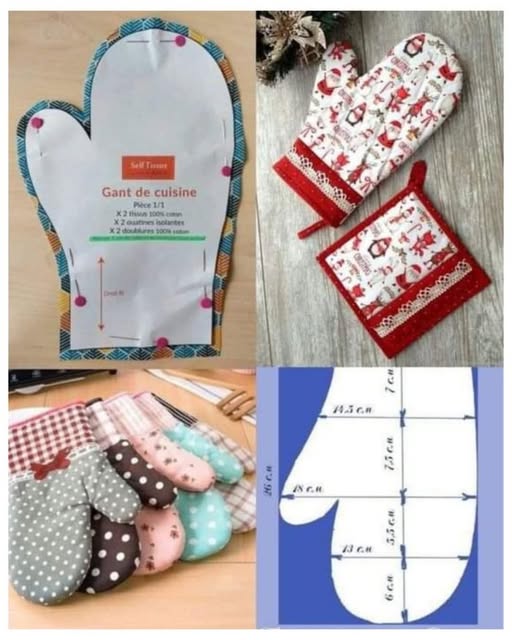
The Oven Glove Pattern – Step by Step begins with creating the base of the glove. Start by measuring the hand size for which you are making the glove. Chain a foundation row that matches the width of the palm. Work in single crochet or half-double crochet to build a solid and dense fabric, as heat-resistant gloves require a sturdy construction.
Next, crochet the body of the glove in rows, gradually increasing and decreasing stitches to accommodate the thumb section. For added strength, consider using double layers by crocheting two identical pieces and joining them later. The dense stitch pattern ensures that the glove will resist heat effectively.
Once the main body is complete, focus on shaping the thumb. This requires careful counting and positioning to allow comfortable movement. Attach the thumb section by joining stitches with a yarn needle or crocheting directly onto the glove body, depending on your preference. Ensure that the thumb fits snugly without being too tight, allowing ease of use.
After the thumb is attached, finish the edges with a neat border. You can use single crochet, slip stitches, or decorative scallops depending on the desired look. Optional embellishments, such as crochet flowers, stripes, or contrasting edges, can enhance the overall aesthetic of the oven glove. Finally, assemble the lining if desired, sew the layers together, and weave in all loose ends. The result is a fully functional, heat-resistant, and visually appealing oven glove.
The Oven Glove Pattern – Step by Step allows for a variety of creative variations to suit your taste. One option is to experiment with colors, creating stripes, chevrons, or ombré effects to match your kitchen décor. Another variation is adding crochet appliqués such as flowers, hearts, or geometric shapes for a personalized touch.
You can also experiment with stitch patterns. Using textured stitches like bobbles, puff stitches, or basketweave can improve both aesthetics and grip. Thicker textures offer better heat resistance, while intricate designs make the gloves visually striking.
Custom sizing is another way to modify the pattern. Make smaller gloves for children, larger ones for adult hands, or even mittens that extend up the forearm for additional protection. You can also create a pair of gloves and matching pot holders using the same stitch patterns and colors, completing a cohesive kitchen set.
Creating the Oven Glove Pattern – Step by Step has several practical and personal benefits. First, handmade gloves are more customizable and durable than store-bought options. You can adjust size, thickness, and materials to your needs, ensuring maximum comfort and safety.
Additionally, crochet offers mental and physical benefits. It improves hand-eye coordination, strengthens fine motor skills, and encourages mindfulness. The repetitive nature of crochet helps reduce stress, while the satisfaction of completing a functional project boosts confidence and creativity.
Handmade oven gloves also make thoughtful gifts. Whether for a housewarming, wedding, or special occasion, personalized gloves show care and attention to detail. They can also be used as decorative pieces, enhancing the visual appeal of your kitchen while remaining practical.
1. Can beginners make this oven glove pattern?
Yes, the step-by-step instructions make it easy for beginners to follow. Basic crochet skills like single crochet, half-double crochet, and increasing/decreasing stitches are sufficient.
2. What yarn is best for heat resistance?
100% cotton yarn is recommended. Avoid synthetic yarns like acrylic for the main glove, as they can melt under high heat.
3. How do I make the glove thicker?
You can crochet double layers or use a textured stitch pattern for added thickness. Adding a quilted cotton lining also increases heat resistance.
4. Can I add embellishments?
Yes, decorative stitches, appliqués, or buttons can enhance aesthetics while maintaining functionality.
5. How long does it take to make a pair of gloves?
Depending on skill level and complexity, each glove may take 3–5 hours.
6. Can I wash handmade oven gloves?
Yes, cotton gloves can usually be machine washed on a gentle cycle, but always check your yarn label for care instructions.
7. Can I sell handmade oven gloves?
Absolutely. Handmade gloves are popular at craft fairs, online marketplaces, and as gifts.
8. How do I size the gloves properly?
Measure the hand from wrist to fingertips and across the palm. Adjust the foundation chain and number of rows accordingly.
9. Are crochet oven gloves safe to use in professional kitchens?
For home use, yes. In commercial kitchens, gloves should meet safety standards, but handmade gloves are suitable for casual cooking.
10. Can I make matching kitchen accessories?
Yes, you can use the same stitch patterns and colors to make pot holders, table runners, or aprons.
The Oven Glove Pattern – Step by Step is a versatile, practical, and enjoyable crochet project. It combines functionality, safety, and aesthetic appeal, allowing you to create a personalized accessory for your kitchen.
From choosing the right yarn and hook to following the detailed instructions for shaping, assembling, and embellishing the gloves, this pattern guides you through every step.
Handmade oven gloves are not only durable and heat-resistant but also offer endless creative possibilities. Whether for personal use or as thoughtful gifts, these gloves embody the perfect balance of craft, care, and style.
Try this pattern today, experiment with colors and textures, and enjoy the satisfaction of making a beautiful and functional crochet project. Don’t forget to share your creations and leave your feedback and suggestions to inspire others in the crochet community.


