
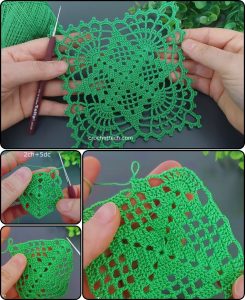
Ballerina pencil case with zipper Pattern


The How to Sew a Quilted Makeup Bag – Step-by-Step guide is perfect for anyone who loves handmade accessories and wants to add a touch of personal style to their everyday routine.
Quilted makeup bags are practical, elegant, and highly customizable, making them ideal gifts for friends, family, or even for yourself.
With this step-by-step approach, you’ll learn not only the sewing techniques required but also how to combine patterns, fabrics, and quilting methods to create a beautiful, functional makeup bag that you can be proud of.
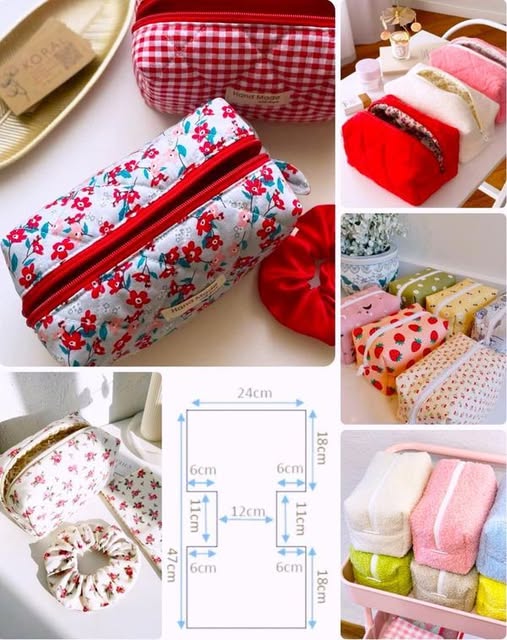
Sewing a quilted makeup bag allows you to explore both creativity and precision. From selecting the right fabrics and batting to mastering the art of stitching, this step-by-step tutorial ensures a smooth process for crafters of all skill levels.
Unlike simple pouches, quilted bags have added padding and structure, making them more durable and giving them a professional look. The finished product not only stores makeup effectively but also serves as a statement piece in your collection of handmade accessories.
The How to Sew a Quilted Makeup Bag – Step-by-Step method also highlights the importance of detail and finishing touches. Quilted seams, topstitching, and the careful attachment of zippers elevate the bag’s overall aesthetic. Following this guide will give you confidence to experiment with different shapes, sizes, and fabric combinations. Whether you are making a compact bag for daily use or a larger organizer for travel, this project combines functionality with creativity.You’ll also need quilt batting or fusible fleece. Batting adds structure and that signature quilted feel to the bag. It also offers some protection for your items inside. Fusible fleece can be ironed directly onto the outer fabric, saving a little sewing time.
A nylon or metal zipper is essential. Make sure it’s longer than the top width of your bag—this allows room to trim and install the zipper with ease. A 9″ or 10″ zipper usually works great for a medium-size pouch.
Before starting the quilted makeup bag, gather the right materials to ensure a smooth process:
Optional: Decorative trims, tassels, or personalized embroidery to make your makeup bag stand out. Preparing all materials ahead of time ensures you can focus on sewing without interruptions.One of the most satisfying parts of learning how to sew a quilted makeup bag – step-by-step is installing the zipper and seeing the project come together. Don’t worry—zipper installation is easier than it looks!
Start by placing one quilted outer panel face up, then lay the zipper face down along the top edge. Align a lining piece on top of the zipper, right side down, so the zipper is sandwiched between the quilted panel and the lining.
Pin in place and sew along the edge using a zipper foot. Sew slowly and remove pins as you go. Once sewn, flip both fabrics right side out and press them away from the zipper. Topstitch along the edge for a clean and finished look.
The How to Sew a Quilted Makeup Bag – Step-by-Step process allows for endless creativity.
These variations ensure that each quilted makeup bag is a unique creation, reflecting your personal style and creativity.
Creating a quilted makeup bag is more than a fun craft; it has practical and emotional benefits:
This project is ideal for both beginners looking to learn quilting techniques and experienced sewers seeking a quick and satisfying project.
1. What type of batting should I use?
Lightweight or medium-weight cotton batting works best to give structure without bulk.
2. Can I use a zipper other than 7 inches?
Yes, adjust the bag width and zipper length accordingly.
3. How do I prevent fabric from shifting while quilting?
Pin all layers carefully and use a walking foot if available.
4. Can I wash my quilted makeup bag?
Yes, hand wash or gentle machine wash, depending on fabric.
5. Can I add multiple compartments?
Absolutely. Sew inner pockets or pouches into the lining for organization.
6. Is this suitable for beginners?
Yes. Follow step-by-step instructions carefully, and take your time with the zipper.
7. Can I sell quilted makeup bags I make?
Yes. Handmade bags are popular at craft fairs and online shops.
8. Can I make matching bags in different sizes?
Yes. Adjust the dimensions while following the same step-by-step process.
9. How can I make the bag more decorative?
Use contrasting thread for topstitching, add appliqués, embroidery, or fabric charms.
10. Can I line the bag with waterproof fabric?
Yes. Choose a thin, flexible waterproof lining for protection against spills.
The How to Sew a Quilted Makeup Bag – Step-by-Step tutorial offers a fun, creative, and practical project suitable for sewers of all skill levels. By combining quilting, sewing, and finishing techniques, you can create a beautiful makeup bag that is durable, stylish, and customizable.
From selecting fabrics and cutting pieces to quilting, assembling, and adding finishing touches, each step contributes to a professional-looking handmade accessory.
Whether it’s for yourself, as a gift, or to sell, a quilted makeup bag is a project that combines creativity with functionality. Try making one today, explore your personal design ideas, and don’t forget to share your results and suggestions to inspire others.


