Crochet Pig In A Granny Square Blanket Pattern


The Ducky Crochet Pattern is a charming and delightful project that appeals to crocheters of all skill levels. Whether you are making toys for children, gifts for baby showers, or cute decorations for your bathroom, this pattern is both fun and practical.
Crocheting a duck allows you to explore creative techniques while producing an adorable finished product that can be cherished for years.
The Ducky Crochet Pattern combines simple stitches, soft yarn, and playful design to create a lovable amigurumi duck that can be customized in size, color, and accessories.
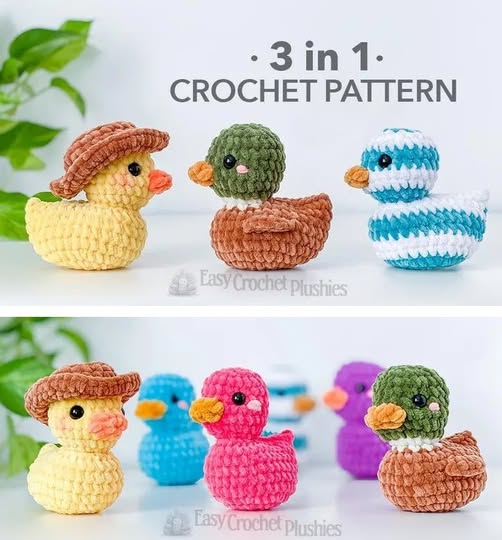
One of the reasons the Ducky Crochet Pattern is so popular is its versatility. Crocheters can make small ducks to use as keychains, medium-sized ducks as plush toys, or larger ones for decorative purposes.
The pattern includes detailed instructions on creating the head, body, wings, beak, and feet, allowing each part to be carefully shaped and stuffed for a professional finish. The simplicity of the stitches makes it accessible to beginners, while the assembly and finishing touches offer a rewarding challenge for more experienced crocheters.
Another appealing aspect of the Ducky Crochet Pattern is its potential for personalization. You can use classic yellow yarn for a traditional rubber duck look or experiment with pastel, bright, or even multicolored yarn for a unique twist. Accessories such as tiny hats, bows, or embroidered eyes add character and charm. This free pattern encourages creativity while providing a clear, step-by-step guide to ensure a beautiful outcome. It is an excellent way to combine functionality, cuteness, and crochet skills in one delightful project.
To start the Ducky Crochet Pattern, gather the appropriate materials to ensure the best results. For a traditional duck, yellow yarn for the body is ideal, with orange for the beak and feet. Soft cotton or acrylic yarn is recommended to create a smooth and plush texture suitable for children or decorative purposes.
You will also need a crochet hook matching your yarn weight, usually between 3.5mm and 4.5mm for worsted or DK yarn. Additional materials include polyester fiberfill for stuffing, a yarn needle for assembly, scissors, and stitch markers. Optional items include safety eyes, embroidery thread for added details like eyelashes or eyebrows, and small accessories like bows or ribbons for personalization. Having all materials ready before starting ensures a smooth crafting process and consistent results.
The Ducky Crochet Pattern involves creating several separate components that are sewn together to form the final amigurumi duck. The following steps provide a clear guide for constructing the toy.
Attach the head to the body, ensuring alignment. Sew wings and feet securely. Add optional embroidery for eyelashes, blush, or other features. For a decorative touch, you can attach a small bow or ribbon around the neck. Check all seams to ensure everything is firmly attached.
The Ducky Crochet Pattern can be personalized in numerous ways to match your style or purpose. Using pastel colors, like pink, blue, or mint green, can make the duck suitable for a baby shower gift. Adding tiny accessories such as hats, scarves, or bows makes each duck unique and playful. For holiday themes, you can crochet small pumpkins, Santa hats, or heart appliqués to attach.
Size variations are also possible. Crocheting with thicker yarn and a larger hook creates a plush toy, while thinner yarn and a smaller hook can create miniature ducks suitable for keychains or charms. Experimenting with stitch patterns, such as using textured stitches or puff stitches for the body, adds dimension and detail.
For collectors, creating a series of ducks in different colors, sizes, or with themed accessories can turn this simple pattern into an impressive display set. The pattern is highly adaptable and allows your imagination to flourish.
Making the Ducky Crochet Pattern is more than a fun project—it also offers numerous benefits. Crocheting improves hand-eye coordination, fine motor skills, and concentration. It is a relaxing and mindful activity that can reduce stress and provide a sense of accomplishment.
The finished crochet duck is safe, soft, and long-lasting, unlike real toys that wear out quickly. Handmade gifts carry sentimental value and can be treasured for years. Crocheting a duck also encourages creativity, as you experiment with colors, textures, and accessories, resulting in a truly one-of-a-kind toy.
Can beginners make this pattern? Yes, the pattern uses basic stitches such as single crochet, increases, and decreases. Assembly guidance makes it beginner-friendly.
How long does it take to complete a duck? A small to medium-sized duck can be completed in 3–5 hours, while larger versions may take longer.
What yarn works best? Cotton yarn gives defined stitches, while acrylic yarn provides softness. Choose soft yarn for toys intended for babies.
Can I wash the crochet duck? Yes, hand wash gently and reshape while drying.
Can I sell ducks made from this pattern? Yes, handmade crochet ducks are popular items for sale at craft fairs and online marketplaces.
Can I customize colors? Absolutely, any color combination can be used, from classic yellow to vibrant or pastel shades.
Is this safe for babies? Yes, but consider embroidering eyes instead of using safety eyes for very young children.
Can I add accessories? Yes, hats, bows, scarves, and other small details can be added for personalization.
How do I make the duck stand? Ensure feet are firmly attached and the body is stuffed evenly. You can also slightly flatten the bottom for stability.
Are there variations for holidays? Yes, attach themed accessories like Santa hats, Easter eggs, or tiny heart appliqués for special occasions.
The Ducky Crochet Pattern is a versatile, charming, and beginner-friendly project that brings joy and creativity to crocheters of all levels.
With basic materials and a few hours of dedication, you can create a soft, adorable, and fully customizable amigurumi duck. From gifts and decorations to keychains and collectibles, this crochet duck is a timeless craft that combines fun, skill-building, and endless possibilities for personalization.
Try the pattern today, explore your creativity, and share your finished ducks to inspire others while enjoying the therapeutic benefits of crochet.


