Crochet Pig In A Granny Square Blanket Pattern


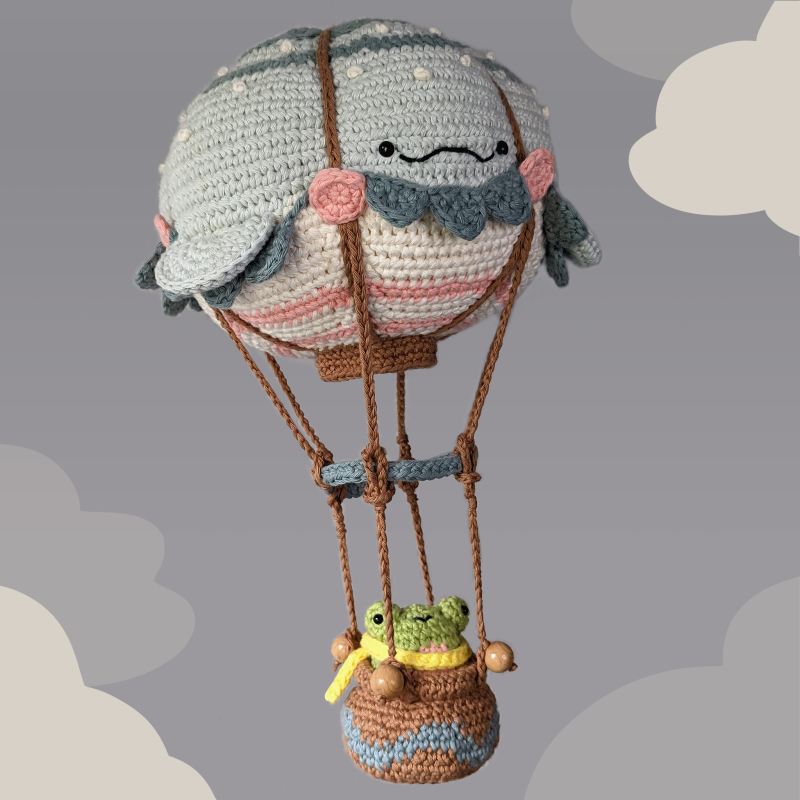
The Crochet Whale Shark Balloon – Step by Step is a playful amigurumi project that blends the gentle charm of a whale shark with the whimsical shape of a balloon — perfect as a nursery mobile, a unique gift, or a shelf buddy.
This step-by-step pattern teaches you how to make a soft, round “balloon” body, add the flat tail and fins that give the piece its shark silhouette, and finish with the iconic spotted pattern of a whale shark.
The finished piece is light, portable, and endlessly customizable: change colors, make mini or jumbo sizes, or add a loop for hanging. Below you’ll find materials, a clear stitch glossary, an exact stitch-by-stitch amigurumi pattern, assembly tips, creative variations, safety notes, and an FAQ to answer common questions.
Why make a Crochet Whale Shark Balloon? It’s a fast project with instant visual payoff — the rounded balloon shape works up quickly, and adding fins and spots turns it into a character.
The balloon silhouette also makes this toy ideal for hanging displays (mobiles, car mirrors, nursery décor), and because the main body is essentially spherical, it’s a great pattern for practicing even tension, increases/decreases, and surface decoration techniques like duplicate stitch and embroidery. This pattern is approachable for confident beginners and satisfying for experienced crocheters who enjoy finishing details.
Before we jump into stitches, a quick note about style: I’ll present the pattern using US crochet terms and a compact round-by-round format. Read through the whole pattern once before starting, gather your materials, and don’t be shy to make adjustments — yarn choice, hook size, and stuffing level will all change the final look. Ready? Let’s stitch a whale shark that floats.
To make one medium-sized Crochet Whale Shark Balloon, gather:
• Worsted weight (medium/4) yarn: about 75–100 grams in a main color (deep blue or slate gray), 25–50 grams in a lighter belly color (pale gray, cream), and a small amount of white for spots.
• Crochet hook: 3.5 mm (E) or adjust to your tension. Use a slightly smaller hook than recommended for the yarn if you want tight stitches so stuffing doesn’t show.
• Polyester fiberfill for stuffing (not too firm — the balloon look is slightly soft).
• Tapestry/yarn needle for sewing pieces and weaving ends.
• Stitch marker to mark the start of rounds.
• Safety eyes (10–14 mm) or embroidery thread if making a toy for a young child.
• Optional: floral wire or cord if you want the whale shark to hang rigidly like a balloon, and small beads/buttons for accents (not for infants).
Gauge isn’t strict for this toy, but recommended finished size with listed yarn/hook: about 20–24 cm (8–9.5 in) diameter (spherical). Adjust hook or yarn to change size.
MR = magic ring
ch = chain
sc = single crochet
inc = 2 sc in same stitch (increase)
dec = single crochet decrease (sc2tog)
sl st = slip stitch
st(s) = stitch(es)
FO = fasten off
This part creates the rounded “balloon” body that will become the whale shark’s torso. Use main color for outer shell; switch to belly color for lower front rounds if you want a two-tone look. Keep a stitch marker to mark the first stitch of each round. Crochet tightly so stuffing doesn’t show through.
Round 1: MR, 6 sc into ring — 6 sts.
Round 2: inc in each st — 12 sts.
Round 3: (sc 1, inc) ×6 — 18 sts.
Round 4: (sc 2, inc) ×6 — 24 sts.
Round 5: (sc 3, inc) ×6 — 30 sts.
Round 6: (sc 4, inc) ×6 — 36 sts.
Rounds 7–12: sc in each st around — 36 sts (6 rounds) — these rounds build the body width.
Round 13: (sc 4, dec) ×6 — 30 sts.
Round 14: (sc 3, dec) ×6 — 24 sts.
Insert safety eyes between rounds 9 and 10, spaced 6–8 sts apart (or embroider eyes later).
Round 15: (sc 2, dec) ×6 — 18 sts.
Stuff the body firmly but not rock hard — you want a rounded balloon shape.
Round 16: (sc 1, dec) ×6 — 12 sts.
Round 17: dec around (6 sts). FO, weave tail through remaining sts and close tightly. Weave in end.
Notes: If you want a subtle lighter belly, change to belly color at Round 12 and work Rounds 13–17 in belly color before stuffing and closing. Alternatively, add a belly panel later with surface crochet if you prefer a striped look.
The tail is flat and triangular; crochet two mirror pieces and seam or crochet one piece and add shaping.
Using main color:
Ch 8. Row 1: sc in 2nd ch from hook and across (7 sc). Turn.
Row 2: ch1, sc across. Turn.
Row 3: ch1, sc2tog at start, sc across until 2 sts remain, sc2tog — reduces the row by 2. Turn.
Repeat row reduction until 1–2 stitches remain to form taper. FO leaving long tail for sewing.
Option: For a fuller tail, make two identical pieces and sew them together leaving top edge open to attach to body. Add slight curve by making extra sc in center row.
Dorsal fin (center top): small triangular fin worked in one piece. Using main color:
MR, ch 1, 6 sc into ring — 6 sts.
Round 1: sc in each — 6.
Round 2: (sc, inc) ×3 — 9.
Round 3: sc around — 9. FO leaving long tail. Flatten and shape into triangle, sew base to top center of body.
Pectoral fins (sides): wider, rounded triangles. MR, 8 sc into ring — 8. R1 sc around. R2: (sc1, inc) ×4 => 12. R3–4: sc around. Flatten and sew to sides.
If you want a distinct belly, crochet a shallow oval/semicircle in belly color and sew to the bottom front of the balloon body before closing fully. This gives a nice two-tone whale shark look.
Whale sharks have white spots and pale stripes. You can add them in two ways: duplicate stitch with white yarn after the body is finished, or embroider small Xs and dots across the upper body using a yarn needle and white yarn. For a tidy look, place clusters of small dots along the sides and back, keeping them evenly spaced. Try to mimic natural patterns: random but denser near the dorsal area and sparser near the belly.
Position the dorsal fin at the top center, sew securely with yarn needle. Attach pectoral fins at side midline, slightly behind the eyes. Sew the tail at the back bottom seam, centering it. Add any small embellishments — tiny felt gills, embroidered smile, or blush with a soft pastel pencil for cheeks (test on scrap yarn first).
If you want the Whale Shark Balloon to be hangable like a balloon: create a hanging loop by chaining 40–60 stitches (or desired length), join ends to make a loop and sew the loop to the top of the dorsal fin base securely. Alternatively, sew a narrow ribbon loop or use a length of sturdy cord. For a more balloon-like look, insert a thin plastic or floral wire loop inside the dorsal seam to keep it erect.
• Weave in all ends securely and trim.
• If you used safety eyes, ensure they are locked and not loose. For small children, prefer embroidered eyes.
• Lightly steam block (if your yarn allows) to even out stitches and help printed/embroidered spots sit flat.
• Washing: hand wash gently in cool water and air dry flat. Avoid machine drying which can distort shape.
• Mini Keychain Whale Sharks: use DK yarn and a 2.5–3.0 mm hook; attach a keychain ring.
• Mobile Set: make three whale sharks in graduated sizes and hang as a nursery mobile.
• Glow-in-the-Dark Spots: use glow yarn or thread for the spots for a fun bedtime mobile.
• Seasonal Skins: make holiday versions — Santa hat and red spots, or pastel colors for spring.
• Textured Balloon: substitute some rounds with puff stitches for a bumpy ocean-skin texture.
• Weighted Base: add a small bean bag or a fabric-weight at the base if you want it to hang more stably (not for infants).
• If your stuffing shows between stitches, go down one hook size or use a tighter tension.
• Keep a consistent stitch count — use a marker to find the start of rounds.
• When sewing on fins, use hidden mattress stitch or ladder stitch to create a smooth seam.
• For perfectly circular balloon bodies, count rounds and keep increases symmetric (6 increases per round is a reliable cadence).
• For symmetrical spots, sketch a quick guideline on paper and transfer mentally; random natural patterns usually look best.
Q: Is this pattern suitable for beginners?
A: Yes — basic amigurumi stitches (MR, sc, inc, dec) are used. Confident beginners can follow this with care; the pattern practices shaping and small-piece assembly.
Q: What yarn works best?
A: Worsted weight cotton or cotton-blend yarn provides crisp stitch definition for spots. Acrylic is softer and cheaper but may fuzz over time. Use a slightly smaller hook than recommended to keep stuffing inside.
Q: Can I make it machine washable?
A: If you use acrylic yarn and securely attach all parts, gentle machine washing in a laundry bag can be okay. However, hand-washing is safest for shape and embroidery.
Q: How do I safely adapt for babies?
A: Replace safety eyes with embroidery, avoid beads/buttons, and secure hanging loops so the toy can’t detach.
Q: How long does it take to make one?
A: For an intermediate crocheter, 4–7 hours total (body 2–3 hours, fins & tail 1–2 hours, assembly 1–2 hours). Beginners may take longer.
Q: Can I sell items made from this pattern?
A: Yes, you may sell finished items you make yourself. If you plan to sell patterns derived from this tutorial, include your own instructions — always respect copyright if pattern contains third-party text.
Q: Can I make different species?
A: Absolutely — a few color and spot changes turn this into a manta, whale, or even a fanciful sea monster.
Q: How do I keep the balloon shape stable over time?
A: Avoid overstuffing (it will bulge) and use quality fiberfill. Light blocking after stuffing helps stabilize the fabric.
Q: What hook size if I want it larger?
A: Use bulkier yarn (bulky/5) and a 6.0–8.0 mm hook; adjust pattern counts proportionally or add extra rounds of sc to enlarge.
The Crochet Whale Shark Balloon – Step by Step pattern is a charming way to blend amigurumi skills with decorative design. You walk away with a soft, spherical friend that’s easy to personalize: spots, colors, fin shape, and hanging options make each whale shark unique.
This pattern helps you practice essential techniques (working in rounds, increases/decreases, finishing) while delivering a satisfying finished object that delights both makers and recipients.
Try a small version for a keychain, a medium version for a shelf, and a trio for a mobile — each will float into someone’s heart. If you make one, share a photo or a note about your modifications; honest feedback and creative twists inspire the community and help refine patterns for everyone. Happy crocheting, and may your whale shark balloon drift on many happy stitches!
We’ll walk you through every phase, from selecting your yarn and materials to shaping the balloon-like body and detailing the fins and tail. This is more than just a crochet project—it’s a joyful experience that will leave you smiling.


