Crochet Pig In A Granny Square Blanket Pattern


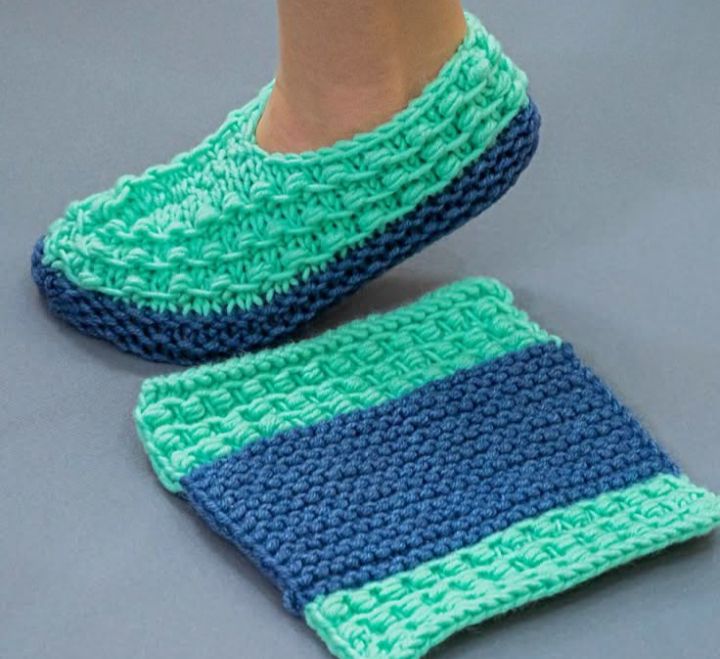
Knitting is a wonderful way to create cozy, handmade items that bring warmth, comfort, and joy to everyday life. Among the most satisfying projects for knitters of all levels are knitted slippers.
Whether you are a beginner just learning how to handle knitting needles or an experienced crafter looking for a fun, relaxing project, this knitted slippers step by step tutorial is perfect for you. Be kind to yourself, take your time, and don’t forget to say hello to your creativity as you get started.
The beauty of knitted slippers lies in their versatility. You can adjust the size, choose your favorite yarn colors, or even add decorative elements like pom-poms, buttons, or embroidery.
Handmade slippers are also fantastic gifts—they show thoughtfulness and care, making them ideal for family members, friends, or loved ones. With the right guidance, you can create slippers that are not only warm and functional but also stylish and fun.
In this tutorial, we’ll walk you through knitted slippers step by step, from selecting materials to completing the final stitch. Along the way, you’ll pick up tips and tricks that make the process smoother and more enjoyable. This guide is friendly, encouraging, and written with the intention of helping you succeed while having fun. By the end of the tutorial, you’ll have a beautiful pair of slippers to enjoy or gift, crafted entirely by your own hands.
To start your knitted slippers project, gather the following materials:
Gathering all materials before starting will help you stay organized and focused throughout your knitting journey.
The knitted slippers step by step tutorial is designed for both beginners and intermediate knitters. We’ll break it down into manageable sections.
Start by casting on the number of stitches that match your foot size. This will vary depending on the pattern and the thickness of your yarn. For a typical adult size slipper, cast on about 40–50 stitches for a medium-weight yarn. Use a stretchy cast-on method to ensure the slipper fits comfortably.
Begin with the cuff, which is usually worked in ribbing to provide stretch and snugness. A simple K1, P1 ribbing works beautifully. Knit for approximately 1.5–2 inches or until the cuff reaches the desired height. Be kind to your hands and take breaks if needed—knitting is meant to be relaxing.
After completing the cuff, switch to stockinette stitch (knit all stitches in the round or alternate knit and purl rows if working flat) to form the body of the slipper. Continue knitting until the slipper reaches the base of your toes. This part allows for easy adjustments depending on foot length.
To shape the toe, begin decreasing stitches gradually. For example, Knit 2 together (K2tog) every few stitches until you have reduced by half. Repeat decreases every other row until a small number of stitches remain. This tapering creates a snug, rounded toe.
Once you have the final few stitches, cut the yarn, leaving a long tail. Use a tapestry needle to weave through the remaining stitches and pull tight to close the toe. Fold and sew any necessary seams along the sole or back of the slipper. Make sure the stitches are secure but not overly tight, maintaining comfort.
You can customize your slippers in countless ways. Add pom-poms, knit a contrasting trim, sew on buttons, or embroider patterns onto the slippers. Some knitters attach a soft felt or rubber sole to prevent slipping. Let your creativity guide you!
The beauty of the knitted slippers step by step tutorial is its versatility. Consider these creative variations:
Each variation makes your slippers uniquely yours and allows you to experiment with knitting techniques.
Making your own slippers has numerous benefits:
Knitting your own slippers combines creativity, practicality, and mental well-being, making it a project that’s as rewarding as it is fun.
1. Can beginners make these slippers?
Yes, the pattern is beginner-friendly with step-by-step instructions.
2. What yarn is best?
Medium-weight wool or acrylic is ideal for warmth, durability, and ease of knitting.
3. How do I adjust the size?
Measure your foot and adjust the cast-on stitches and length of the foot section.
4. Can I make these non-slip?
Yes, add felt, rubber, or fabric paint to the sole for grip.
5. How long does it take to make a pair?
Depending on skill and complexity, 4–8 hours is typical.
6. Can I add decorations?
Absolutely! Pom-poms, buttons, embroidery, or contrasting cuffs add style.
7. Can these slippers be washed?
Yes, but hand wash in cold water to preserve the yarn and shape.
8. Can I sell handmade slippers?
Yes, handmade slippers are popular items for craft markets and online shops.
9. Are these suitable for children?
Yes, but avoid small detachable decorations to prevent choking hazards.
10. Can I combine different yarn textures?
Definitely! Mixing textures can create cozy, visually interesting slippers.
The knitted slippers step by step tutorial is a fun, practical, and rewarding project for knitters of all levels. From choosing yarn and needles to shaping the toe and adding decorative touches, this tutorial walks you through each step with care and encouragement.
Handmade slippers offer warmth, comfort, and personal satisfaction, making them a perfect gift or a treat for yourself. Take your time, enjoy the process, and don’t forget to say hello to your creativity along the way.
With a little patience and attention to detail, you’ll soon have a cozy pair of slippers that are completely handmade and entirely your own.


