Crochet Pig In A Granny Square Blanket Pattern


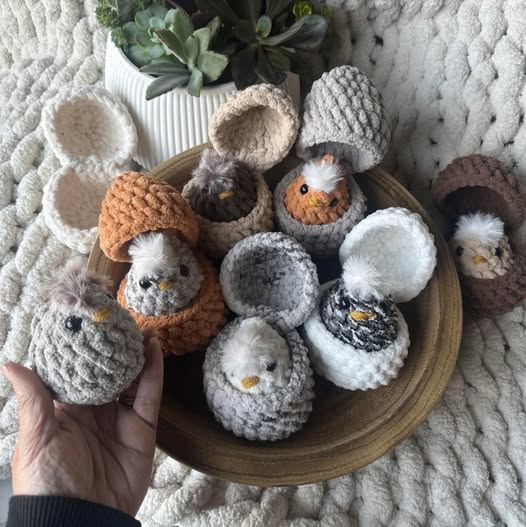
The Crochet Chick in Egg – Pattern is an adorable and festive project that brings the charm of spring and Easter directly into your crochet creations.
This pattern features a cute little chick peeking out of a cracked eggshell, making it a perfect decoration, gift, or playful accessory. Unlike traditional amigurumi, the Crochet Chick in Egg – Pattern combines both 3D shaping and simple surface details, offering a delightful challenge for crocheters of all skill levels.
Each finished chick feels lively and whimsical, capturing the essence of the season while allowing you to practice and enhance your crochet skills.
Handmade chicks like these are not only visually appealing but also encourage creativity, as you can customize the colors, size, and tiny details such as eyes, beaks, and wings.
One of the key attractions of the Crochet Chick in Egg – Pattern is its versatility. You can use it as a standalone decoration for Easter tables, attach a keyring to make a fun bag charm, or even create a set of chicks as playful ornaments. By following this pattern, you are not only learning how to create a structured amigurumi but also how to make small, detailed embellishments that bring character to your work. The process emphasizes precision and attention to detail, ensuring that every stitch contributes to the overall appearance of the chick. This pattern is perfect for those who enjoy the satisfaction of creating something both cute and structurally sound.
The Crochet Chick in Egg – Pattern also encourages exploration with colors and textures. While the classic design uses yellow for the chick and white for the eggshell, you can experiment with pastel shades, speckled yarn, or even metallic threads for a whimsical touch. By mixing yarn textures or using different stitch patterns, each chick can take on a unique personality. Creating a series of chicks with variations in size, color, and facial expression can result in a charming display that brings joy to any room. This project highlights how small amigurumi patterns can have a big impact, both as decor and as a showcase of your crochet skills.
To complete the Crochet Chick in Egg – Pattern, you will need several essential materials. Choose a medium-weight yarn, such as worsted weight, in yellow for the chick, white or cream for the eggshell, and optional accent colors for the beak, wings, and embellishments. Cotton yarn is ideal for its durability and smooth finish, while acrylic can provide flexibility and softness.
A crochet hook suitable for your yarn weight, usually between 3.5mm and 4.5mm, is necessary to maintain even tension and proper shaping. Additional tools include scissors for trimming yarn, a yarn needle for weaving in ends and stitching details, and small stitch markers if you prefer to keep track of rounds. Safety eyes or small beads can be used for the chick’s eyes, although embroidered eyes are also a charming option. Optional stuffing, such as polyester fiberfill, is required to give the chick a soft, plump appearance and help it hold its shape inside the egg.
Proper preparation ensures that the Crochet Chick in Egg – Pattern proceeds smoothly. Having all yarns and tools ready allows you to focus on the intricate stitches and shaping that make this amigurumi project so appealing. By planning colors and deciding on optional decorations ahead of time, you can also personalize each chick to match your style or the theme of your holiday decor.
The Crochet Chick in Egg – Pattern generally begins with the body of the chick. Start by creating a magic ring with yellow yarn, then work in continuous rounds, increasing to form a rounded body shape. Simple stitches like single crochet are used for most of the body, while increases and decreases shape the head and lower part of the body. The use of a magic ring ensures a tight, neat start without holes at the center.
Next, shape the eggshell by crocheting white yarn separately, starting with a small circle for the bottom and expanding outward to form a half-egg shape. The eggshell is often designed to split slightly at the top, allowing the chick to peek through. The shell can be decorated with small surface stitches or appliqués to mimic a cracked or speckled look.
Once the body and shell are complete, assemble the chick by carefully stuffing it with fiberfill, positioning the body inside the egg, and sewing the shell pieces together. Attach wings, beak, and any additional embellishments securely. If using safety eyes, insert them before fully closing the chick’s head. Embroidered eyes can be added after assembly. This step requires precision to ensure the chick sits correctly and the egg holds its shape.
Finally, add finishing touches such as tiny stitches to indicate feathers, color accents for cheeks, or small embellishments for a festive appearance. The result is a cheerful, compact amigurumi that is perfect for display, gifting, or as part of a seasonal collection.
The Crochet Chick in Egg – Pattern can be customized in many ways. For a whimsical effect, try using pastel or gradient yarns for the chick or eggshell. Add small decorative stitches, beads, or embroidered details to give each chick a unique personality. You can create a series of chicks with slightly different expressions, sizes, or color schemes to form a delightful set for Easter or springtime décor.
Another variation is to make the eggshell fully detachable, allowing the chick to “pop out” and be played with. You can also add tiny accessories such as miniature scarves, hats, or bows for a playful look. Some crafters enjoy creating matching nests or floral accents around the chick for table displays or gift sets. These variations keep the project fresh and engaging, making the Crochet Chick in Egg – Pattern suitable for both personal enjoyment and creative gifting.
Handmade items like the Crochet Chick in Egg – Pattern make excellent gifts. Their small size, charm, and seasonal appeal ensure that they are well-received by both children and adults. They can be used as keychains, ornaments, or part of a decorative centerpiece. For Easter celebrations, a group of these chicks can form a playful arrangement on a table or mantel, instantly adding a festive touch. They are also ideal for craft fairs or markets, as their unique design and handcrafted quality appeal to buyers looking for thoughtful and creative gifts.
The versatility of the pattern allows you to make one chick or many, combining them into sets for gifts or decor. Because they are relatively quick to make compared to larger amigurumi projects, you can complete multiple chicks in a short period, making them ideal for last-minute gifts or seasonal decorations. Adding personal touches such as initials, small embellishments, or color variations also enhances their charm and gives them a truly handmade quality.
Is this pattern suitable for beginners? Yes, while it involves shaping and small details, the Crochet Chick in Egg – Pattern uses basic stitches and can be accomplished with patience and attention to detail.
What type of yarn works best? Medium-weight cotton or acrylic yarn is recommended for durability and stitch definition.
Can I make the eggshell in different colors? Absolutely. Feel free to use pastels, speckled yarn, or gradient shades to make each chick unique.
Do I need to use safety eyes? No, embroidered eyes are safe and charming alternatives, especially for children’s gifts.
How much stuffing is needed? Just enough fiberfill to make the chick firm but soft, so it holds its shape inside the egg without being overstuffed.
Can I adjust the size of the chick? Yes, using different yarn weights and hook sizes will result in smaller or larger chicks.
Are these chicks washable? Handmade chicks can be gently hand-washed with mild soap and air-dried, especially if you avoid beads or glued embellishments.
Can this pattern be used for decorations? Yes, the chick is perfect for Easter, springtime displays, or as a playful table accent.
How long does it take to make one chick? Depending on experience, one chick typically takes between two to four hours to complete.
Can I sell the finished chicks? Yes, handmade items made from personal crochet work can be sold, but ensure you follow any copyright restrictions if using a published pattern.
The Crochet Chick in Egg – Pattern is a delightful and versatile project that combines cuteness, creativity, and functionality. It offers crocheters an opportunity to practice shaping, 3D construction, and small decorative details, while also producing charming seasonal decor or gifts.
By experimenting with yarn colors, textures, and embellishments, each chick can become a unique piece of art, perfect for Easter, springtime, or playful displays.
The pattern is accessible to beginners yet engaging enough for advanced crocheters who enjoy intricate details. Now that you have learned about materials, step-by-step instructions, variations, and tips, it is time to create your own adorable crochet chicks.
Share your experience, personal modifications, and creative ideas so others can be inspired by your handmade creations, and enjoy the joy of giving and displaying these charming little chicks during the season.


