Crochet Pig In A Granny Square Blanket Pattern


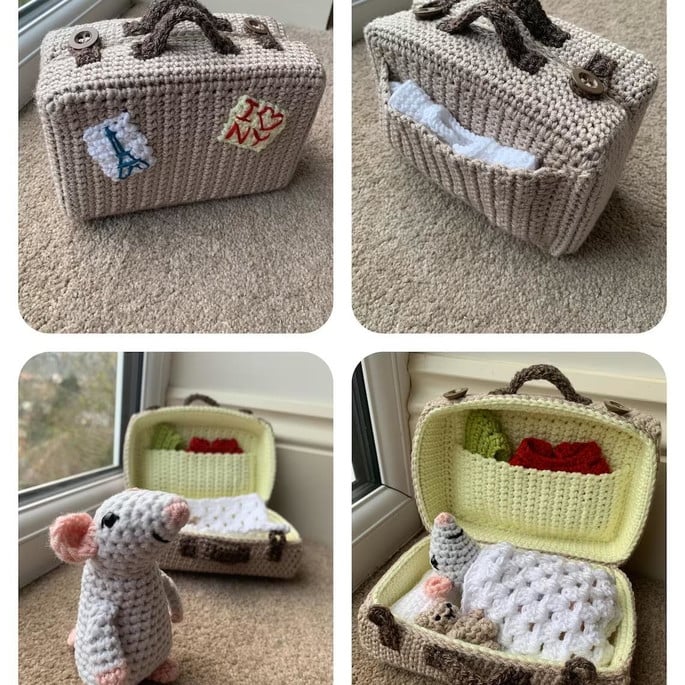
The Amigurumi Mouse Pattern is a charming and creative project that allows crafters of all skill levels to produce a cute and tiny handmade mouse.
Amigurumi, the Japanese art of crocheting small stuffed animals, has gained worldwide popularity for its ability to turn simple yarn into adorable creatures.
The Amigurumi Mouse Pattern is perfect for beginners looking for a fun project or for experienced crafters seeking a relaxing and rewarding creation. With this pattern, you can craft a tiny mouse that can be used as a decorative piece, toy, keychain, or a heartfelt gift.
Crocheting an amigurumi mouse is more than just creating a small toy; it is a way to improve your crochet skills while producing something that brings joy.
The Amigurumi Mouse Pattern teaches essential techniques such as working in rounds, increasing and decreasing stitches, and carefully assembling pieces for a polished finish. Each part of the mouse—from its rounded head to its tiny tail—requires attention to detail, ensuring that the final creation is both realistic and huggable. Following this pattern step by step gives crafters confidence and encourages patience and precision, valuable skills in any crochet project.
In addition to being a fun and educational activity, the Amigurumi Mouse Pattern allows for extensive customization. You can select any yarn colors you prefer, giving each mouse its own personality. Accessories like tiny scarves, hats, bows, or embroidered details such as eyes and whiskers enhance the character of your creation. Handmade amigurumi mice make perfect gifts for children, friends, or family members, as each mouse carries a personal and heartfelt touch. They can also be used as home décor, adding a whimsical and playful element to shelves, desks, or display cases.
To start the Amigurumi Mouse Pattern, gather the necessary materials. The primary component is yarn, usually in shades of gray, brown, or cream for a classic mouse appearance, but you can experiment with pastel or vibrant colors for a more whimsical effect. Cotton yarn is highly recommended because it holds shape well, provides a smooth finish, and is durable. Acrylic yarn can also be used, particularly if a softer texture is desired.
You will need an appropriate crochet hook matching the yarn weight. Using the correct hook ensures stitches are tight enough to keep the stuffing from showing through, a key factor in amigurumi. Additional tools include scissors, a yarn needle for sewing pieces together, and stitch markers to track rounds, which helps maintain consistent shape and size.
Stuffing material, like polyester fiberfill, is essential to give the mouse its soft, plush feel. Safety eyes or embroidery thread can be used to create facial features. Some crafters like to add small embellishments such as tiny beads, buttons, or tiny bows to make their mice extra charming. Having all materials ready before starting ensures a smooth, uninterrupted crafting process and allows you to follow the pattern step by step.
Begin the Amigurumi Mouse Pattern by creating a magic ring for the head. Work in rounds, gradually increasing stitches to form a smooth, rounded shape. Proper increases ensure the head is symmetrical and evenly shaped.
Once the head reaches the desired size, continue with the body. Working in continuous rounds helps create a seamless connection between the head and body, giving your mouse a professional appearance. The body is typically slightly elongated and tapers at the bottom for a realistic mouse silhouette.
Next, crochet the ears. Small circular or oval pieces are attached to the sides of the head, positioned to maintain balance and proportion. Properly attaching the ears gives your amigurumi mouse a lifelike and charming look.
After the ears, create the tail using a long chain or crocheted tube. Legs and arms can be small and slightly curved, sewn securely to the body. Accurate attachment of these parts is crucial to maintain the structural integrity and aesthetic appeal of the mouse.
Facial features are next. Safety eyes or embroidery thread can be used for the eyes, while embroidery thread can also create a nose, whiskers, and small mouth details. Optional accessories such as tiny scarves, bows, or hats can personalize your mouse and enhance its character.
Finally, stuff the mouse with fiberfill, making sure it maintains its shape. Weave in all yarn ends neatly, ensuring nothing unravels. Your Amigurumi Mouse Pattern is now complete, ready to be displayed, gifted, or used as a toy.
The Amigurumi Mouse Pattern allows for countless creative possibilities. You can change yarn colors to create unique and whimsical mice, from classic gray to pastel pink, blue, or multi-colored designs. Each mouse can be individualized to reflect personality or match a themed project.
Adding accessories like tiny scarves, hats, bows, or embroidered features adds charm and uniqueness. Accessories make the mice collectible and appealing as gifts, and they give each mouse its own story.
Adjusting the size of your mouse is another creative option. Using thicker yarn and a larger hook creates a bigger plush toy, while finer yarn and a smaller hook can make mini mice suitable as keychains or ornaments.
You can create a set of mice, each with different colors and accessories, to form a whimsical collection. Displaying them together or using them as part of a themed décor arrangement adds playful charm to any space.
Different yarn textures can also be experimented with. Soft fuzzy yarn makes a cuddly mouse, while smooth cotton yarn provides a cleaner and more polished finish. This flexibility allows you to achieve the exact look and feel you desire.
Finally, seasonal variations are possible. Add tiny Santa hats for Christmas, pastel bows for Easter, or festive embroidery to match any occasion. The Amigurumi Mouse Pattern can be adapted for year-round crafting projects, making it versatile and fun.
Is this pattern suitable for beginners?
Yes, the Amigurumi Mouse Pattern is designed with step-by-step instructions, making it beginner-friendly.
What type of yarn is best?
Cotton yarn is recommended for durability and a smooth finish, but acrylic yarn works well for a soft texture.
Can I adjust the size of the mouse?
Yes, using different yarn thicknesses and hook sizes allows you to create small, medium, or large mice.
How do I attach the ears, arms, and legs?
Sew each piece securely with a yarn needle, positioning them carefully to maintain balance and proportion.
Can I add accessories?
Absolutely. Small scarves, bows, hats, or embroidery details enhance personalization and charm.
Is the mouse safe for children?
Use embroidered eyes or securely attach safety eyes to ensure safety, especially for young children.
The Amigurumi Mouse Pattern is a fun, creative, and versatile crochet project suitable for all skill levels. It allows crafters to practice essential crochet techniques while producing a cute, handcrafted mouse that can be used as a toy, gift, keychain, or decorative piece.
With the ability to customize colors, accessories, and size, each mouse becomes a unique creation reflecting the maker’s personality and creativity.
Following this pattern provides a satisfying crafting experience, resulting in a handmade item full of charm and character. Share your finished mice, explore variations, and enjoy the process of bringing these adorable amigurumi mice to life.


