Crochet Pig In A Granny Square Blanket Pattern


The Square Persa – Step-by-step guide is an excellent resource for crochet enthusiasts who want to create a beautiful and intricate design with clear, easy-to-follow instructions.
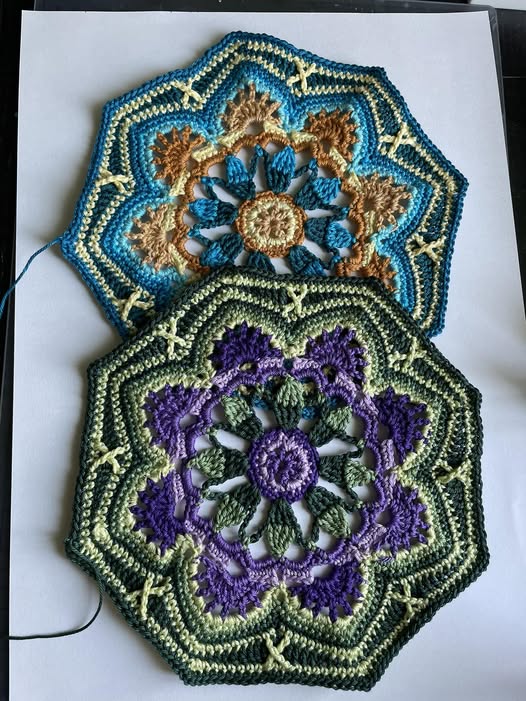
The Square Persa pattern is renowned for its geometric elegance and the flexibility it offers for a variety of projects, from blankets and throws to decorative pillows. Following a detailed step-by-step approach ensures that both beginners and experienced crocheters can achieve a professional-looking result.
Creating a Square Persa requires patience and attention to detail, as the pattern involves carefully aligned stitches to form symmetrical squares. Each square can be used individually as a motif or joined together to form larger projects, making this pattern highly versatile.
The beauty of the Square Persa – Step-by-step approach is that it allows crafters to work at their own pace, mastering one section at a time while building confidence in their crochet skills.
The popularity of the Square Persa pattern has grown due to its striking visual appeal and adaptability. Using different yarn colors and textures can create endless variations, ensuring that no two projects look exactly alike. This pattern not only enhances a crafter’s technical skills but also provides a sense of accomplishment when the finished piece reflects the effort and care put into each stitch.
To successfully complete the Square Persa – Step-by-step, having the right materials is essential. High-quality yarn ensures that the finished squares have a clean, defined appearance. Cotton or acrylic yarns are commonly recommended due to their durability and ease of handling. Color choices play a crucial role in highlighting the geometric design, with contrasting shades enhancing the pattern’s details.
The crochet hook should match the yarn weight. For medium-weight yarn, a 4mm to 5mm hook is usually ideal. Using the correct hook size maintains even tension and ensures the squares remain uniform in size. Beginners should consider having a small hook selection on hand to adjust tension if needed.
Additional materials include stitch markers to track rounds and corners, scissors, yarn needles for weaving in ends, and a tape measure to ensure consistent square dimensions. Optional materials may include blocking tools, which help flatten and shape the squares for a polished look.
Attention to material selection helps ensure the Square Persa – Step-by-step results in professional-quality motifs. Choosing vibrant, durable yarn and the proper tools makes the crocheting experience smoother and more enjoyable, reducing frustration and errors.
Finally, having a workspace with good lighting and a comfortable seating arrangement contributes to a productive and pleasant crafting session. Comfort and visibility are often underestimated but essential for maintaining consistency in detailed patterns like the Square Persa.
The Square Persa – Step-by-step begins with creating a foundation chain or magic ring, depending on the specific variation of the pattern. The first rounds establish the central motifs and corners, which serve as anchors for the subsequent stitches. Accuracy in this stage ensures symmetry and helps the square maintain its shape.
Crocheters then follow a series of stitch sequences, combining basic stitches such as single crochet, double crochet, and chain stitches with strategic increases and decreases. These sequences form the characteristic geometric patterns of the Square Persa. Counting stitches and monitoring the placement of corners is crucial to maintain the square’s integrity.
Once the main body of the square is complete, finishing touches like borders or edging can be added. Borders help define the square, add stability, and provide a clean transition when joining multiple squares. Common border options include simple single crochet rounds, picots, or shell stitch edges.
Joining multiple squares can be accomplished with whip stitch, slip stitch, or join-as-you-go techniques. Each method offers a slightly different look, and the choice depends on personal preference and the desired final effect. The join should be neat and consistent to ensure a polished finish.
Optional embellishments, such as embroidered motifs or contrasting thread highlights, can enhance the Square Persa. These additions allow for personal expression and create a unique piece that stands out.
Following the step-by-step instructions carefully ensures that each square turns out uniform and visually appealing. This methodical approach helps avoid errors and ensures the final project is cohesive and professional-looking.
Beginners working on the Square Persa – Step-by-step pattern may find certain sections challenging, but with patience and practice, success is achievable. Starting with single squares before attempting multiple joins allows newcomers to familiarize themselves with stitch patterns and tension control.
Using stitch markers is highly recommended, especially for marking corners and central points. Markers help maintain symmetry and prevent accidental mistakes when counting stitches.
Maintaining even tension is critical for the Square Persa. Uneven tension can distort the geometric patterns, so practicing on a test square can help develop consistency.
Reading through the entire step-by-step guide before starting is another helpful tip. Understanding the overall structure and sequence of stitches allows for smoother progress and minimizes the need to undo or redo sections.
Beginners should also take breaks to prevent hand fatigue and maintain focus. Long sessions without rest can lead to inconsistent stitching and errors in alignment.
Finally, remember that practice improves precision. Every square made is an opportunity to refine technique, making subsequent squares faster and more accurate. Embrace the learning process as part of the crafting experience.
The Square Persa – Step-by-step allows for endless creative variations. Changing yarn colors is one of the simplest ways to personalize the squares. Gradients, complementary colors, or random color changes each create a distinct visual effect.
Texture can also be introduced by using different yarn types or incorporating stitches like bobbles, popcorns, or puff stitches. These variations add depth and tactile interest to the squares.
Size adjustments are easy to make. Adding extra rounds can create larger squares, while fewer rounds result in smaller motifs suitable for coasters or patchwork projects.
Borders and edges can be customized to reflect personal style. Simple, clean edges create a modern look, while decorative shell or scalloped edges offer a more ornate and traditional appearance.
Combining squares with different patterns or motifs is another exciting option. For example, alternating the Square Persa with floral or star motifs creates a patchwork quilt with variety and cohesion.
These creative possibilities ensure that each Square Persa project is unique, reflecting the crafter’s individual taste and style. Experimenting with color, texture, and size makes the pattern versatile and enjoyable to work with.
Q: What skill level is needed for the Square Persa – Step-by-step?
A: The pattern is suitable for intermediate crocheters, but dedicated beginners can succeed by carefully following instructions and practicing basic stitches.
Q: Can I use any type of yarn for this pattern?
A: Medium-weight cotton or acrylic yarn works best for clarity and durability. Choosing high-quality yarn ensures a polished final square.
Q: How long does it take to complete one square?
A: Depending on skill level and complexity, each square may take 1–2 hours to complete.
Q: How do I join multiple squares?
A: Whip stitch, slip stitch, or join-as-you-go techniques can be used. Each creates a different effect, so choose based on preference.
Q: Can I change the size of the square?
A: Yes. Adjusting the number of rounds or using a larger hook and yarn can increase the square’s size.
Q: Is this pattern suitable for gifts?
A: Absolutely. The intricate design and handmade quality make the Square Persa a thoughtful and unique gift.
The Square Persa – Step-by-step pattern is a versatile and rewarding project for crocheters of various skill levels. By carefully following instructions, selecting appropriate materials, and exploring creative variations, crafters can produce beautiful squares for blankets, pillows, or standalone decorations.
This step-by-step guide helps ensure uniformity, precision, and a polished appearance for each square. Whether you are making a single motif or an entire patchwork quilt, the Square Persa pattern offers both a challenge and a rewarding outcome.
We encourage you to try the pattern, share your feedback, and provide suggestions for future projects, inspiring others in the crochet community.


