Crochet Pig In A Granny Square Blanket Pattern


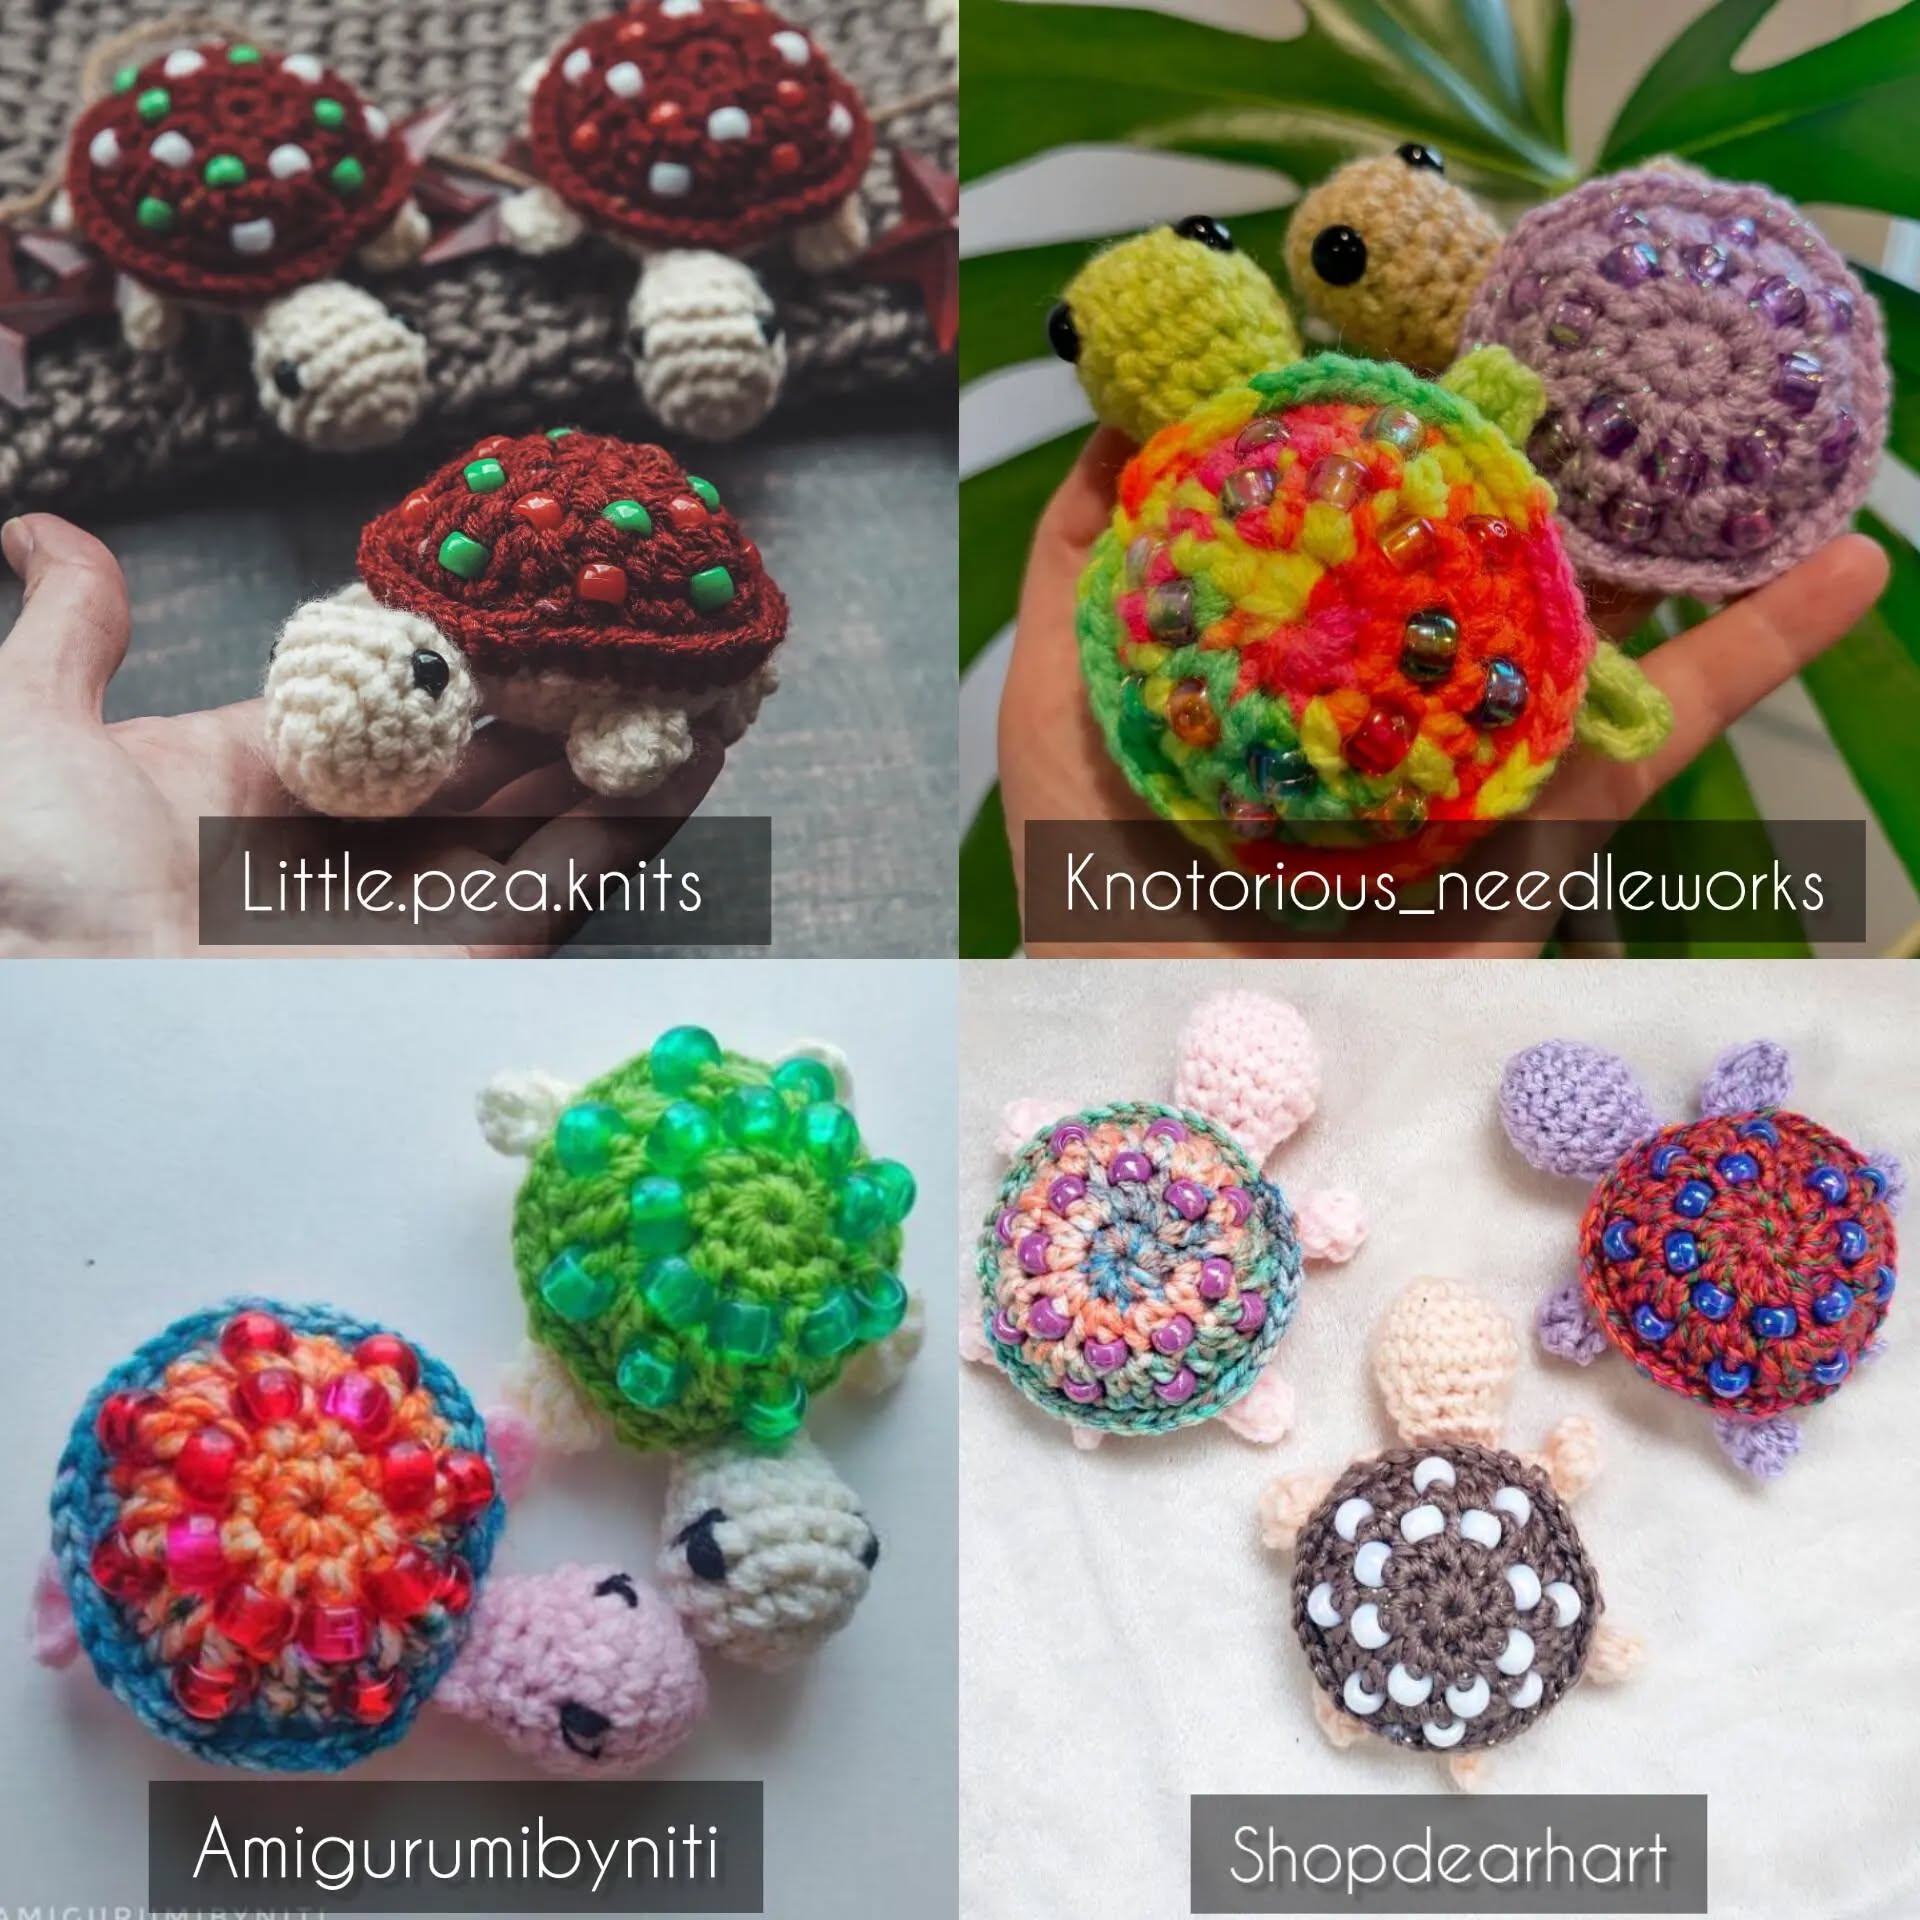
Beaded Fidget Turtle – Crochet Pattern is a delightful project that combines creativity, relaxation, and functionality. This adorable crochet turtle is not only a cute handmade toy but also works as a sensory item, thanks to the beads incorporated into its design.
Whether you are a beginner wanting to try something new or an experienced crocheter searching for your next project, this pattern can bring joy and a sense of accomplishment.
By creating a Beaded Fidget Turtle – Crochet Pattern, you are not just crafting a small toy—you are making something that can help calm nerves and provide comfort through tactile play.
The beads add an extra dimension, making it fun to touch, squeeze, and move around. This combination of soft yarn and textured beads appeals to both children and adults, making the project versatile and rewarding.
When working with this crochet pattern, you will discover how the turtle’s structure blends with the beads to form a balanced design. Each step of the process teaches patience and precision while leaving room for creativity in choosing colors and bead styles. Before diving into the instructions, it’s important to understand the essential tools, stitches, and materials needed. Once you prepare your yarn, hook, and beads, you’ll be ready to start shaping your turtle and turning your imagination into a tangible piece of handmade art.
To bring your Beaded Fidget Turtle – Crochet Pattern to life, selecting the right materials is crucial. Cotton yarn is highly recommended because it is durable, smooth, and comfortable to work with. The color palette is entirely up to you—classic greens and browns can give a natural turtle look, while pastel or vibrant shades make the toy more playful and unique.
Beads are the special element that transform this from a simple amigurumi to a sensory toy. Make sure the beads you choose are smooth, safe, and not too small, especially if the finished turtle will be used by children. Wooden or plastic craft beads are excellent options, as they are lightweight yet sturdy.
For the hook, a size that complements your yarn weight is essential. A slightly smaller hook than usual works best for amigurumi, as it ensures tight stitches and prevents stuffing or beads from slipping out. Alongside the hook, you’ll need a yarn needle, stuffing material like fiberfill, and scissors to complete your toolkit.
Safety should always come first. If your crochet turtle is intended for small children, consider using larger beads or securely stitching them into place to avoid choking hazards. You may also choose to crochet around the beads instead of attaching them loosely, which keeps the design safe and durable.
Finally, remember that materials can affect the finished look. Thicker yarn results in a larger turtle, while thinner yarn creates a miniature version perfect as a keychain. Experimenting with different yarn types and bead combinations lets you customize your turtle for specific purposes, from decorative accessories to sensory stress-relievers.
To start your Beaded Fidget Turtle – Crochet Pattern, begin with the turtle’s body. This typically involves crocheting in rounds using basic stitches like single crochet and increases. Working in continuous spirals creates a seamless, professional look, which is ideal for amigurumi projects.
Once the base of the shell is complete, you can begin incorporating beads. One common method is threading beads onto the yarn before starting and sliding them into place as you stitch. This gives the shell a textured, tactile feel that makes the turtle both visually appealing and functional as a fidget toy.
The turtle’s head, legs, and tail are crocheted separately and then sewn onto the body. Each piece should be firmly stuffed with fiberfill to maintain shape and stability. Pay attention to proportion—keeping the limbs balanced ensures the turtle looks symmetrical and polished.
When attaching beads, consistency is key. Evenly spacing them throughout the shell creates harmony in the design. However, you can also arrange beads in patterns, such as spirals or stripes, for a more creative appearance. This flexibility is one of the best parts of crafting your own turtle.
Finishing details matter just as much as the main structure. Embroidered eyes, stitched smiles, or even safety eyes can bring your turtle’s face to life. If you want to keep the turtle more sensory-friendly, sticking with embroidered features ensures softness and safety.
At the end of the process, secure all knots tightly and weave in loose ends neatly. A clean finish not only makes your project durable but also enhances its overall aesthetic. After completing these steps, you’ll have a fully functional Beaded Fidget Turtle – Crochet Pattern ready for play or gifting.
Crafting a Beaded Fidget Turtle – Crochet Pattern offers more than just a finished toy. It provides relaxation and focus during the process. Crocheting is widely recognized as a therapeutic activity that reduces stress and enhances mindfulness, and this project is no exception.
For children, the finished turtle can serve as a fun toy and a sensory aid. The beads encourage tactile exploration, helping with fine motor skills and providing a calming effect during moments of restlessness. Parents and educators often find such handmade items valuable for children who need sensory stimulation.
Adults also benefit from this creation. The turtle works as a pocket-sized stress reliever, perfect for keeping hands busy during meetings, travel, or moments of anxiety. Unlike commercial fidget toys, a crocheted turtle has the warmth of being handmade, making it more personal and comforting.
Beyond functionality, the project strengthens your crochet skills. Working with beads requires careful stitch control, which helps refine your technique. It also encourages experimenting with color combinations and textures, which can inspire future crochet creations.
Handmade gifts carry special meaning, and the Beaded Fidget Turtle is no exception. Whether given to a child, friend, or family member, it shows thoughtfulness and effort. The toy’s unique design ensures it will stand out as a cherished keepsake.
Lastly, selling your finished turtles could even open up opportunities for small businesses. Many people seek unique, handmade fidget toys, and offering this crochet turtle in different colors and sizes can appeal to a wide audience. The project is both rewarding and potentially profitable.
Personalization is one of the most exciting parts of working on the Beaded Fidget Turtle – Crochet Pattern. Each choice you make, from yarn color to bead placement, shapes the final look of your turtle. By experimenting, you can create turtles that reflect different styles and personalities.
Color variation can dramatically change the turtle’s mood. For example, earthy tones make it realistic, while bright, bold colors make it whimsical and fun. Pastel shades, on the other hand, are perfect for baby toys or decorative pieces.
Bead selection allows for further customization. Using multicolored beads can create a playful shell, while monochrome beads give a minimalist, elegant look. You can even choose beads with different textures for an enhanced sensory experience.
Adding accessories is another fun option. Small bows, embroidered initials, or even tiny crocheted hats can make your turtle stand out. These little touches add personality and make the toy even more special.
You may also alter the size to suit specific purposes. Larger turtles are excellent as huggable sensory toys, while smaller ones can serve as keychains or desk companions. Adjusting the yarn weight and hook size makes these variations easy to achieve.
Finally, don’t hesitate to experiment with bead patterns. Creating spirals, stripes, or even flower shapes on the shell adds an artistic element. With creativity, your Beaded Fidget Turtle – Crochet Pattern becomes a unique expression of your style and skill.
What is a Beaded Fidget Turtle?
It is a handmade crochet turtle that incorporates beads into its design, creating a fun, textured, and sensory-friendly toy.
Is this pattern suitable for beginners?
Yes, the basic stitches used are beginner-friendly, but working with beads may require patience and practice.
What type of beads should I use?
Smooth, lightweight beads such as wooden or plastic ones are best. Always ensure they are safe, especially for children.
Can I make the turtle without beads?
Absolutely. You can create a simple amigurumi turtle and add texture through stitch variation instead.
How big does the finished turtle usually turn out?
The size depends on your yarn and hook, but most versions fit comfortably in the palm of your hand.
Is this project safe for young children?
Yes, as long as you securely attach the beads and avoid very small beads that may pose a choking risk.
The Beaded Fidget Turtle – Crochet Pattern is a perfect blend of creativity, relaxation, and functionality. From selecting materials to adding personal touches, the process is enjoyable and rewarding.
The finished turtle is more than just a toy—it’s a sensory companion, a stress reliever, and a meaningful handmade gift. Whether you make it for yourself, a loved one, or as part of a small business, this project offers endless possibilities.
I hope this article has inspired you to try creating your own turtle. Share your thoughts, experiences, and suggestions—I’d love to hear your feedback on this crochet journey!


