Crochet Pig In A Granny Square Blanket Pattern


If you love crocheting, this project allows you to combine functionality with style, producing a scarf that is not only cozy but also whimsical.
Crochet enthusiasts often seek patterns that are both easy to follow and visually appealing. The Crochet pencil scarf – Pattern meets both criteria, offering a straightforward guide while allowing you to explore different textures and stitches.
Beginners will appreciate the simple instructions that lead to a polished final product, while experienced crafters can experiment with yarn types, stitch variations, and color combinations.
Before starting your Crochet pencil scarf – Pattern, selecting the right materials is crucial. The yarn you choose will determine not only the look of your scarf but also its feel and drape. Soft, medium-weight yarns work best for this project, ensuring comfort and ease of handling during crocheting.
Next, choose a crochet hook that matches your yarn weight. Typically, the yarn label will provide a recommended hook size. Using the correct hook ensures even stitches and helps maintain the structure of the pencil design.
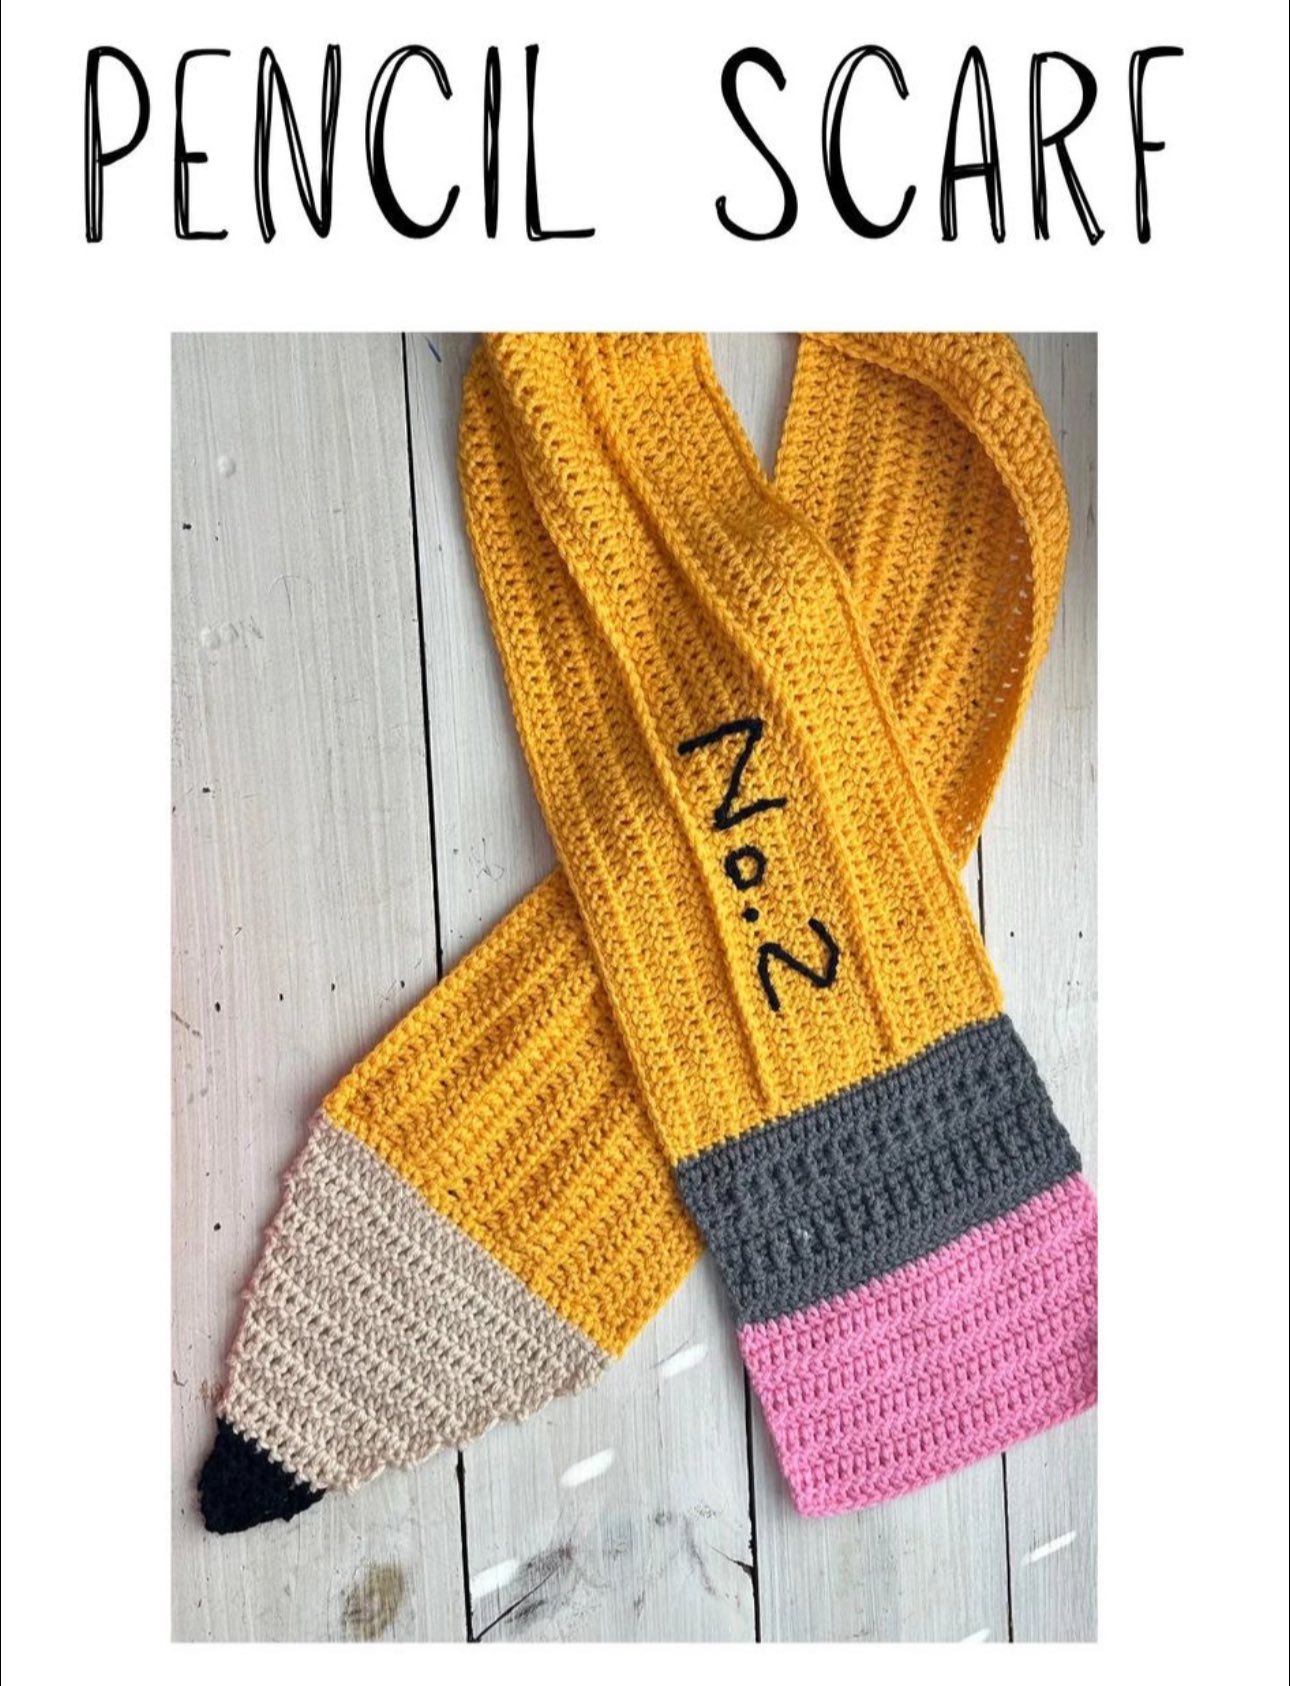
Colors are another key aspect of your Crochet pencil scarf – Pattern. You will need a combination of yellow for the pencil body, pink for the eraser, and a neutral shade like brown or gray for the pencil tip. These colors will make your scarf instantly recognizable as a pencil and add a playful touch to your outfit.
Yarn texture can also enhance your scarf’s appearance. Smooth yarns provide clean lines, while textured or variegated yarns create a more dynamic and visually interesting pattern.
Consider the length and width of your scarf before starting. A longer scarf offers more versatility for styling, while a shorter scarf is easier to carry and wear in various ways. The width should be comfortable around your neck, typically between 6-10 inches.
Finally, gather all materials in advance. Having everything ready—yarn, hooks, scissors, stitch markers, and a yarn needle—will streamline your crocheting process and make following the Crochet pencil scarf – Pattern more enjoyable.
The first step in your Crochet pencil scarf – Pattern is creating the pencil’s eraser section. Start with a chain that matches your desired scarf width. Then work rows of single crochet stitches in pink yarn to form the eraser. This section should be neat and even, as it sets the foundation for the rest of the scarf.
Once the eraser is complete, transition to the yellow yarn for the pencil body. Continue with single or double crochet stitches, maintaining consistent tension to keep the scarf uniform. The pencil body is the longest section, so take your time to ensure smooth, even rows.
Adding the pencil tip involves changing to a darker yarn, such as brown or gray. Work triangular decreases or tapered rows to mimic the shape of a sharpened pencil. This final section adds realism and completes the pencil look.
You can incorporate small details, like a stitched line along the pencil body, to resemble a classic wooden pencil design. These finishing touches make your Crochet pencil scarf – Pattern more authentic and visually striking.
Remember to weave in all loose ends as you finish each section. Properly securing your yarn ensures durability and a polished final appearance, preventing unraveling with use.
Blocking the scarf after completing it can improve its shape and drape. Wet the scarf lightly, lay it flat, and shape it as desired. Let it dry completely to finalize your Crochet pencil scarf – Pattern.
Customizing your Crochet pencil scarf – Pattern allows you to express your creativity. Experiment with different colors for the pencil body, tip, or eraser to match personal style or school colors.
You can also add embellishments, such as embroidered letters or patterns along the pencil, to make the scarf unique. These personal touches turn a simple accessory into a conversation starter.
Adjusting the scarf’s length and width is another customization option. A wider scarf can be worn as a wrap, while a longer scarf allows for more stylish draping around the neck.
Mixing yarn textures provides additional visual interest. Combining smooth and textured yarns enhances the pencil’s three-dimensional look and adds depth to your project.
Consider creating a set of pencils with varying colors and sizes. These mini-pencil scarves can be paired together or used as fun, creative gifts for friends and family.
Finally, keep a record of your modifications. Note which colors, stitches, and lengths you used for each version of your Crochet pencil scarf – Pattern, making it easier to replicate or improve upon your design in the future.
One common mistake in the Crochet pencil scarf – Pattern is inconsistent tension. Uneven stitches can make the scarf appear lopsided, detracting from the pencil design. Maintain steady tension throughout each row.
Another error is skipping color changes or making abrupt transitions. Smooth color changes are essential for a professional-looking pencil, so plan your yarn changes carefully.
Not counting rows accurately can also cause problems. The pencil tip should taper evenly, and miscounting can disrupt the triangular shape. Use stitch markers or row counters to stay on track.
Choosing yarn that is too thick or thin for your hook can affect the scarf’s size and flexibility. Match yarn weight and hook size to maintain the intended dimensions of your Crochet pencil scarf – Pattern.
Rushing through the project can lead to sloppy stitches or missed details. Take your time with each section, especially when forming the eraser and pencil tip, which define the scarf’s character.
Finally, neglecting finishing touches, such as weaving in ends or blocking, can make your scarf look unfinished. Proper finishing ensures your Crochet pencil scarf – Pattern is polished and durable.
Q: Is the Crochet pencil scarf – Pattern suitable for beginners?
A: Yes, it is beginner-friendly. The pattern uses basic stitches like single and double crochet, with clear instructions for each section of the pencil.
Q: How long does it take to complete a Crochet pencil scarf – Pattern?
A: Completion time varies based on experience and speed, but most crocheters can finish it in a few hours to a couple of days.
Q: What yarn types are best for this project?
A: Medium-weight, soft yarns are recommended. Acrylic or cotton blends work well for durability and comfort.
Q: Can I change the colors of my Crochet pencil scarf – Pattern?
A: Absolutely! You can customize the pencil body, eraser, and tip with any color combination you prefer.
Q: How do I care for a finished Crochet pencil scarf – Pattern?
A: Hand wash in cold water and lay flat to dry. Avoid wringing or twisting the scarf to maintain its shape.
Q: Can I sell scarves made from this pattern?
A: Yes, you can sell finished scarves, but avoid distributing the written pattern without permission if it is copyrighted.
Q: How can I make the scarf longer or wider?
A: Adjust the initial chain length for width and add extra rows for length, keeping the pencil proportions consistent.
From selecting the right materials and yarn colors to following step-by-step instructions, this project combines creativity with practical crocheting skills.
Customization options allow you to personalize your scarf, while careful attention to common mistakes ensures a polished and professional result.


