
Ballerina pencil case with zipper Pattern


Creating beautiful patchwork coasters is not only a practical way to protect your furniture but also a fun and creative project for sewing enthusiasts of all levels.
Sewing patchwork coasters allows you to explore various patterns, textures, and color combinations, giving you the freedom to personalize your home décor.
Understanding the basics of patchwork and the techniques involved in sewing coasters is essential before starting your project. This Patchwork Coasters Sewing Tutorial will cover fabric selection, cutting, piecing, and quilting methods to ensure your coasters are durable and aesthetically pleasing.
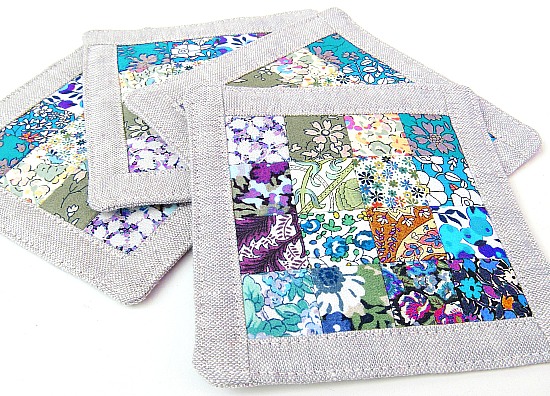
The first step in this Patchwork Coasters Sewing Tutorial is selecting the right fabrics. Cotton is the most popular choice due to its durability and ease of handling. Opt for fabrics that complement each other in color and pattern to create a harmonious design.
Consider using a mix of prints and solids to add visual interest to your patchwork coasters. A balance between busy patterns and plain fabrics helps highlight the details of each piece. This combination will make your coasters more dynamic and appealing.
Pre-wash your fabrics to prevent shrinking and color bleeding. This step ensures that your patchwork coasters maintain their shape and vibrant colors after washing. Proper preparation of fabrics is crucial for achieving professional-looking results.
When cutting your fabric pieces, accuracy is key. Use a rotary cutter, ruler, and cutting mat to achieve straight edges. Precise cutting is fundamental in this Patchwork Coasters Sewing Tutorial to ensure your pieces fit together neatly.
Think about the size and shape of your coasters. Standard coasters are usually 4×4 inches or 5×5 inches. Adjusting the size of your fabric squares will help you plan your overall design effectively.
Finally, consider using batting or interfacing for added thickness and durability. This extra layer not only protects surfaces from heat and moisture but also gives your patchwork coasters a polished, professional finish.
Once your fabrics are ready, the next step in this Patchwork Coasters Sewing Tutorial is piecing the fabric together. Begin by arranging your fabric squares in the desired pattern. Planning your layout ensures that the final product has a cohesive design.
Sew the pieces together using a consistent seam allowance, typically ¼ inch. Maintaining uniform seams is essential to ensure your patchwork coasters are well-aligned and durable. Precision in sewing makes the finished coasters look professional.
Press your seams as you go. Pressing not only flattens the fabric but also helps maintain accurate shapes. In this Patchwork Coasters Sewing Tutorial, proper pressing contributes to a smooth and polished final look.
Consider using chain piecing to save time when sewing multiple coasters. This method allows you to sew several pieces continuously without stopping, making the process more efficient.
Trimming the sewn pieces to the correct dimensions is important. Check that each square aligns perfectly before moving on to the next step. Accurate trimming ensures your patchwork coasters are uniform in size.
Finally, double-check your layout and seams before assembling the backing and batting. Taking the time to review your work at this stage prevents errors that could affect the overall quality of your coasters.
Quilting adds texture and strength to your patchwork coasters. You can use straight-line quilting, free-motion quilting, or simple stitch-in-the-ditch techniques depending on your preference and skill level. This step enhances the durability and appearance of your coasters.
Choose a coordinating thread color that complements your fabrics. The right thread not only strengthens the coasters but also adds an aesthetic touch. In this Patchwork Coasters Sewing Tutorial, thread selection is as important as fabric choice.
Layer your quilted top, batting, and backing before sewing. Pin or clip the layers together to prevent shifting while quilting. Proper layering ensures your patchwork coasters remain even and stable during use.
Sew around the edges with a sturdy stitch to prevent fraying. You can use a zigzag or straight stitch depending on your preference. This finishing step secures your coasters for long-lasting use.
Trim the edges neatly after quilting. Accurate trimming gives your patchwork coasters a clean, professional look and ensures consistency across multiple coasters in a set.
Consider adding decorative edging or binding to enhance the appearance. Binding adds a polished finish and protects the edges from wear and tear, completing your Patchwork Coasters Sewing Tutorial with style.
Once you are comfortable with the basic techniques in this Patchwork Coasters Sewing Tutorial, experiment with different designs and patterns. You can create themed coasters for holidays, seasons, or special occasions.
Try using various fabric textures, such as linen, denim, or flannel, to add depth and interest to your patchwork coasters. Mixing textures can make each coaster unique and visually appealing.
Incorporate appliqué or embroidery to personalize your coasters further. Adding monograms or small motifs enhances the creative aspect of your Patchwork Coasters Sewing Tutorial.
Experiment with different quilting patterns. You can try diagonal lines, grid designs, or free-motion swirls to achieve unique textures. Diverse quilting techniques elevate the overall aesthetic of your coasters.
Consider using scraps of fabric from other projects. This sustainable approach allows you to create charming patchwork coasters while minimizing waste. It’s a great way to make something beautiful and eco-friendly.
Finally, think about creating sets with coordinated designs. Matching sets make excellent gifts or additions to your home décor, showcasing the skills and creativity learned in this Patchwork Coasters Sewing Tutorial.
Q: What fabrics are best for patchwork coasters?
A: Cotton is recommended due to its durability, ease of handling, and wide variety of patterns. Pre-wash fabrics to avoid shrinkage and color bleeding.
Q: Do I need batting for coasters?
A: Yes, batting adds thickness, durability, and protection for surfaces from heat or moisture. It also gives your coasters a professional finish.
Q: How big should patchwork coasters be?
A: Standard sizes are 4×4 inches or 5×5 inches. Adjust the size according to your design and personal preference.
Q: Can beginners make patchwork coasters?
A: Absolutely! This Patchwork Coasters Sewing Tutorial is suitable for beginners. Start with simple patterns and gradually explore more complex designs.
Q: How should I quilt my coasters?
A: Use straight-line quilting, free-motion quilting, or stitch-in-the-ditch techniques. Quilting adds texture, strength, and style to your coasters.
Q: Can I use scrap fabric for this project?
A: Yes, using scraps is a great way to create charming, eco-friendly patchwork coasters. It also allows for unique designs with minimal waste.
This Patchwork Coasters Sewing Tutorial has guided you through every step, from selecting fabrics to piecing, quilting, and finishing your coasters. By following these instructions, you can create durable, stylish, and personalized coasters that reflect your creativity.
Experimenting with different patterns, textures, and designs can enhance your sewing skills and inspire more projects in the future. We encourage you to share your honest opinions and suggestions about this tutorial and let us know how your patchwork coasters turned out.
The Patchwork Coasters Sewing Tutorial is the perfect project for anyone who wants to combine creativity, functionality, and style in a small yet meaningful sewing craft.
Whether you are a beginner eager to learn basic patchwork techniques or an experienced sewer searching for a quick, relaxing project, making patchwork coasters is an excellent choice.
These handmade coasters not only protect your tables but also add a warm, cozy, and artistic touch to your home décor.


