Crochet Pig In A Granny Square Blanket Pattern


The Crochet Halloween Puppy – Pattern is a delightful and fun project for anyone looking to create a festive and adorable addition to their Halloween decorations.
One of the most appealing aspects of the Crochet Halloween Puppy – Pattern is its versatility. You can customize the puppy with different colors, accessories, and expressions to match your Halloween theme.
Another advantage of the Crochet Halloween Puppy – Pattern is that it introduces you to a variety of crochet stitches and techniques.
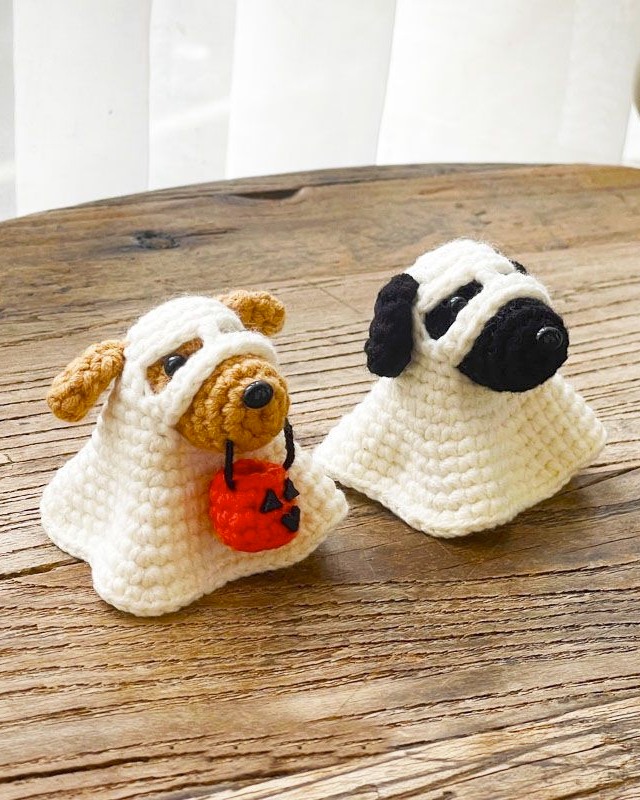
To begin your Crochet Halloween Puppy – Pattern, it’s essential to gather all the necessary materials. The right materials will ensure that your puppy has a smooth finish and maintains its shape. First, you will need yarn in Halloween-themed colors, such as black, orange, purple, and white. Choosing high-quality, soft yarn will make your puppy more enjoyable to handle and display.
You will also need a crochet hook appropriate for the yarn weight. Most small amigurumi projects, like this Crochet Halloween Puppy – Pattern, work best with a slightly smaller hook than recommended on the yarn label. This ensures tight stitches, preventing the stuffing from showing through the gaps.
Polyester fiberfill is essential for stuffing your puppy evenly. Be careful not to overstuff, as it can distort the shape. Stuff gradually and check the shape as you go to achieve a balanced, plump look.
Safety eyes or embroidered eyes are another crucial element. If you are making the puppy for a child, embroidery is safer. The eyes can greatly enhance the puppy’s expression and bring it to life.
Additional tools like a yarn needle, stitch markers, and scissors will help keep your work organized and precise. These simple tools make a big difference when following the Crochet Halloween Puppy – Pattern and will help you achieve professional-looking results.
Finally, having a printed or digital copy of the pattern will guide you step by step. Reading through the entire pattern before starting ensures you understand the sequence and techniques, making the crocheting process smoother and more enjoyable.
Starting the Crochet Halloween Puppy – Pattern involves creating the head and body as the foundation of the project. Begin by forming a magic ring and crocheting in rounds. Increasing stitches gradually will create a round, sturdy head shape. Maintaining consistent tension throughout is crucial for a neat appearance.
After the head, work on the body using similar techniques. The body should be slightly elongated to create the classic puppy look. Pay attention to stitch counts and shaping instructions to maintain proportion.
The ears are typically created separately and sewn onto the head. Using different colors or adding details like stripes or spots can give your puppy a more festive, Halloween-inspired appearance. This customization enhances the charm and uniqueness of your project.
Next, create the legs and tail. The legs can be crocheted in rounds and attached securely to the body. The tail can be short or long, straight or curled, depending on your design preference. Each piece should be firmly attached to withstand handling and play.
Adding Halloween-themed accessories is the final step. Miniature crochet pumpkins, witch hats, or tiny bats can be sewn or glued on carefully. These details emphasize the festive theme and make your puppy truly special.
Finishing touches, such as embroidering a cute nose or adding a small bow, complete the Crochet Halloween Puppy – Pattern. Take your time with these details to ensure a polished and adorable final result.
For beginners, the Crochet Halloween Puppy – Pattern may seem challenging, but with patience and practice, it is achievable. Start by familiarizing yourself with basic stitches like chain, single crochet, and slip stitch. These foundational techniques are used throughout the pattern.
Keeping your tension even is crucial for a professional look. Too tight, and your stitches may be difficult to work into; too loose, and the stuffing may show through. Consistent tension ensures smooth, uniform stitches.
Using stitch markers can help track your rounds and avoid mistakes. This is especially helpful for shaping the head, body, and limbs accurately.
Do not rush through the assembly process. Attaching ears, legs, and tails properly takes time, but it significantly improves the final appearance. Ensuring symmetry and stability will make your puppy look polished and balanced.
Watch online tutorials for techniques you find difficult. Visual demonstrations can provide valuable insight that written instructions may not convey fully. Combining written patterns with videos enhances understanding.
Finally, practice patience and enjoy the process. The Crochet Halloween Puppy – Pattern is meant to be a fun, creative project. Taking your time ensures both a beautiful outcome and a rewarding experience.
One common mistake in the Crochet Halloween Puppy – Pattern is miscounting stitches, which can throw off the shape of your puppy. Double-check your stitch counts at the end of each round to prevent errors.
Another mistake is overstuffing. Excess stuffing can distort shapes and make sewing pieces together more difficult. Stuff gradually, checking shape consistency as you go.
Crocheting too loosely is also problematic. Loose stitches allow stuffing to show and can reduce structural integrity. Using a slightly smaller hook than recommended helps keep stitches tight and neat.
Attaching pieces unevenly is another frequent issue. Take care to align ears, legs, and tails symmetrically. Measuring and pinning pieces before sewing can ensure proper placement.
Skipping finishing touches may reduce the pattern’s charm. Adding small details like eyes, nose, or Halloween-themed accessories enhances the character and appeal of your puppy.
Finally, avoid rushing. Crocheting quickly can lead to mistakes and uneven stitches. Slow, deliberate work ensures better results and a more satisfying finished project.
Q: Is the Crochet Halloween Puppy – Pattern suitable for beginners?
A: Yes, this pattern can be adapted for beginners by following step-by-step instructions and using basic stitches. Beginners may need extra time for assembly and finishing touches.
Q: What yarn is best for this pattern?
A: Soft, medium-weight yarn in Halloween colors is recommended. Cotton or acrylic yarn works well for durability and ease of handling.
Q: Can I customize my puppy?
A: Absolutely. You can change colors, add accessories like tiny pumpkins or witch hats, and modify expressions to make your puppy unique.
Q: Are safety eyes necessary?
A: Safety eyes are optional. For children, it is safer to embroider the eyes to prevent choking hazards.
Q: How long does it take to complete this pattern?
A: Completion time depends on skill level, but most crafters can finish in several hours to a few days, especially if taking time for detailed accessories.
Q: Can I sell my finished Crochet Halloween Puppy?
A: Yes, you can sell handmade items created from this pattern. Ensure you respect copyright laws and do not claim the original design as your own if it’s protected.
The Crochet Halloween Puppy – Pattern is a fun and creative project suitable for crafters of all skill levels. It allows you to practice essential crochet techniques while creating a festive, charming decoration for Halloween.
From choosing materials to finishing touches, this pattern guides you through every step, ensuring a polished, professional result.
We hope this guide has provided clear, detailed instructions and inspired you to start your project. Try following the steps, experimenting with your own creative ideas, and enjoying the process.


