Crochet Pig In A Granny Square Blanket Pattern


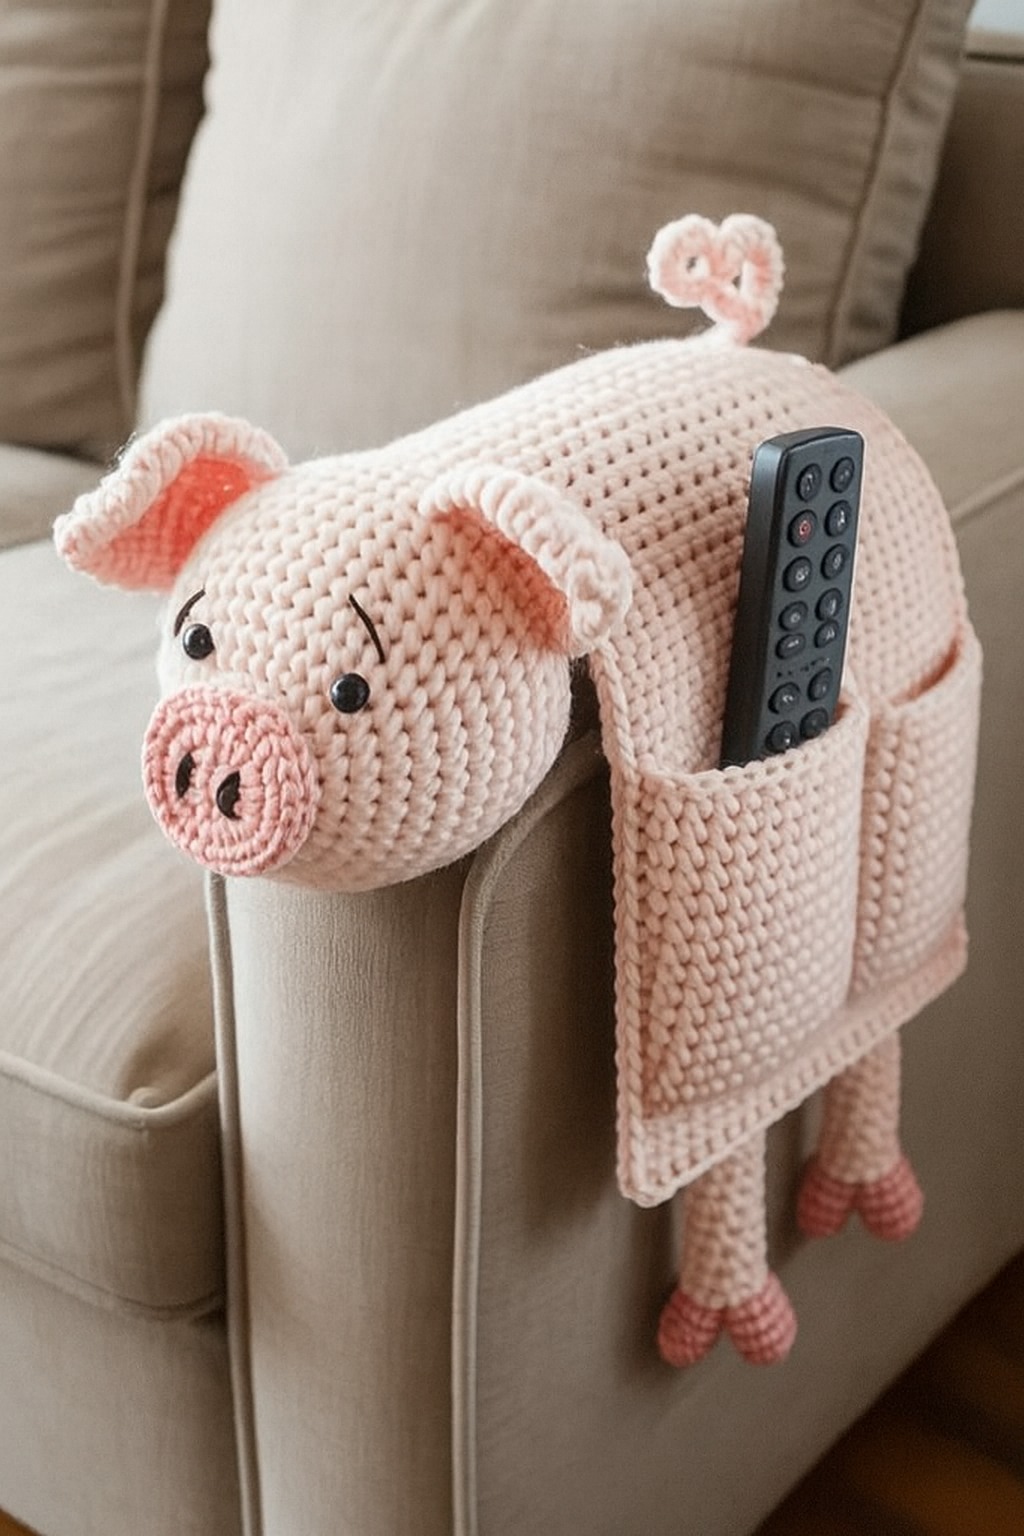
Amigurumi has become a beloved craft that brings joy and personality to every home. One of the most charming creations within the world of crochet is the Amigurumi Pig Couch Arm Remote Holder.
This free crochet pattern allows you to make a cute, functional item that will not only add a fun, quirky touch to your living room but also serve a practical purpose.
Whether you’re a seasoned crocheter or just starting, this easy-to-follow pattern will help you create your very own pig-shaped remote holder that fits perfectly over the arm of your couch. The Amigurumi pig will hold your remotes, ensuring they are always within arm’s reach and neatly organized.
In this article, we’ll explore the steps for creating your own Amigurumi Pig Couch Arm Remote Holder. We will cover the essential materials needed, the crochet techniques you’ll use, and the key steps involved in bringing this adorable pig to life.
Additionally, we will discuss some tips for customizing your remote holder, ensuring that your project is uniquely yours. Whether you plan to make a pig for yourself or as a gift, you’ll find that this is a fun and practical project that anyone can enjoy.
Amigurumi Pig Couch Arm Remote Holder is more than just a decoration; it’s a clever way to keep your remotes safe and easily accessible. Let’s dive into the process and learn how to create this adorable, functional accessory for your couch!
Before you start crocheting your pig-shaped remote holder, it’s essential to gather all the necessary materials. The beauty of Amigurumi is that it uses basic crochet techniques and simple materials, making it perfect for beginners and experienced crocheters alike. Here’s a list of the materials you will need to create your Amigurumi pig:
Once you have your materials ready, you’re all set to start crocheting your Amigurumi Pig Couch Arm Remote Holder.
The foundation of Amigurumi crochet involves basic stitches that form tight, compact fabrics. These stitches include the slip stitch, single crochet, and increase and decrease techniques. Here’s a quick overview of the essential crochet techniques you’ll need to create your pig-shaped remote holder:
These techniques will allow you to create the body, limbs, snout, and ears of your Amigurumi pig. The pattern itself will walk you through these techniques step-by-step, so you can focus on enjoying the process and watching your pig take shape.
Now that you have your materials and basic techniques in hand, let’s dive into the step-by-step instructions for creating your Amigurumi Pig Couch Arm Remote Holder. Don’t worry if this is your first time making an Amigurumi project—each step is clear and easy to follow!
Begin by crocheting the body of the pig. This part is essentially a tube that will fit around the arm of your couch. Using the magic ring, work your single crochets in rounds. Once you reach the desired length, you can start shaping the pig’s body by increasing and decreasing.
Next, move on to crocheting the snout. The snout is a small, round shape that you’ll attach to the front of the pig’s body. Use the pink yarn and increase stitches to create a rounded, puffy effect. Add a small amount of fiberfill to the snout to give it dimension.
The ears are small, triangular shapes. Using the pink yarn, crochet the ears separately and then sew them onto the top of the pig’s head. You can add a little bend to the ears for a cute, floppy effect!
If you’re using safety eyes, position them on the pig’s face, near the snout. If you prefer to crochet the eyes, use black yarn to create small circles and sew them onto the pig’s head.
Once the body and snout are complete, it’s time to stuff your pig. Add a small amount of polyester fiberfill into the body and snout to give the pig some structure, but don’t overstuff it. You want it to be firm, but still flexible enough to fit comfortably around the couch arm.
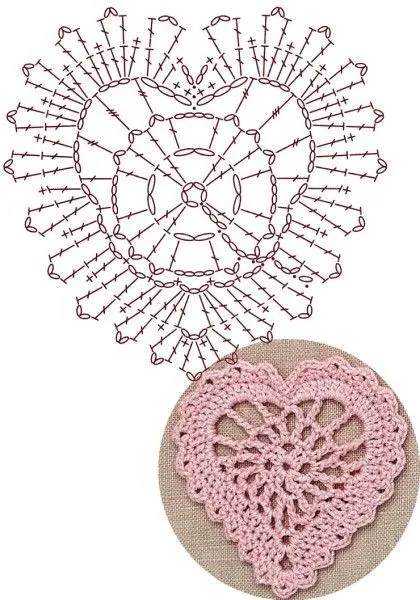
Finally, crochet a small, curly tail for your pig and attach it to the back of the body. This adds the perfect finishing touch to your cute pig!
Once you’ve mastered the basic pattern, you can easily customize your Amigurumi pig to make it even more special. Here are a few ideas for personalizing your pig:
1. How long does it take to crochet the Amigurumi pig?
The time it takes to crochet the Amigurumi pig depends on your experience level. On average, it may take anywhere from 3 to 5 hours to complete, including stuffing and assembling the pieces.
2. Can I make this pig with other yarn weights?
Yes, you can experiment with different yarn weights. Just keep in mind that using a heavier yarn might make the pig larger than expected, so adjust your pattern accordingly.
3. Do I need to use safety eyes for this project?
Safety eyes are optional. If you prefer a more soft and crochet-only look, you can simply stitch the eyes using black yarn or embroider them.
4. What size couch arm does the remote holder fit?
The Amigurumi pig remote holder is designed to fit most standard couch arms. However, if your couch has a particularly wide or narrow armrest, you can adjust the length of the body by adding or removing a few rounds to ensure a snug fit.
5. Can I use the remote holder for other items besides remotes?
Absolutely! While the primary purpose is to hold remotes, you can use the holder to store small items like pens, snacks, or even a phone. It’s a versatile accessory.
6. Is this pattern suitable for beginners?
Yes, this pattern is beginner-friendly. The basic Amigurumi techniques are easy to learn, and the pattern provides clear instructions and tips for creating your pig.
In this article, we’ve walked through the process of creating your very own Amigurumi Pig Couch Arm Remote Holder. From gathering materials to following step-by-step instructions, you now have the knowledge to make a cute, functional addition to your living room decor. Whether you’re an experienced crocheter or a beginner, this project is sure to bring a smile to your face.
This adorable pig design is sure to bring smiles to everyone in your household while also reducing the frustration of losing the remote under cushions or tables. It’s a conversation starter, a functional accessory, and a lovely handmade touch to your living space.


