Crochet Pig In A Granny Square Blanket Pattern


Creating a Halloween Ghost Wreath – FREE Crochet Pattern is one of the most delightful ways to welcome the spooky season into your home.
One of the best things about the Halloween Ghost Wreath – FREE Crochet Pattern is its versatility. You can customize the wreath by choosing different colors, yarn textures, and sizes to match your personal style.
If you are looking to create memorable Halloween decorations, the Halloween Ghost Wreath – FREE Crochet Pattern is a must-try. Unlike store-bought options, handmade wreaths carry a personal touch that cannot be replicated.
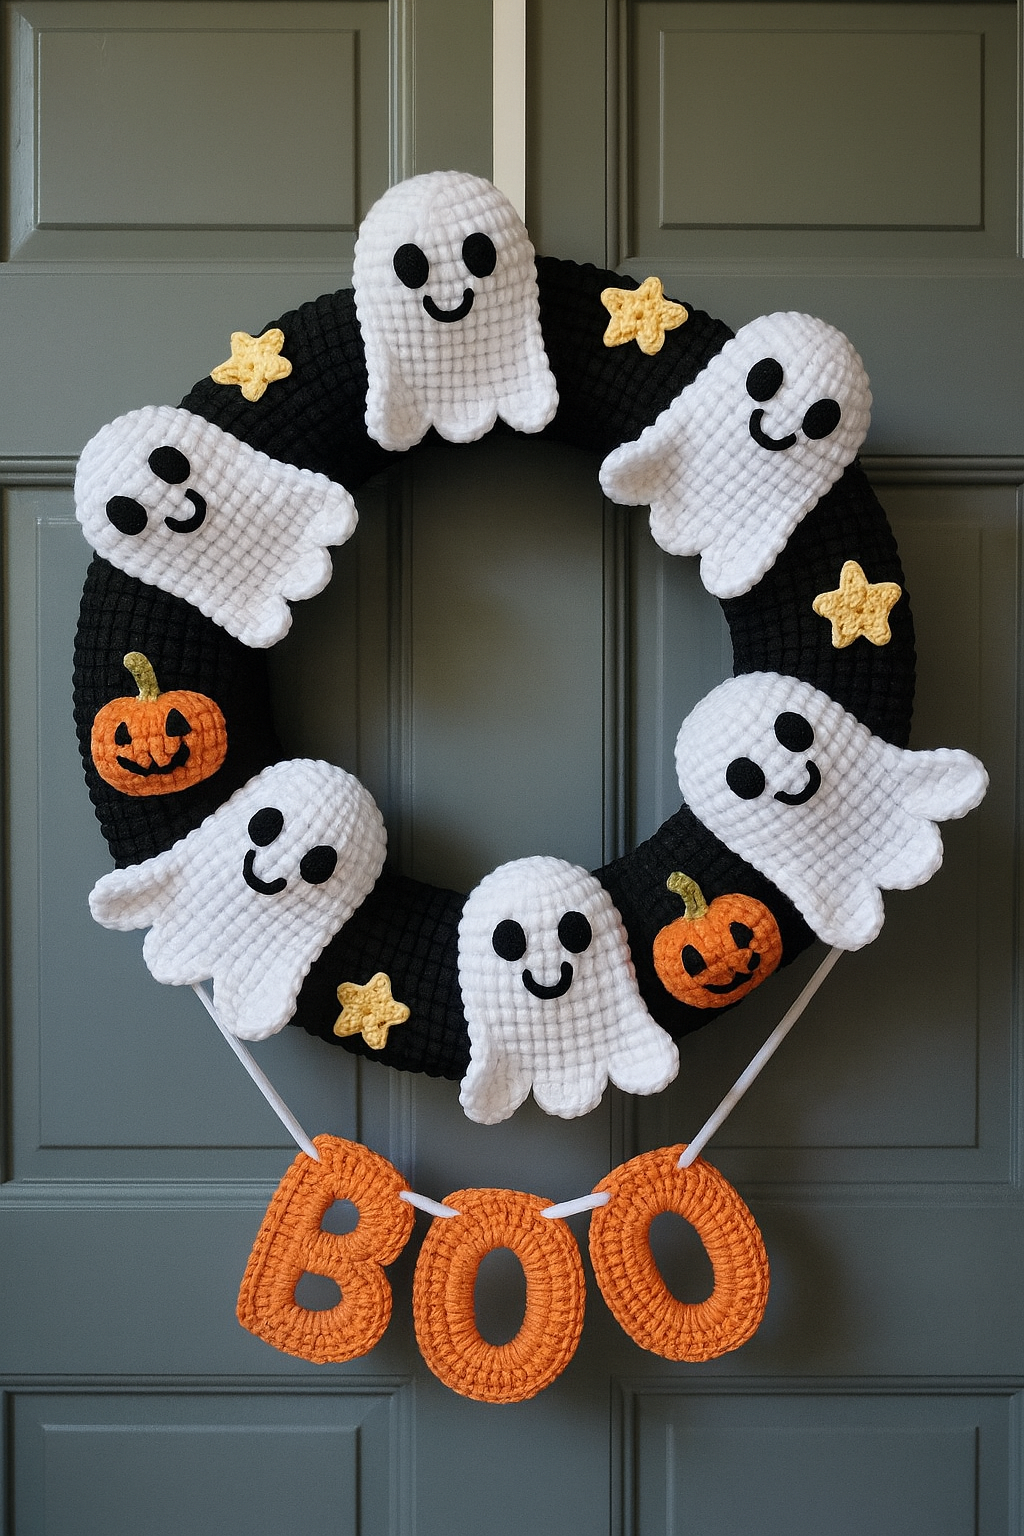
To start your Halloween Ghost Wreath – FREE Crochet Pattern, gathering the right materials is crucial. You will need yarn in colors like white for the ghosts, black for the facial features, and optional accent colors for added decorations. Acrylic yarn is a great choice for beginners as it is easy to work with and holds its shape well. Additionally, a crochet hook suitable for your yarn weight, a wreath base (foam or wire), scissors, a yarn needle, and stuffing for the ghosts are necessary.
Choosing the correct yarn and hook is essential for achieving a professional-looking Halloween Ghost Wreath. Using a yarn that is too thin or too thick can affect the size and shape of your ghosts. It’s recommended to use worsted weight yarn and an appropriately sized hook, usually around 4.0mm to 5.0mm. This combination ensures that your ghosts are firm but soft enough to look fluffy and cute.
Before starting the crochet pattern, prepare your workspace. Organize your yarn, hooks, and stuffing so everything is within reach. Proper lighting will help you see your stitches clearly, which is especially important for adding the facial details of each ghost. A clean, spacious area also helps prevent tangling and makes the process more enjoyable.
Creating a Halloween Ghost Wreath is more than just crocheting; it’s about assembling the pieces beautifully. Cut the wreath base to the desired size if necessary and attach small markers where each ghost will be placed. This planning step helps maintain symmetry and ensures your wreath looks balanced when completed.
Another important tip for your Halloween Ghost Wreath – FREE Crochet Pattern is to plan for extra ghosts. Crocheting a few additional ghosts ensures you have enough in case of mistakes or if you decide to fill out the wreath more densely. It also gives you options to swap out colors or expressions for variety.
Finally, make sure to have a hot glue gun or floral wire on hand to attach your crocheted ghosts securely to the wreath base. Proper attachment is crucial to maintain the shape and stability of the wreath over time, especially if it will be displayed outdoors or handled frequently.
Starting with the ghosts themselves, the Halloween Ghost Wreath – FREE Crochet Pattern provides a clear step-by-step guide for creating each adorable figure. Begin by crocheting a small circle for the ghost’s base using a magic ring technique. This allows for a neat, tight center that can be gradually expanded.
Increase the stitches evenly around the circle to form a dome shape. The dome will serve as the ghost’s body, giving it a rounded and plump appearance. This is where the choice of yarn and hook size plays a significant role in maintaining consistency across all ghosts.
Once the body is complete, start forming the ghost’s tail. Use simple decreases to taper the bottom of the ghost, creating a flowing, wavy effect that adds character and movement. This tapering is what gives the ghost a realistic floating appearance.
Next, stuff the ghost lightly with fiberfill. Be careful not to overstuff, as too much filling can distort the shape of the ghost. A lightly stuffed ghost retains its shape while still appearing soft and airy, perfect for the whimsical charm of your Halloween Ghost Wreath.
After stuffing, use black yarn or embroidery thread to add facial features. Simple eyes and a mouth bring your ghost to life and can be customized to show different expressions, from spooky to playful. Small variations in expressions add personality and charm to your wreath.
Finally, finish each ghost with a row of slip stitches around the opening to secure the stuffing. This ensures your ghosts maintain their shape and are ready to be attached to the wreath base. Repeat these steps until you have enough ghosts to fill your wreath.
Assembling your Halloween Ghost Wreath – FREE Crochet Pattern is where the project truly comes together. Start by attaching the largest ghosts first, spacing them evenly around the wreath base. This provides a balanced foundation and allows smaller ghosts to fill in the gaps later.
Use hot glue or floral wire to attach each ghost securely. Be careful not to apply too much glue directly to the yarn, as it can seep through and create hard spots. Floral wire is a great alternative for a cleaner finish and easier adjustments.
Layering is key to creating a visually appealing wreath. Position smaller ghosts in front of or behind larger ones to add depth. Overlapping the ghosts slightly creates a natural, floating effect that makes the wreath more dynamic and interesting.
Incorporate other decorative elements if desired. Bats, tiny pumpkins, or cobwebs can be added to enhance the Halloween theme. These accents should complement the ghosts without overpowering the main focus of your wreath.
Check the wreath from multiple angles as you assemble it. This ensures symmetry and consistency in spacing, helping your Halloween Ghost Wreath look polished and professional. Minor adjustments can make a big difference in the final presentation.
Once all pieces are attached, gently shake or move the wreath to ensure all elements are secure. Reinforce any loose ghosts or decorations to prevent them from falling off over time. Your wreath is now ready to be displayed proudly on a door, wall, or mantel.
To make your Halloween Ghost Wreath – FREE Crochet Pattern last for many seasons, proper display and care are essential. Avoid exposing the wreath to direct sunlight for long periods, as it can fade the yarn colors. Indoors or shaded areas are ideal for long-term preservation.
Dust the wreath regularly using a soft brush or a can of compressed air. Yarn can attract dust, and keeping the ghosts clean ensures your wreath always looks fresh and inviting.
If displaying outdoors, consider a protective spray to make the yarn water-resistant. This prevents moisture from affecting the shape and texture of your crocheted ghosts. However, avoid heavy rain or damp conditions that can cause the wreath to sag or mold.
Store the wreath in a cool, dry place during off-seasons. Using a large plastic storage container or a sturdy box prevents the wreath from being squashed or damaged. Wrap the ghosts lightly in tissue paper for extra protection.
When handling the wreath, be gentle with the ghosts. Crocheted figures can be delicate, and rough handling may loosen stitches or flatten the stuffing. Treating the wreath with care ensures it remains beautiful for years to come.
Finally, feel free to get creative with your wreath each year. Add seasonal elements or change the ghost expressions to give it a fresh look. Personalizing your Halloween Ghost Wreath keeps the tradition exciting and engaging for everyone in your household.
Q1: Can beginners make the Halloween Ghost Wreath?
A1: Absolutely! The Halloween Ghost Wreath – FREE Crochet Pattern is designed with beginners in mind. Using basic crochet stitches and simple shapes makes it accessible for anyone with minimal experience.
Q2: What type of yarn is best for this project?
A2: Acrylic yarn is recommended because it holds its shape well and is easy to work with. Worsted weight yarn with a suitable hook (4.0mm–5.0mm) works perfectly.
Q3: Can I customize the ghosts?
A3: Yes! You can create different expressions, sizes, and even use colored yarn for a more whimsical wreath. Adding small decorations like bats or pumpkins is also encouraged.
Q4: How do I attach the ghosts to the wreath base?
A4: You can use hot glue for a secure attachment or floral wire for easier adjustments. Make sure each ghost is firmly attached to prevent them from falling off.
Q5: Can the wreath be displayed outdoors?
A5: Yes, but it should be in a protected area. Avoid direct rain and sunlight to prevent fading or damage. A water-resistant spray can help protect the yarn.
Q6: How should I store the wreath when not in use?
A6: Store it in a cool, dry place in a box or plastic container. Wrapping the ghosts in tissue paper helps maintain their shape and keeps the wreath dust-free.
The Halloween Ghost Wreath – FREE Crochet Pattern is a fun, creative, and rewarding project that brings a personal touch to your Halloween decorations.
By following this guide, you’ve learned how to select materials, crochet ghosts, assemble a balanced wreath, and care for it to ensure it lasts for many seasons.
From beginners to experienced crocheters, this project offers both enjoyment and a beautiful handmade result. Share your wreath proudly, and don’t forget to leave your honest opinions and suggestions for improving or customizing the design.


