Crochet Pig In A Granny Square Blanket Pattern


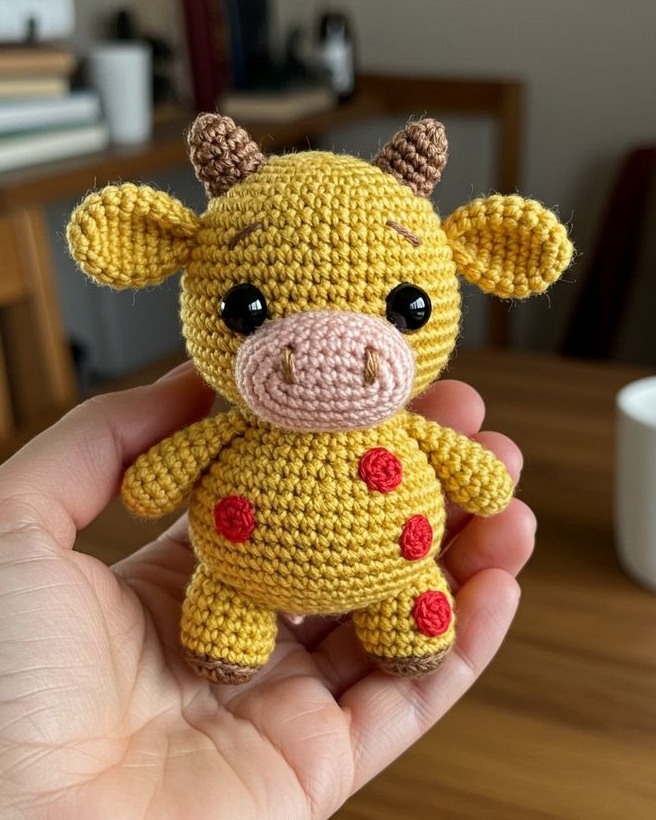
Amigurumi Mini Cow – Pattern is one of the most charming projects for crochet lovers who want to create something small, adorable, and full of personality.
This pattern is perfect for beginners who are starting their amigurumi journey, as well as advanced crocheters who enjoy working on quick and satisfying pieces.
By following a well-structured approach, you can bring to life a cute little cow that makes a perfect gift, decorative piece, or collectible item.
Working with this Amigurumi Mini Cow – Pattern allows crafters to explore creative possibilities, from experimenting with different yarn colors to adding small details that give each cow its own unique character.
One of the main appeals of this pattern is its simplicity, yet the final result looks highly detailed and professional. The Amigurumi Mini Cow – Pattern relies on basic stitches such as single crochet, increases, and decreases, making it accessible even to those who have never completed an amigurumi before. With patience and attention to detail, anyone can create a lovely cow that instantly brightens up a room or brings a smile to a child’s face. Beyond its cuteness, this pattern teaches important amigurumi skills, building a strong foundation for more complex projects in the future.
When following the Amigurumi Mini Cow – Pattern, the joy is not just in the end result but in the process itself. Each round worked in continuous spirals feels rewarding, and watching the small cow slowly take shape in your hands is a delightful experience. Whether you intend to make it for personal use, as a gift, or even to sell in handmade craft shops, this project is both practical and enjoyable. Many crocheters find that working on small projects like this provides stress relief, mindfulness, and a sense of accomplishment.
To get started with the Amigurumi Mini Cow – Pattern, you only need a few basic materials. The primary requirement is yarn, and most crafters recommend using 100% cotton or acrylic yarn for its durability and ease of use. The cow usually requires at least two colors—white and black or brown—to achieve a realistic cow look, but you can experiment with pastel shades for a more whimsical design.
Another important item is the crochet hook, typically ranging from 2.0 mm to 3.5 mm depending on your yarn thickness. A smaller hook size helps keep the stitches tight, ensuring that no stuffing shows through the gaps. Additionally, fiberfill stuffing is essential for giving the cow its soft and squeezable form, while safety eyes or embroidered eyes add personality and charm.
Stitch markers are also highly recommended, especially for beginners. Since amigurumi is worked in continuous rounds, it is easy to lose track of where each round begins and ends. A simple stitch marker prevents mistakes and keeps your project organized. Scissors and a yarn needle for sewing parts together will also be needed. These basic tools are affordable, making this project accessible to anyone.
For those who want to personalize their Amigurumi Mini Cow – Pattern, accessories such as small ribbons, bells, or embroidered details can add extra cuteness. Some crocheters even create tiny flowers, scarves, or hats to dress up their cow, turning it into a character full of life. With just a few additional touches, the cow becomes more than just a toy; it transforms into a keepsake with sentimental value.
The choice of materials also influences the size of your finished cow. Using thinner yarn and a smaller hook results in a miniature version, while thicker yarn makes a slightly larger but equally adorable cow. This flexibility allows crafters to adapt the Amigurumi Mini Cow – Pattern to their personal preferences.
Overall, having the right materials is the foundation of success. By preparing everything beforehand, you ensure that your crochet time is smooth, enjoyable, and free from interruptions. This preparation stage is often overlooked, but it makes a huge difference in the outcome of the project.
The first step in creating the Amigurumi Mini Cow – Pattern is starting with the head. Typically, this involves making a magic ring and working single crochet stitches in spirals. The head is usually formed as a round ball, gradually increasing the number of stitches before decreasing to shape it properly. Once complete, safety eyes are attached securely, and the head can be stuffed firmly to give it its rounded form.
Next, the body is crocheted in a similar way, though slightly larger than the head. The body provides balance and stability to the cow, making it sturdy enough to stand or sit as a display piece. Attention should be given to stuffing evenly, as lumps or loose filling can distort the shape. A tightly stuffed body results in a professional-looking piece that holds its shape over time.
After the body and head are completed, they are sewn together using a yarn needle. This step requires patience and precision, as it determines how proportional the final cow will appear. Ensuring the head is aligned with the body is key to achieving that adorable amigurumi look. Beginners often find this part challenging, but with practice, it becomes easier and more enjoyable.
Once the main structure is in place, it is time to work on the smaller details such as ears, arms, and legs. These are usually small cylindrical or oval shapes that are attached symmetrically to the body. The ears give the cow its recognizable silhouette, while the arms and legs add character and playfulness. Each part is stuffed lightly before being sewn on, giving the cow a soft but defined appearance.
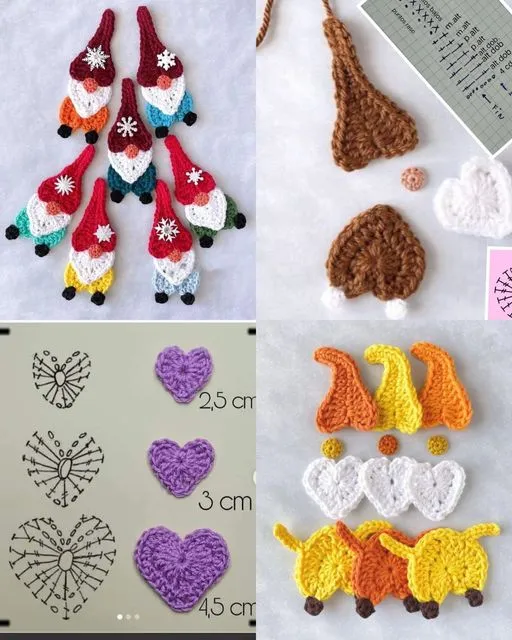
The final touch is the addition of the cow’s spots and tail. Spots can be crocheted separately as small flat circles and sewn onto the body in random patterns. This step is where creativity shines, as no two cows need to look alike. The tail is a simple crochet chain with a small tuft at the end, adding charm and realism.
By following this sequence step by step, even beginners can successfully complete the Amigurumi Mini Cow – Pattern. The key is to work slowly, pay attention to details, and enjoy the journey of bringing this little character to life.
One of the best tips for making a flawless Amigurumi Mini Cow – Pattern is to keep your tension consistent. Loose stitches can make the toy floppy, while overly tight stitches can make it difficult to crochet and insert stuffing. Practicing tension control ensures your cow looks neat and professional.
Another trick is to use invisible decreases instead of standard decreases. This technique creates a smoother surface and prevents unsightly gaps in the fabric. Many experienced crocheters consider invisible decreases essential for amigurumi work.
For beginners, it’s also wise to count your stitches carefully. Even a small mistake can throw off the symmetry of your cow. Using a stitch counter or simply checking your rounds regularly helps avoid having to unravel large portions of your work.
Color changes are another area where practice makes perfect. To achieve clean transitions between white and black or brown yarn, it’s important to change colors in the last step of the stitch before the new color begins. This ensures the new shade appears seamless and professional.
When assembling parts, pinning them in place before sewing helps maintain symmetry. This step may seem unnecessary, but it saves time and prevents the frustration of uneven arms or ears. It also gives you a preview of how the finished cow will look.
Lastly, remember that each cow can have its own personality. Some crafters like to give their cow a smiling embroidered mouth, while others prefer a neutral expression. Experimenting with facial expressions and accessories makes every Amigurumi Mini Cow – Pattern unique and special.
One of the most enjoyable aspects of the Amigurumi Mini Cow – Pattern is the variety of ways it can be used. These little cows make excellent gifts for birthdays, baby showers, or holidays. Because they are handmade, they carry a sentimental value that store-bought toys cannot match.
Crafters also use mini cows as decorative pieces. Placed on a shelf, desk, or nursery room, they add warmth and charm to any space. Some people even create themed collections, pairing their mini cow with other amigurumi animals to form a cute farm display.
Another popular use is turning the mini cow into a keychain or bag charm. By simply attaching a metal ring or clasp, you can carry your cow everywhere you go. This makes it not only a fun accessory but also a great conversation starter.
For those who sell handmade crafts, the Amigurumi Mini Cow – Pattern can be turned into a profitable product. Its small size means it requires less time and material compared to larger projects, making it ideal for selling at fairs or online shops. Buyers are often drawn to unique, handmade items that showcase creativity and care.
Educationally, making amigurumi helps children and beginners learn patience, hand-eye coordination, and creativity. The mini cow can even be used as a teaching tool for crochet classes, demonstrating essential techniques in a manageable project.
Finally, the mini cow can serve as a keepsake or heirloom. Parents often treasure handmade toys as reminders of their children’s early years, and a well-made amigurumi cow can last for many years if cared for properly.
1. Is the Amigurumi Mini Cow – Pattern suitable for beginners?
Yes, this pattern is great for beginners because it uses basic stitches like single crochet, increases, and decreases. With patience and practice, anyone can complete it successfully.
2. How long does it take to make the Amigurumi Mini Cow?
The time depends on your skill level. Beginners may take a few days working a little each day, while experienced crocheters can finish it in just a few hours.
3. What size will the finished mini cow be?
The finished size usually ranges between 10 to 15 cm tall, depending on the yarn and hook size used. Thinner yarn makes a smaller cow, while thicker yarn creates a slightly larger one.
4. Can I use different colors for the Amigurumi Mini Cow – Pattern?
Absolutely! While traditional cows are white with black or brown spots, you can use any color combination you like, including pastel or bright shades.
5. Do I need safety eyes for this project?
Safety eyes are optional. They give a polished look, but you can also embroider the eyes with black yarn for a child-safe alternative.
6. Is the Amigurumi Mini Cow washable?
Yes, but it’s best to hand wash it gently and let it air dry. Machine washing may damage the stuffing or loosen the stitches.
From choosing the right materials to mastering basic stitches and adding personal touches, this pattern offers both simplicity and creativity.
Whether you make it as a gift, decoration, or even a product to sell, the mini cow is sure to bring joy to anyone who sees it.
If you try this project, feel free to share your opinion and suggestions—we would love to hear your experiences and see how your little cow turns out.


