Crochet Pig In A Granny Square Blanket Pattern


Creating an Amigurumi turtle crochet pattern is a delightful project for crochet enthusiasts of all skill levels. This charming little turtle is not only cute but also a wonderful gift for children, friends, or anyone who appreciates handmade crafts.
One of the most appealing aspects of this Amigurumi turtle crochet pattern is its versatility. You can choose to make a small keychain version, a medium-sized toy, or even a larger decorative piece.
Additionally, working on an Amigurumi turtle crochet pattern can be a therapeutic and relaxing activity. Many crafters find that the repetitive motions of crocheting reduce stress and provide a sense of accomplishment.
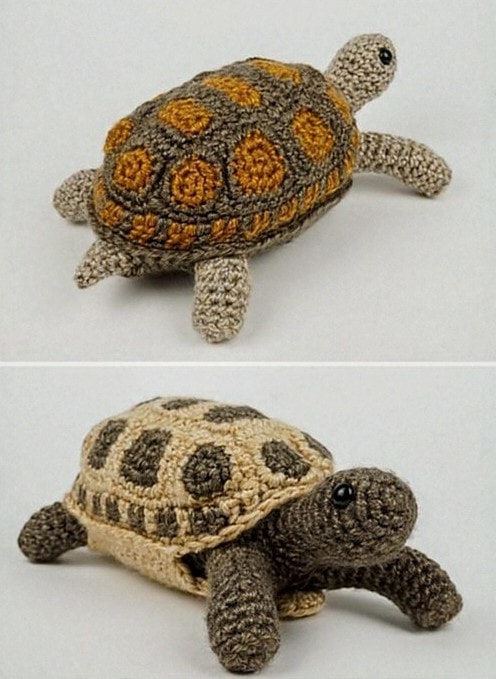
The first step in mastering the Amigurumi turtle crochet pattern is understanding its structure. Amigurumi is a Japanese technique for creating small, stuffed yarn creatures, and this turtle pattern follows that tradition. The pattern typically includes separate pieces for the head, shell, body, legs, and tail, all of which are sewn together at the end. This modular approach ensures that the finished turtle is proportionate and well-balanced.
Using high-quality yarn and the appropriate crochet hook is essential to achieving the perfect texture for your Amigurumi turtle crochet pattern. Acrylic or cotton yarns are commonly recommended because they hold their shape well and provide a smooth finish. Additionally, selecting a hook size that complements your chosen yarn ensures that your stitches are tight enough to prevent stuffing from showing through while still being easy to work with.
Color selection is another important consideration in the Amigurumi turtle crochet pattern. While green shades are traditional for turtles, you can choose any color combination you like. Experimenting with soft pastels or bright, bold colors can create a more whimsical or playful version. Adding small details, such as embroidered eyes or patterns on the shell, enhances the character and uniqueness of your finished piece.
This pattern also emphasizes the importance of consistent tension. Maintaining even stitches throughout the project ensures that each part of the turtle fits together smoothly. By carefully following the instructions and counting stitches accurately, you can avoid common mistakes and produce a professional-looking Amigurumi turtle crochet pattern.
Before starting the Amigurumi turtle crochet pattern, it’s crucial to gather all necessary materials. Basic supplies include yarn, a crochet hook, a yarn needle, stuffing, and safety eyes or embroidery thread for facial features. Having everything prepared in advance streamlines the process and allows you to focus entirely on crafting.
Selecting the right yarn is particularly important for the Amigurumi turtle crochet pattern. Soft, medium-weight yarns like worsted weight or DK yarn work well, as they provide structure without being too stiff. Cotton yarn offers a smooth finish and durability, while acrylic yarn is easier to maintain and comes in a wide range of colors.
A suitable crochet hook is also essential. Using the recommended size ensures that your stitches are tight enough to hold the stuffing inside without leaving gaps. Most Amigurumi turtle crochet patterns suggest using a slightly smaller hook than usual to achieve a dense, sturdy fabric. This technique helps maintain the shape of the turtle and prevents it from becoming floppy.
Stuffing material plays a vital role in the final appearance of your Amigurumi turtle crochet pattern. Polyester fiberfill is commonly used because it is lightweight, washable, and hypoallergenic. Stuffing should be added gradually to each piece, ensuring that the turtle maintains its form without becoming overstuffed or lumpy.
Additional tools, such as a yarn needle, stitch markers, and scissors, make assembling the turtle easier. Stitch markers help keep track of rounds and ensure that increases and decreases are placed accurately. A yarn needle is essential for sewing parts together neatly and weaving in ends for a polished finish.
Finally, safety eyes or embroidery thread can bring your Amigurumi turtle crochet pattern to life. These small details add character and charm, giving your turtle a friendly and expressive face. Embroidering features instead of using plastic eyes is also a great choice for toys intended for young children, as it eliminates any choking hazards.
The Amigurumi turtle crochet pattern is divided into sections for the head, body, shell, legs, and tail. Each section is worked separately and then assembled to create the final turtle. Following step-by-step instructions ensures accuracy and consistency throughout the project.
Begin with the head, which is typically worked in continuous rounds. This method creates a smooth, rounded shape that forms the turtle’s face. The pattern usually includes instructions for increasing and decreasing stitches to shape the head properly.
Next, work on the body, which connects to the head. The body is often made slightly oval or rounded, providing a stable base for the turtle. The Amigurumi turtle crochet pattern requires careful counting of stitches to maintain symmetry and proportion.
The shell is the centerpiece of the turtle. Many patterns suggest creating a separate piece that is slightly domed to mimic a real turtle shell. You can use different colors, stripes, or crochet motifs to add texture and visual interest. This customization makes each turtle unique.
The legs and tail are smaller pieces worked individually. Attaching them securely to the body ensures that your Amigurumi turtle crochet pattern can sit upright and maintain its shape. Some crafters prefer slightly flexible stuffing in the legs for a more realistic, poseable effect.
Finally, assemble all the pieces by sewing them together. Use a yarn needle to join edges neatly, hiding any loose ends inside the stuffing. Adding facial features, such as embroidered eyes, a mouth, or other embellishments, completes the charming look of your Amigurumi turtle crochet pattern.
Customizing your Amigurumi turtle crochet pattern adds personality and uniqueness to your creation. Experimenting with different yarn colors and textures allows you to create turtles that reflect your personal style or match specific themes.
Adding embroidery details is a simple way to enhance your Amigurumi turtle crochet pattern. You can stitch patterns on the shell, cheeks, or even create tiny accessories like a scarf or bow. These details make your turtle stand out as a handmade work of art.
You can also adjust the size of the turtle by using different yarn weights and hook sizes. Larger yarn and hooks create bigger turtles, perfect for cuddling, while smaller options make miniature toys or keychain charms. This flexibility ensures that your Amigurumi turtle crochet pattern can fit any purpose or occasion.
Another way to customize your turtle is by varying the shape of the shell. Some patterns suggest a perfectly round shell, while others allow for slightly oval or textured designs. Experimenting with shell shapes adds depth and dimension to your final piece.
Consider using different stuffing techniques to create a firmer or softer turtle. Lightly stuffing each piece gives a more relaxed appearance, while densely stuffing provides a sturdier, sculpted shape. Adjusting the stuffing is a subtle way to influence the overall feel and functionality of your Amigurumi turtle crochet pattern.
Finally, creating themed turtles is a fun option. You can design holiday-themed turtles, color-coded for seasons or special events. Incorporating beads, buttons, or tiny accessories adds a playful touch while maintaining the handmade charm of your Amigurumi turtle crochet pattern.
Q: Is this pattern suitable for beginners?
Yes, the Amigurumi turtle crochet pattern is beginner-friendly, though some basic knowledge of crochet stitches like single crochet, increases, and decreases is helpful.
Q: What type of yarn is best for this pattern?
Medium-weight acrylic or cotton yarn is recommended. Acrylic is easy to maintain, while cotton provides a smooth, firm texture ideal for shaping.
Q: Can I make the turtle in different sizes?
Absolutely. Using different yarn weights and crochet hooks allows you to create small, medium, or large turtles. Adjusting the hook size also affects the tightness of the stitches.
Q: How do I attach the legs and tail securely?
Use a yarn needle to sew the pieces to the body, ensuring tight, even stitches. Stuff the legs and tail lightly for a stable and balanced finished toy.
Q: Are there alternatives to safety eyes for children?
Yes, you can embroider the eyes and facial features with yarn or embroidery thread to make the toy completely safe for young children.
Q: Can I customize the shell design?
Yes, you can add stripes, motifs, or different colors to make each Amigurumi turtle crochet pattern unique. Experimenting with textures enhances its charm.
This pattern teaches valuable crochet skills, from basic stitches to shaping techniques, while allowing for endless customization options.
By following the step-by-step instructions, gathering the right materials, and experimenting with colors and textures, you can create a unique turtle that is both charming and functional.
We encourage you to try this Amigurumi turtle crochet pattern and share your results. Leave your honest feedback and suggestions to inspire others and help improve future patterns.
This handmade turtle is more than just a toy—it’s a labor of love that can bring joy and creativity to anyone who sees it.


