Crochet Pig In A Granny Square Blanket Pattern


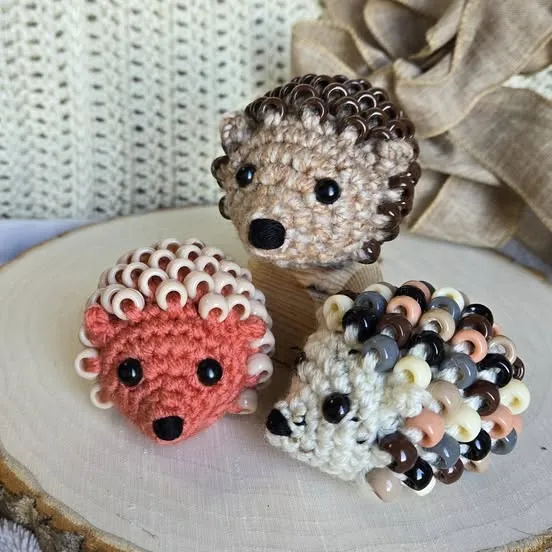
The Fidget Hendgohog Crochet Pattern has quickly become a favorite among crochet enthusiasts and crafters who enjoy making fun and tactile creations.
The beauty of this pattern is its versatility; you can customize the colors, size, and even the type of yarn to create a unique creation every time.
One of the standout features of the Fidget Hendgohog Crochet Pattern is its accessibility. You do not need to be a crochet master to complete this project.
To get started with the Fidget Hendgohog Crochet Pattern, you will need a few essential materials. First, choose a soft yarn in the colors you prefer for your hedgehog’s body and spikes. Cotton or acrylic yarn works best for durability and a pleasant texture. A crochet hook appropriate for your chosen yarn is also necessary; most patterns recommend a size that allows for tight stitches to maintain the hedgehog’s shape.
Additionally, you will need a small amount of fiberfill stuffing to give your Fidget Hendgohog its three-dimensional form. Safety eyes or embroidery floss can be used to create the eyes and nose, adding personality to your creation. Stitch markers, a yarn needle, and scissors are helpful tools that will make the assembly process smoother. Ensuring that you have all materials on hand before starting will make your crafting experience enjoyable and stress-free.
Choosing the right materials is crucial for the success of your Fidget Hendgohog Crochet Pattern. The softness of the yarn impacts how pleasant the hedgehog feels when handled, while the strength and elasticity of the stitches influence the durability of the final product. Take the time to select colors and textures that appeal to you, as this will enhance both the crafting process and the final result.
Working with the correct materials also ensures that your Fidget Hendgohog will have the proper shape and fidget-friendly qualities. Using stuffing that is too firm or yarn that is too loose can result in a hedgehog that does not maintain its form or provide satisfying tactile feedback. Following the material recommendations in the pattern is an essential step toward achieving the perfect handmade hedgehog.
Lastly, personalizing your Fidget Hendgohog Crochet Pattern with accessories such as small bows or tiny scarves can make it even more unique. These small touches allow you to add character and individuality to your project. Whether you intend to gift it, sell it, or keep it for yourself, the right materials combined with creative touches will elevate your hedgehog to a charming and functional fidget toy.
Having all the proper materials ready before starting also reduces frustration and helps maintain focus on the enjoyable aspects of crocheting. With preparation complete, you can dive into the Fidget Hendgohog Crochet Pattern with confidence, knowing that your final creation will be both delightful and durable.
The Fidget Hendgohog Crochet Pattern provides a detailed guide to create a small, handheld hedgehog that is perfect for fidgeting or gifting. Begin by crocheting the body of the hedgehog using single crochet stitches. The pattern typically starts with a magic ring to form a tight, round base, which is essential for the hedgehog’s shape. Gradually increase stitches to shape the body, following the pattern carefully for the correct proportions.
Once the body is complete, you will move on to creating the spikes. The spikes are typically crocheted separately and attached individually or in rows to the hedgehog’s back. Using the right stitch technique is crucial for the spikes to hold their shape and give your Fidget Hendgohog its characteristic texture. This step requires patience but contributes significantly to the toy’s tactile appeal.
After attaching the spikes, focus on the facial features. Using safety eyes, embroidery floss, or small beads, create the eyes and nose to give your Fidget Hendgohog a charming expression. Placement is important; following the pattern’s instructions ensures a symmetrical and visually appealing face. You can also embroider small details like a smile or eyebrows to enhance personality.
Stuffing the hedgehog properly is another key step in the Fidget Hendgohog Crochet Pattern. Use fiberfill stuffing sparingly at first, then gradually add more to maintain a firm yet squeezable texture. Overstuffing can distort the shape, while under-stuffing may result in a floppy toy. The goal is to create a hedgehog that is both soft and resilient.
Finally, secure all stitches and weave in any loose ends using a yarn needle. Check the spikes and body for uniformity, and adjust any areas as needed. Your Fidget Hendgohog should now be complete, with a pleasing appearance, satisfying texture, and durable construction.
Following these step-by-step instructions ensures that even beginners can successfully complete the Fidget Hendgohog Crochet Pattern. The result is a playful, fidget-friendly hedgehog that provides enjoyment and stress relief for anyone who handles it.
When working on the Fidget Hendgohog Crochet Pattern, paying attention to small details can greatly improve the final product. One tip is to use stitch markers to keep track of rounds, especially when crocheting the spikes. This ensures that your hedgehog’s back remains symmetrical and tidy. Consistency in stitch tension is another key factor; uneven stitches can affect the hedgehog’s shape and texture.
Selecting the right yarn for your Fidget Hendgohog is equally important. Softer yarn creates a more pleasant tactile experience, while slightly firmer yarn may help the spikes stand up better. Combining yarn textures can add depth and dimension, making your hedgehog even more visually appealing.
Experimenting with different sizes is another way to enhance your Fidget Hendgohog Crochet Pattern experience. Smaller versions make great keychains or decorations, while larger versions serve as comfortable fidget toys or display pieces. Adjusting hook size and yarn thickness allows you to customize each hedgehog to your preference.
Pay attention to the stuffing technique when working with your Fidget Hendgohog Crochet Pattern. Gradually add fiberfill and shape it with your fingers to maintain a smooth, firm texture. This ensures that the toy remains squeezable without losing its form.
Adding personalized touches can elevate your Fidget Hendgohog. Consider embroidering initials, adding tiny accessories, or even experimenting with different facial expressions. These small adjustments make each hedgehog unique and special, perfect for gifts or personal use.
Lastly, practicing patience is crucial. Crocheting a detailed item like a Fidget Hendgohog takes time, but the result is rewarding. Taking breaks, reviewing instructions carefully, and enjoying the process will lead to a beautiful and functional finished product.
Even experienced crafters can make mistakes when following the Fidget Hendgohog Crochet Pattern, but knowing what to avoid can save time and frustration. One common error is incorrect stitch counting, which can distort the hedgehog’s body. Always double-check your counts at the end of each round to ensure accuracy.
Skipping important steps, such as securing spikes properly, can affect the toy’s durability and tactile quality. The spikes are essential for the characteristic fidget experience, so attaching them carefully is crucial.
Overstuffing or understuffing the hedgehog can also create problems. Too much stuffing can cause the hedgehog to lose shape, while too little can make it floppy and unsatisfying to handle. Follow the stuffing guidelines in the Fidget Hendgohog Crochet Pattern for the best results.
Using the wrong yarn or hook size is another common issue. Thicker yarn with a smaller hook can make the toy dense and hard, while thinner yarn with a large hook may create loose stitches that compromise the structure. Matching the yarn and hook as recommended in the pattern ensures optimal results.
Rushing through the project often leads to uneven stitches, asymmetry, and a less polished final product. Take your time to follow the instructions carefully, and enjoy the creative process of the Fidget Hendgohog Crochet Pattern.
Finally, ignoring finishing touches like weaving in ends or checking spike placement can detract from the overall quality. Attention to detail ensures a neat, professional, and functional fidget toy.
Q1: Is the Fidget Hendgohog Crochet Pattern suitable for beginners?
Yes, this pattern is beginner-friendly. It uses basic stitches and provides clear instructions, making it accessible for anyone new to crochet.
Q2: What type of yarn works best for the Fidget Hendgohog?
Soft cotton or acrylic yarn is ideal. Choose colors and textures that enhance both appearance and tactile feel.
Q3: Can I make the hedgehog larger or smaller?
Absolutely. Adjust the hook size and yarn thickness to create hedgehogs of various sizes for different purposes.
Q4: How do I ensure the spikes stay upright?
Use the recommended stitch technique and yarn tension. Some crafters layer stitches or use slightly firmer yarn for better spike stability.
Q5: Can the Fidget Hendgohog be washed?
Hand washing with mild soap is safest. Avoid machine washing, as it may damage stitches and stuffing.
Q6: How long does it take to complete one hedgehog?
Completion time varies depending on experience, but most crafters can finish in 3-5 hours.
Q7: Can I customize the hedgehog’s face?
Yes, you can embroider different facial expressions, use beads, or adjust the eyes and nose placement for a unique look.
Q8: Is this pattern suitable for gifts?
Absolutely. Handmade Fidget Hendgohog toys make thoughtful, personal gifts for both children and adults.
By following the steps outlined in this article, you can create a delightful hedgehog that is perfect for fidgeting, gifting, or displaying.
From selecting the right materials to mastering the stitch techniques and adding personal touches, this pattern combines simplicity and charm.
Avoiding common mistakes and practicing patience ensures that your hedgehog is both durable and visually appealing.


