Crochet Pig In A Granny Square Blanket Pattern


If you have ever dreamed of blending creativity, nostalgia, and skill, learning How to Crochet a Mini Vintage Carava might be the perfect project for you. This charming crochet pattern captures the look of a retro caravan in miniature form, making it a delightful decoration or a thoughtful handmade gift.
Whether you are a beginner who wants to take on a fun challenge or an experienced crocheter looking for something unique, this tutorial will walk you through the process step by step.
What makes the idea of How to Crochet a Mini Vintage Carava so appealing is its mix of vintage style and modern crafting techniques.
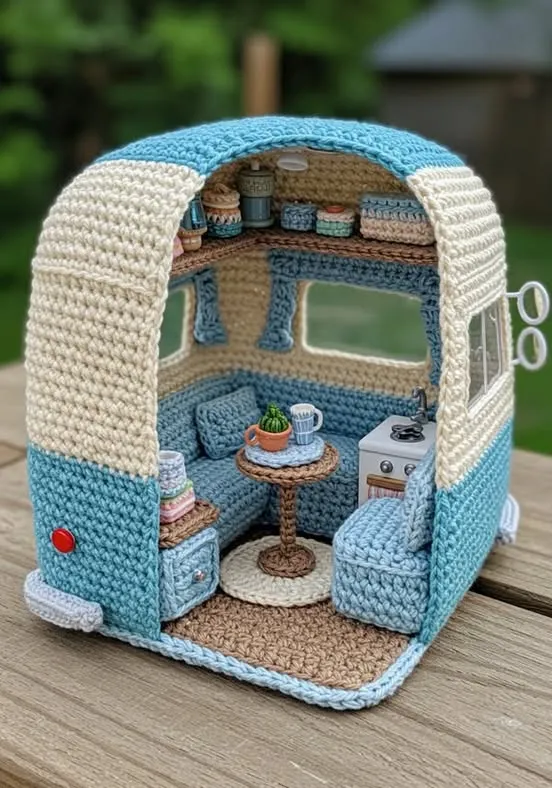
The project brings together colorful yarns, simple stitches, and imaginative details to recreate the look of a cozy caravan. With a few basic materials and some patience, you can crochet a piece that stands out and sparks conversations whenever someone sees it.
The beauty of this project lies in its flexibility. While this guide shows you the basic structure, you can easily customize your caravan with different colors, trims, and embellishments. You could crochet a classic pastel design, or you might prefer a bold and vibrant version that reflects your personality.
No matter which path you choose, this How to Crochet a Mini Vintage Carava tutorial ensures you end up with a project that is both satisfying to make and beautiful to display.
Before you begin, gathering the right materials will make your How to Crochet a Mini Vintage Carava experience much smoother. Choosing the right yarn is one of the most important steps. Lightweight cotton yarn is ideal because it holds its shape well, comes in a wide variety of colors, and produces clean stitches that look neat in a small project.
A crochet hook that matches the yarn weight is also essential. For most mini crochet projects, a hook size between 2.5mm and 3.5mm works well. Using a smaller hook creates tighter stitches, which helps the caravan maintain its structure without becoming too floppy.
Stuffing is another key material. Polyester fiberfill is the most common choice, as it is lightweight, easy to use, and holds its shape over time. You will need enough stuffing to fill the body of the caravan and give it a firm appearance.
Additional materials include a yarn needle for sewing pieces together, scissors for trimming, and stitch markers to keep track of your rounds. These small tools may seem simple, but they make the project more organized and enjoyable.
For decoration, you can use buttons, beads, or embroidery thread to create windows, wheels, or small details that enhance the vintage look. The choice of embellishments allows you to get creative and add personal touches to your mini caravan.
Finally, having a pattern or sketch of the design helps you stay on track. Even though this is a small project, breaking it into manageable steps ensures you do not miss important details. With all these materials ready, you are well-prepared to begin the journey of How to Crochet a Mini Vintage Carava.
The first step in How to Crochet a Mini Vintage Carava is creating the base. This is typically done with a simple oval or rectangular shape, crocheted in rounds or rows depending on the style you prefer. The base provides the foundation on which the rest of the caravan is built.
Once the base is complete, you will crochet the walls of the caravan. This usually involves working in continuous rounds to build height. The key is to keep the stitches tight and even, so the structure remains sturdy. You can experiment with different colors at this stage, perhaps using stripes to mimic the look of painted panels on a vintage caravan.
The roof is the next step, and it often requires shaping to give the caravan its iconic rounded top. Using increases and decreases in your stitches, you can create a curved roof that sits neatly on top of the walls. This part may take patience, but it is one of the most rewarding aspects of the project.
Adding details such as windows and doors brings your caravan to life. These can be crocheted as small separate pieces and sewn onto the body, or they can be embroidered directly onto the walls with yarn or thread. Whichever method you choose, these details add charm and personality.
The wheels are another fun element. They can be made as flat circles and attached to the sides of the caravan, giving it a realistic touch. Buttons can also be used as wheels if you want a quicker option.
Finally, assemble all the pieces together and stuff the caravan firmly. Be sure to close seams securely with a yarn needle, so the stuffing does not escape. With this step complete, your How to Crochet a Mini Vintage Carava project begins to take its final form.
One of the best things about How to Crochet a Mini Vintage Carava is the opportunity to personalize your creation. Start with color choices. You could make a caravan in classic pastel shades for a soft retro look, or go bold with bright reds, yellows, and blues for a cheerful design.
You can also add decorative details like bunting or curtains. Crocheting tiny triangles and attaching them as bunting gives the caravan a festive feel. Small fabric or crochet curtains behind the windows add a cozy, lived-in touch.
For added texture, consider using different stitch patterns in parts of the caravan. For example, a textured stitch on the roof can make it stand out, while simple stitches on the walls keep the design balanced.
Adding embellishments such as beads, sequins, or embroidery can make your caravan even more unique. These small details capture attention and showcase your creativity.
Think about functional uses as well. Instead of leaving the caravan as a simple decoration, you could turn it into a pincushion, a keychain, or even a small toy. These practical adaptations make the project even more rewarding.
Finally, don’t be afraid to experiment. The instructions in How to Crochet a Mini Vintage Carava give you a solid starting point, but your imagination is what truly makes the project shine.
Working on How to Crochet a Mini Vintage Carava can be enjoyable, but like any project, it comes with challenges. To help you succeed, here are some tips and tricks. First, always keep your tension even. Tight and loose stitches mixed together can cause the caravan to look uneven or lopsided.
Using stitch markers is especially helpful when working in continuous rounds. They ensure you don’t lose track of where each round begins, keeping your project neat and symmetrical.
Take time to stuff the caravan properly. Too little stuffing will make it sag, while too much can stretch the stitches. Add small amounts gradually and distribute the filling evenly for the best result.
If you are new to crochet shaping, practice increases and decreases on a scrap piece of yarn first. This builds confidence and helps you avoid mistakes when working on the actual caravan.
Don’t rush through the details. Small features like windows and wheels may seem minor, but they contribute greatly to the finished look. Taking extra care with them will make your caravan stand out.
Lastly, enjoy the process. The charm of How to Crochet a Mini Vintage Carava is not only in the finished item but also in the journey of creating it stitch by stitch.
Q1: Is the Mini Vintage Carava suitable for beginners?
Yes, beginners can attempt this project, especially if they are familiar with basic stitches like single crochet and double crochet.
Q2: How long does it take to make one caravan?
Depending on your skill level, it can take anywhere from a few hours to a couple of days to complete.
Q3: What yarn is best for this project?
Cotton yarn works best because it provides structure, but you can also use acrylic yarn if you prefer softer results.
Q4: Can I wash the finished caravan?
Yes, if you use washable yarn and stuffing. However, hand washing is recommended to preserve the shape and details.
Q5: Can I scale the pattern to make a larger version?
Yes, by using thicker yarn and a larger hook, you can create a bigger caravan with the same pattern.
Q6: What can I use the Mini Vintage Carava for?
It can be a decoration, a pincushion, a gift, or even a fun toy depending on how you finish it.
Learning How to Crochet a Mini Vintage Carava is a rewarding journey that combines creativity, nostalgia, and skill. From choosing materials to adding the final details, each step allows you to put your personality into the project. Whether you keep it as a charming decoration, turn it into a practical item, or gift it to someone special, the mini vintage caravan is a project that always brings joy.
I hope this tutorial has inspired you to try this crochet design for yourself. Please share your honest opinion and suggestions—I would love to hear how your version of the Mini Vintage Carava turned out and what creative touches you added.


