Crochet Pig In A Granny Square Blanket Pattern


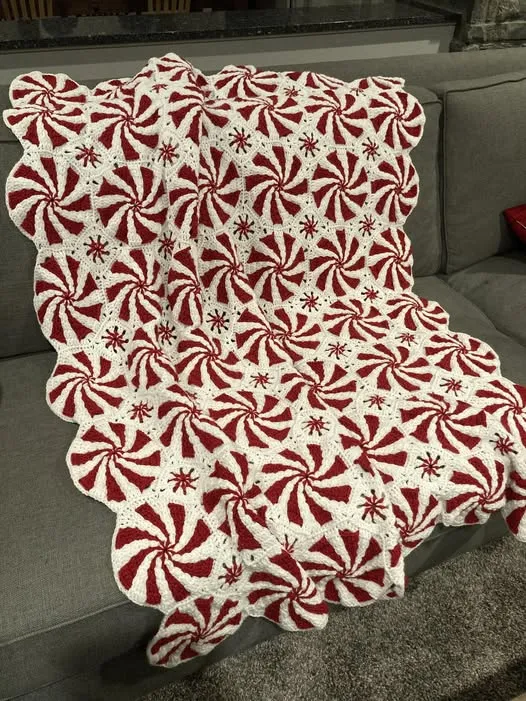
The Peppermint Throw – Free Pattern is a delightful crochet project that captures the warmth and charm of the holiday season. Inspired by the classic peppermint candy swirl, this throw brings festive cheer and cozy comfort into any home.
With its spiraling red and white design, it’s a project that looks intricate but is surprisingly fun and straightforward to create. Whether you’re crocheting it for yourself or as a handmade gift, the Peppermint Throw will quickly become a seasonal favorite.
Crocheting the Peppermint Throw – Free Pattern is a joyful experience, as it combines color play and repetition in a relaxing rhythm.
The pattern involves simple rounds that build upon each other, creating a mesmerizing swirl effect reminiscent of peppermint candies. Even if you’re new to crocheting, this guide will help you master the technique while enjoying every stitch.
The best part about the Peppermint Throw is its versatility. It’s perfect for Christmas décor, a cozy blanket for cold evenings, or even a striking year-round accent piece. The bold color contrast and soft texture make it both visually appealing and comfortable. With this Free Pattern, you can easily follow along, customize your size, and finish with a professional-looking piece that showcases your creativity.
The Peppermint Throw – Free Pattern is built around the concept of a swirl, typically using alternating rounds of red and white yarn to mimic peppermint candy. Each round expands outward in a continuous spiral, and the clever color changes give the illusion of movement and depth.
To start, you’ll work from the center outwards using a magic ring or adjustable loop. This allows for a tight, neat center without gaps. The basic structure uses double crochet stitches with strategic increases to maintain the circular shape.
As you work, each color band spirals naturally around the throw, forming the signature peppermint swirl. You can use traditional red and white for a classic Christmas look or experiment with other combinations — such as red and cream for a vintage feel, or pastel shades for a softer version suitable for any season.
Yarn choice is also important for the Peppermint Throw Pattern. A medium-weight yarn (category 4) works perfectly for warmth and definition. Acrylic yarns hold their shape well, while cotton blends provide a soft, breathable finish. Choose a yarn that offers good stitch clarity to enhance the swirl effect.
Maintaining consistent tension is essential to keep your spiral balanced. Loose stitches can distort the pattern, while tight stitches may cause the throw to curl. Practicing even tension and counting your increases carefully ensures a smooth, flat result.
Finally, this pattern can be customized easily. You can make smaller versions as table mats or larger ones for bed throws simply by continuing to add rounds. The structure of the Peppermint Throw – Free Pattern makes scaling effortless.
To begin your Peppermint Throw – Free Pattern, gather your supplies: two skeins of red yarn, two skeins of white yarn, a crochet hook suitable for your yarn weight (typically 5mm or 5.5mm), and scissors with a yarn needle for finishing.
Step 1: Start with a magic ring in your first color (red). Chain three (counts as your first double crochet), then work eleven more double crochets into the ring. Join with a slip stitch to the top of the chain-three. You’ll have twelve stitches total.
Step 2: Attach the second color (white). Chain three, then work two double crochets into the same stitch. One red stitch, two white stitches alternated around will begin to form the swirl effect. Continue this pattern around the circle.
Step 3: As you expand, follow a simple formula: increase evenly in each round by adding one additional double crochet per repeat. This maintains the circular shape while allowing the colors to twist naturally. Always change colors at the end of each round for crisp stripes.
Step 4: Continue alternating colors and increasing in each round until you reach the desired size. For a standard lap blanket, about 40–45 rounds usually works well. Larger afghans may need 60 or more rounds.
Step 5: Once the body is complete, finish with a decorative border. A scalloped edge in red adds a festive touch, while a simple single-crochet border in white keeps things classic.
Step 6: Weave in all ends carefully. Because of frequent color changes, secure each join neatly to prevent unraveling. Blocking your throw lightly with steam or water helps smooth out the swirl and set the stitches perfectly.
With these steps, your Peppermint Throw will be ready to display or gift, spreading handmade joy wherever it’s placed.
The Peppermint Throw – Free Pattern is all about precision, color, and flow. Following these tips will help you achieve flawless results.
First, always use high-contrast colors for a clear swirl effect. The traditional red and white combination is iconic, but you can experiment with red and green for a Christmas variation or pink and mint for a whimsical twist.
Second, use stitch markers at the start of each round. This helps you keep track of where one round ends and another begins, especially since spirals can sometimes appear continuous.
Third, when changing colors, avoid cutting yarn after each round. Instead, carry it loosely along the back to minimize weaving ends later. This keeps your work neat and efficient.
Fourth, maintain even tension throughout the throw. If your edges start to ripple, you may have added too many increases. If it curls, you may need more. Adjust as needed to keep your circle flat.
Fifth, take advantage of blocking. A light steam block will even out stitches and enhance the peppermint swirl pattern, making it look crisp and professional.
Lastly, have fun with customization. You can add tassels, pom-poms, or even a ruffled edge to give your Peppermint Throw a personalized flair that reflects your style.
Once you’ve mastered the Peppermint Throw – Free Pattern, the design possibilities are endless. You can adapt this pattern to create matching home accessories or alternative seasonal themes.
For a modern twist, try using gradient yarns. The gentle color transitions create a subtle peppermint effect without sharp contrasts.
If you love texture, alternate rows of standard double crochets with puff stitches to add dimension. The puff stitch gives the throw a soft, cloud-like surface while preserving the swirl layout.
Another idea is to use metallic or glitter-accented yarns for a holiday sparkle. Gold or silver accents between red and white rounds make your throw shimmer beautifully under festive lights.
You can also modify the pattern into a square or rectangular blanket. Simply stop increasing in rounds and start working in straight rows, maintaining the stripe pattern for a contemporary look.
For smaller projects, scale down the pattern to create matching coasters, pillow covers, or tree skirts. The Peppermint Throw Pattern adapts perfectly to smaller designs while maintaining its charm.
Finally, experiment with multi-tone peppermint styles, such as red-white-green combinations or candy-inspired pastel colors. Each variation brings a unique character to the traditional peppermint motif.
Q: Is the Peppermint Throw – Free Pattern suitable for beginners?
A: Yes, it’s beginner-friendly. The pattern uses basic stitches like double crochet and simple color changes, making it easy to follow even if you’re new to crochet.
Q: What yarn works best for this project?
A: Medium-weight acrylic yarn is ideal. It’s soft, durable, and easy to care for, ensuring your throw remains vibrant and cozy.
Q: Can I make this throw larger or smaller?
A: Absolutely. Simply continue adding rounds to make it larger or stop earlier for a smaller blanket. The spiral design expands naturally.
Q: How do I get clean color transitions?
A: Always change colors at the end of a round and pull the new yarn through during the final stitch of the previous color. This keeps joins smooth and invisible.
Q: Can I wash the Peppermint Throw in a machine?
A: Yes, most acrylic yarns are machine-washable. Use a gentle cycle with cold water and lay flat to dry to preserve shape.
Q: How long does it take to make the Peppermint Throw?
A: Depending on your pace, it typically takes between 10 to 15 hours to complete. It’s a great weekend or holiday project.
Q: Can I use other colors besides red and white?
A: Of course! Try red and green for Christmas, pink and mint for spring, or blue and white for a winter theme. The swirl looks beautiful in any combination.
The Peppermint Throw – Free Pattern is a wonderful crochet project that combines simplicity, creativity, and festive beauty. Its spiraling design brings a sense of joy and nostalgia, while the repetitive stitches make it a relaxing project for all skill levels. With just two colors and basic techniques, you can create a stunning piece that brightens your home and warms your heart.
Whether you choose to follow the traditional peppermint look or experiment with your own color palette, the Peppermint Throw is sure to become a cherished handmade treasure. Take your time, enjoy each round, and watch your swirl of color grow into something magical.


