Crochet Pig In A Granny Square Blanket Pattern


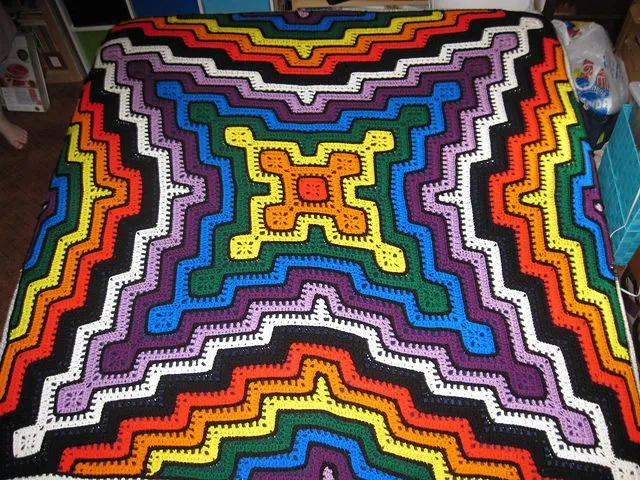
The Pronged Square and Ripple Blanket is a unique crochet project that combines geometric precision with flowing waves, resulting in a visually striking and cozy piece.
This pattern is perfect for both beginners and experienced crocheters who want to create a blanket that stands out. With its combination of pronged square motifs and ripple stitches, this blanket is as much an art piece as it is a functional accessory for your home.
Crocheting the Pronged Square and Ripple Blanket allows you to explore two complementary stitch patterns in one project.
The pronged squares provide structure and visual interest, while the ripple stitch adds softness and movement. Together, they create a harmonious balance that can enhance any room or serve as a perfect gift for loved ones.
Using this pattern encourages creativity with color and texture. The Pronged Square and Ripple Blanket can be made with a single color for a minimalist look or multiple colors to showcase a rainbow or gradient effect. Each section highlights the interplay between the rigid squares and fluid ripples, making the blanket dynamic and unique.
The pronged square is a crochet motif that features a central square with protruding “prongs” at each corner, giving it a distinctive geometric appearance. These squares can be made individually and later joined together or integrated directly into the ripple sections for a seamless design.
To begin a pronged square, start with a central ring, typically made with a magic circle or chain loop. Work a series of double crochets, chains, and slip stitches to form the square base. The prongs are created by extending stitches at each corner, which adds dimension and interest.
When creating multiple pronged squares, consistent tension is key to ensure uniformity across the blanket. Blocking each square after completion also helps maintain shape and alignment when joining motifs.
Color choices for pronged squares can dramatically impact the final look. Alternating contrasting colors between the central square and prongs creates a bold, eye-catching effect, while a monochromatic scheme emphasizes texture and stitch detail.
Joining pronged squares can be done using slip stitches, whip stitch, or single crochet seams, depending on whether you want a subtle or more prominent joining line. Each method changes the visual flow of the blanket.
Finally, pronged squares serve as focal points within the blanket, adding depth and structure. Their geometric design contrasts beautifully with the softness of the ripple sections, creating a balanced, harmonious piece.
The ripple stitch, also known as the chevron stitch, adds flowing waves to the blanket. Its peaks and valleys create a dynamic, rhythmic pattern that contrasts perfectly with the geometric pronged squares.
To create a ripple stitch, start with a foundation chain that is a multiple of the stitch repeat. The pattern typically alternates increases and decreases to form the wavy effect. Choosing a consistent stitch height, usually double crochet, ensures smooth ripples.
Ripple sections can be worked in solid colors or stripes to highlight the movement of the waves. Many crocheters enjoy combining the ripple with gradient yarns to achieve a flowing color transition, enhancing the blanket’s visual appeal.
Tension is critical when working the ripple stitch, especially if combining it with pronged squares. Uneven tension can distort the waves and misalign connections with square motifs. Practicing the ripple pattern on a swatch before starting the full blanket is highly recommended.
Joining ripple rows to pronged squares requires careful planning. Aligning the peaks of the ripples with the prongs’ edges ensures a smooth integration, maintaining visual flow without gaps or distortion.
The ripple stitch also allows for creative edge finishing. You can add scalloped, picot, or straight borders to frame the blanket, depending on the overall aesthetic you want to achieve.
The charm of the Pronged Square and Ripple Blanket lies in the combination of its two distinct patterns. By alternating or strategically placing squares and ripples, you can create a balanced design that is both structured and fluid.
Start by planning your layout. Decide how many pronged squares you want in each row and where the ripple sections will be integrated. Sketching a layout diagram can help visualize the final blanket.
Consider color placement carefully. Using a consistent palette throughout both motifs ensures harmony, while contrasting colors can make each section stand out dramatically.
When joining pronged squares and ripple rows, use consistent seam methods to maintain alignment. Slip stitching or single crochet joins work well to create seamless transitions between motifs.
Pay attention to overall dimensions. Measuring as you go prevents surprises at the end and ensures that the blanket is the intended size, whether it’s a lap blanket, throw, or full-sized bedspread.
Blocking the completed blanket is essential. It helps straighten the ripples, define the pronged squares, and smooth any uneven tension, giving the finished piece a polished, professional appearance.
Finally, add a finishing border if desired. A simple border in a contrasting color or a decorative scallop complements both the squares and ripples, framing the blanket beautifully.
Choose the right yarn for comfort and durability. A medium-weight acrylic or cotton blend works best for maintaining structure in the pronged squares while keeping ripples soft and flexible.
Maintain consistent tension throughout the project. Uneven tension can cause waves to become distorted or squares to appear uneven, affecting the overall look.
Work on a flat surface when joining motifs. This helps align pronged squares and ripple sections accurately, ensuring clean seams and smooth edges.
Experiment with color gradients, stripes, or blocks of contrasting hues to highlight the interplay between geometric and wavy patterns.
Take breaks during long sessions. Large blankets can be time-consuming, and stepping back allows you to evaluate layout, color, and tension.
Consider adding personalized touches like tassels, embroidery, or decorative edging to make your Pronged Square and Ripple Blanket truly unique.
Q: Is the Pronged Square and Ripple Blanket suitable for beginners?
A: Yes, with practice. Beginners can start with individual motifs or smaller ripple sections before attempting a full blanket.
Q: What type of yarn is best?
A: Medium-weight acrylic or cotton blends are ideal. They provide structure for squares and softness for ripples.
Q: Can I adjust the size of the blanket?
A: Absolutely. Increase or decrease the number of squares and ripple rows to achieve your desired dimensions.
Q: How do I join pronged squares to ripple sections?
A: Align edges carefully and use slip stitches or single crochet joins to maintain continuity.
Q: How do I prevent uneven ripples?
A: Maintain consistent stitch height and tension. Practice on a swatch before starting the full blanket.
Q: Can I use multiple colors?
A: Yes. Contrasting or gradient colors enhance both the pronged squares and ripple waves, adding visual interest.
Q: How should I care for the finished blanket?
A: Wash gently on a delicate cycle and lay flat to dry to preserve shape and texture.
The Pronged Square and Ripple Blanket is a stunning combination of geometric and flowing patterns, offering both challenge and satisfaction to crocheters of all skill levels. By mastering pronged squares and ripple stitches, you can create a blanket that is visually dynamic, cozy, and unique.
With careful planning, consistent tension, and thoughtful color choices, your blanket will be a standout piece in any home. Enjoy the creative process, share your experience, and let your finished Pronged Square and Ripple Blanket reflect your personal style and artistry.


