Crochet Pig In A Granny Square Blanket Pattern


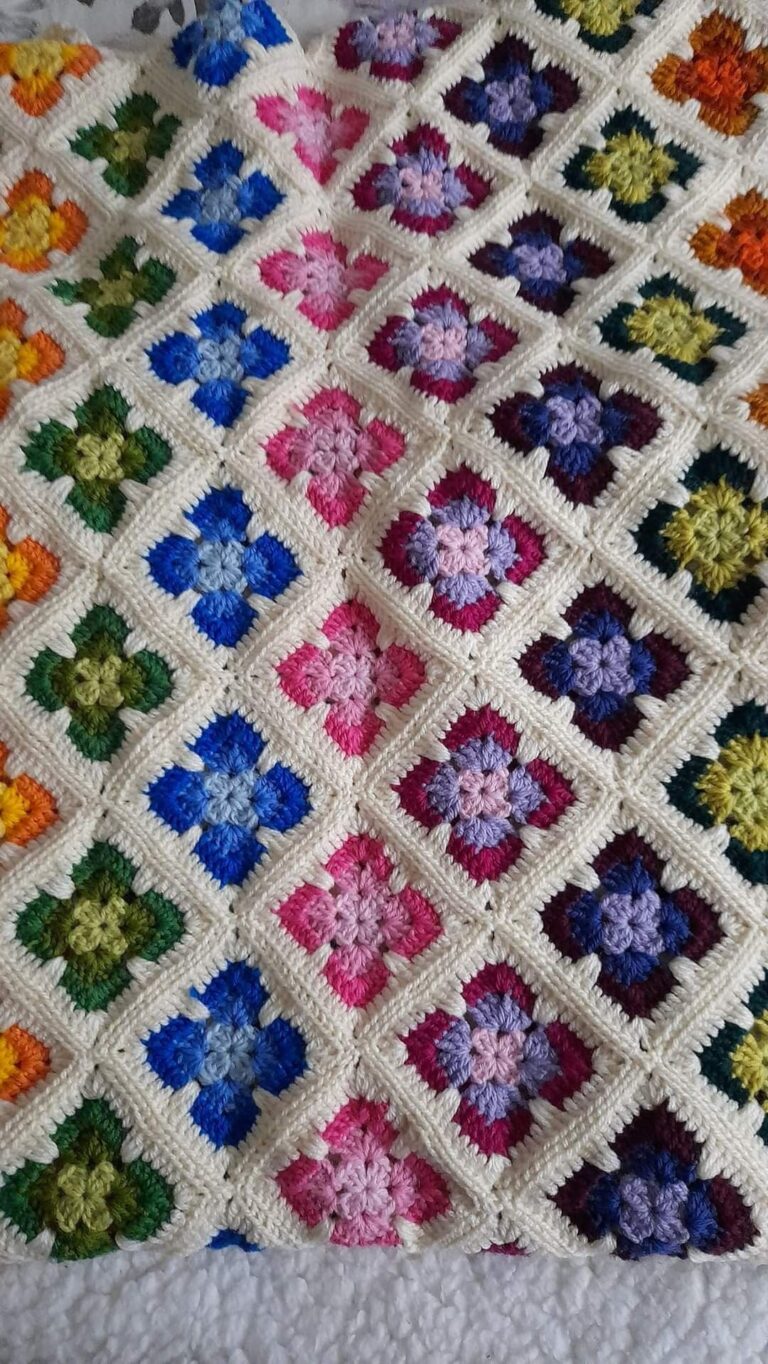
The Retro Vibe Square Pattern is a versatile and charming crochet design that brings a nostalgic touch to any project. Perfect for blankets, cushions, slippers, or decorative items, this pattern allows crafters to combine vibrant colors, geometric shapes, and classic granny square techniques.
By following this guide, you can learn how to create your own Retro Vibe Square Pattern while enjoying a relaxing and rewarding crafting experience.
Crocheting the Retro Vibe Square Pattern is ideal for both beginners and experienced makers. Its repetitive stitch structure makes it easy to follow, while the mix of colors allows for creative freedom.
You can tailor the pattern to match your personal style or home decor. Using this step-by-step guide ensures that every square is consistent, beautiful, and ready to be joined into larger projects.
One of the most appealing aspects of the Retro Vibe Square Pattern is its flexibility. You can experiment with yarn types, textures, and color combinations to achieve different effects. From plush wool for cozy blankets to cotton yarn for lightweight summer throws, the pattern adapts easily while maintaining its signature retro aesthetic.
Selecting the right colors and materials is crucial for a striking Retro Vibe Square Pattern. Retro designs often incorporate warm and earthy tones such as mustard yellows, burnt oranges, browns, and muted greens. Combining these shades with contrasting colors can make each square pop and enhance the vintage feel.
Yarn type also impacts the final result. Medium-weight acrylic or cotton yarns are ideal for most projects, providing structure while remaining soft and comfortable. Mixing textures, such as plush yarn with smooth cotton, adds depth and dimension to your squares, making your Retro Vibe Square Pattern stand out.
Crochet hook size determines stitch tension and square size. A slightly larger hook can give a looser, more flexible fabric, while a smaller hook results in tighter, sturdier stitches. Choosing the right combination ensures that your Retro Vibe Square Pattern squares are uniform and easy to assemble.
Pre-washing yarn can prevent shrinkage and color bleeding, especially important when mixing multiple colors in your Retro Vibe Square Pattern. It also ensures your finished project maintains its shape and vibrancy after washing.
Creating a small gauge swatch helps check your stitch tension and color choices. This step allows you to adjust hook size or yarn combinations before starting the full project, ensuring your Retro Vibe Square Pattern turns out perfectly.
Finally, gather all materials—yarn, crochet hooks, scissors, stitch markers, and tapestry needles. Having everything ready streamlines your workflow and makes crocheting the Retro Vibe Square Pattern an enjoyable and efficient experience.
To start your Retro Vibe Square Pattern, create a magic ring and work your first round of double crochet stitches. This forms the central point of your square and sets the foundation for the geometric design.
Each round introduces new colors and stitch combinations, building the characteristic layered look of the Retro Vibe Square Pattern. Chain spaces and clusters create texture, while consistent stitch counts ensure square symmetry.
Changing colors is a key feature of the Retro Vibe Square Pattern. By carefully planning color placement, you can emphasize contrast and retro aesthetics. Slip stitches and careful color transitions create clean lines and a polished appearance.
Work multiple rounds until your square reaches the desired size. Typical squares measure between 4 to 6 inches, but you can adjust based on project requirements. Consistency in stitch tension ensures that all squares match when assembled.
Joining squares is the next step. Use whip stitch, slip stitch, or crochet join methods to connect squares. The Retro Vibe Square Pattern naturally aligns due to uniform stitch counts, making assembly straightforward.
Finally, add finishing touches like borders or edging. Contrasting colors or scalloped edges enhance the retro charm and make the Retro Vibe Square Pattern visually striking while adding durability to your project.
The Retro Vibe Square Pattern is highly adaptable to various projects. For blankets, connect multiple squares in alternating colors to create a vibrant retro design. For cushions, a single square or small cluster can add decorative flair.
Slippers and wearable items benefit from the pattern’s geometric structure. Position the squares strategically for both visual appeal and comfort, creating unique handmade fashion pieces.
Decorative items such as wall hangings, tote bags, or table runners also work beautifully with the Retro Vibe Square Pattern. Its vintage aesthetic adds personality and charm to any space.
Mixing yarn textures allows for creative experimentation. Plush yarns give a soft, cozy feel, while smooth cotton highlights the geometric shapes, providing a professional and polished look.
Color planning is key. Combining muted retro tones with bright accent colors can make your project eye-catching, while still maintaining the classic vintage vibe of the Retro Vibe Square Pattern.
Finally, the pattern is suitable for both small projects and large-scale designs. Its repeatable structure ensures scalability without losing the retro charm that defines this classic crochet style.
Maintain consistent stitch tension throughout to ensure squares align properly during assembly. This is essential for achieving a neat Retro Vibe Square Pattern.
Plan your color sequence in advance to avoid clashing shades and to maximize the retro aesthetic. Consider sketching a color layout before starting.
Blocking your finished squares can help them lay flat and even out stitches. This step is particularly helpful when creating larger projects like blankets.
Experiment with stitch variations to add subtle textures. Popcorn stitches, clusters, and puff stitches can enhance the visual interest of your Retro Vibe Square Pattern.
Labeling your squares during assembly can simplify the joining process, ensuring your design remains organized and symmetrical.
Finally, enjoy the process! Crocheting the Retro Vibe Square Pattern is not only creative but also relaxing and rewarding, giving you handmade items with personal charm.
Q: Can beginners make the Retro Vibe Square Pattern?
A: Yes! The pattern uses basic stitches like double crochet and chain spaces. Beginners can follow step-by-step instructions and practice color changes gradually.
Q: What yarn is best for this pattern?
A: Medium-weight acrylic or cotton yarn works best. Mixing textures can add dimension, while pre-washing yarn prevents shrinkage.
Q: How do I join squares together?
A: Use slip stitch, whip stitch, or crochet join methods. Consistent stitch counts make alignment easy.
Q: How do I maintain retro color combinations?
A: Choose warm, earthy tones like mustard, burnt orange, brown, and muted greens, and mix in contrasting shades for a vintage look.
Q: Can I use the pattern for slippers?
A: Absolutely. The geometric structure makes it perfect for wearable items. Position squares for comfort and style.
Q: How do I finish edges neatly?
A: Add a contrasting border, scalloped edging, or single crochet around the perimeter to enhance durability and visual appeal.
The Retro Vibe Square Pattern is a timeless and versatile crochet design that can elevate a variety of projects. From cozy blankets and stylish slippers to decorative cushions and accessories, this pattern offers endless creative possibilities.
By following this guide, you can master the pattern, experiment with colors, and create unique handmade items that blend retro charm with modern style.
Share your results, leave a sincere opinion, and suggest improvements—you might inspire others to embrace the Retro Vibe Square Pattern in their own crafting journey.


