Crochet Pig In A Granny Square Blanket Pattern


The 6-Day Kid Blanket – Free Pattern has become a beloved project among crocheters worldwide. It’s fast, fun, and rewarding — perfect for anyone who wants to create a cozy, handmade blanket in less than a week.
Whether you’re making it for a child, a friend, or just to add a pop of color to your home, this blanket offers a relaxing and creative experience. With simple stitches, colorful yarns, and a rhythmic flow, this pattern is ideal for both beginners and experienced crocheters alike.
One of the biggest charms of the 6-Day Kid Blanket is its simplicity and adaptability. You can easily adjust its size, color palette, or texture depending on your style or the recipient.
The pattern is known for its wavy texture and balanced repetition — which makes it incredibly satisfying to work on. Each day, you’ll see noticeable progress, and by the sixth day, you’ll have a soft, warm, and cheerful blanket that looks like it took weeks to finish.
This free crochet pattern allows you to enjoy the process of crocheting without pressure. It’s a great stash-busting project since you can use leftover yarns or experiment with new combinations of shades. In this guide, we’ll walk through how to crochet the 6-Day Kid Blanket – Step by Step, along with essential tips to ensure your stitches are consistent and your blanket turns out stunning.
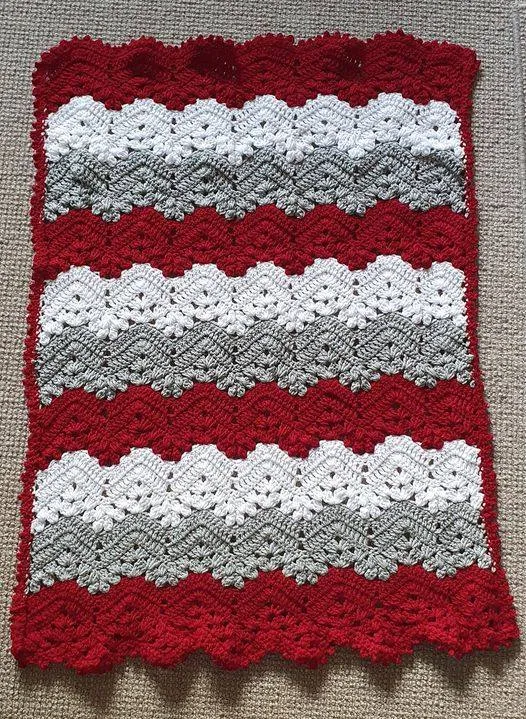
The 6-Day Kid Blanket is famous for its distinctive wavy pattern, created using a sequence of double crochets and chains. The repeat design creates a soft ripple effect that gives the blanket both texture and movement. This technique also allows for playful color transitions, which is one reason why so many crocheters love this project.
You’ll start with a foundation chain that determines the blanket’s width. Then, you’ll work in rows using a series of double crochet stitches combined with strategic increases and decreases. This stitch rhythm forms gentle waves across the blanket. Even if you’re new to crochet, once you complete the first few rows, you’ll find the pattern easy to memorize.
Color choice plays a huge role in the overall look. Some crafters prefer bright, bold stripes, while others opt for soft pastels for a baby version. The 6-Day Kid Blanket – Free Pattern is flexible enough to match any taste or theme. The design is also reversible — meaning both sides look beautiful, making it perfect for gifting.
To keep your stitches even, try using a consistent yarn weight, ideally medium or worsted. Cotton blends or soft acrylics work best because they’re durable, washable, and comfortable against the skin. You’ll typically need around 4 to 5 skeins of yarn for a standard child-sized blanket, depending on your tension and chosen size.
Before you begin, make sure you have all your supplies ready. You don’t need much to start, but having the right tools can make your experience smoother and more enjoyable.
First, choose your yarn. For the 6-Day Kid Blanket, medium (worsted) weight yarn is ideal. You can use a single color for a minimalist look or several shades to create vibrant stripes. Many crocheters like using six colors — one for each day — to make the blanket more playful and visually appealing.
Next, you’ll need a crochet hook suitable for your yarn weight. A 5mm or 5.5mm hook is a popular choice for this pattern. Check your yarn label for the manufacturer’s recommended hook size to ensure proper tension.
You’ll also want a pair of scissors and a yarn needle for weaving in ends once you finish. Stitch markers can help you keep track of row changes or mark your starting points if needed.
Finally, don’t forget a comfortable workspace with good lighting. Crochet is much more enjoyable when your hands are relaxed and your space is tidy. The 6-Day Kid Blanket – Free Pattern can be done anywhere — your couch, a park, or even while watching your favorite series.
Let’s begin the actual process of making the 6-Day Kid Blanket – Step by Step. This is where the magic starts!
The pattern is soothing and rhythmic, making it a great stress-relieving activity. If you maintain even tension, your blanket will look professional and uniform.
To make your 6-Day Kid Blanket – Free Pattern turn out beautifully, here are a few helpful tips:
Start with a gauge swatch. This helps ensure your tension matches the pattern’s expectations. If your stitches are too tight, use a slightly larger hook; if too loose, go smaller.
Keep your yarn organized. When working with multiple colors, wind smaller balls to avoid tangling. Label each one if needed to follow your stripe sequence easily.
Block your finished blanket. Wet blocking or steam blocking helps the waves settle evenly and enhances the blanket’s softness and drape.
Don’t rush the process. Although it’s called a “6-Day Blanket,” take your time if needed — the goal is to enjoy the creative flow.
Crocheting should be relaxing, not stressful. Remember that even small imperfections give your handmade piece personality. The 6-Day Kid Blanket – Step by Step Tutorial is as much about the joy of making as it is about the final product.
1. Can beginners make the 6-Day Kid Blanket?
Yes! The 6-Day Kid Blanket – Free Pattern is great for beginners. Once you understand basic stitches like chain and double crochet, you’ll find it easy to follow.
2. How much yarn do I need for this pattern?
Typically, 4–5 skeins of worsted weight yarn are enough for a child-sized blanket, but this depends on your stitch tension and final size.
3. Can I make this blanket bigger or smaller?
Absolutely. Just adjust the starting chain length in multiples of 14 plus 2. You can also add or remove rows to modify the height.
4. What’s the best yarn to use?
Soft acrylic or cotton blends work best since they’re durable and easy to wash. Choose yarns that feel comfortable against the skin.
5. Do I need to change colors every day?
No. You can use one color throughout or alternate shades whenever you prefer. The pattern looks beautiful either way.
6. How can I stop the edges from curling?
If your edges curl, your tension may be too tight. Try loosening your stitches or blocking the finished blanket.
7. Is this a good project for gifting?
Definitely! The 6-Day Kid Blanket – Step by Step Tutorial makes a heartfelt and cozy handmade gift that anyone will appreciate.
8. How do I care for the blanket?
Machine wash gently in cold water and dry flat or on a low setting. Always check your yarn label for washing instructions.
The 6-Day Kid Blanket – Free Pattern is more than just a crochet project — it’s a creative journey filled with color, comfort, and satisfaction. In just a few days, you can turn simple yarn into a warm and delightful blanket that will be cherished for years. Whether you’re a beginner or an experienced crocheter, this project is a joyful reminder of how rewarding handmade creations can be.
Now that you’ve learned the 6-Day Kid Blanket – Step by Step Tutorial, it’s time to pick up your hook, choose your favorite yarns, and start creating your masterpiece.
Don’t forget to share your experience and leave a sincere opinion or suggestion — your feedback helps other crafters feel inspired too!


