Crochet Pig In A Granny Square Blanket Pattern


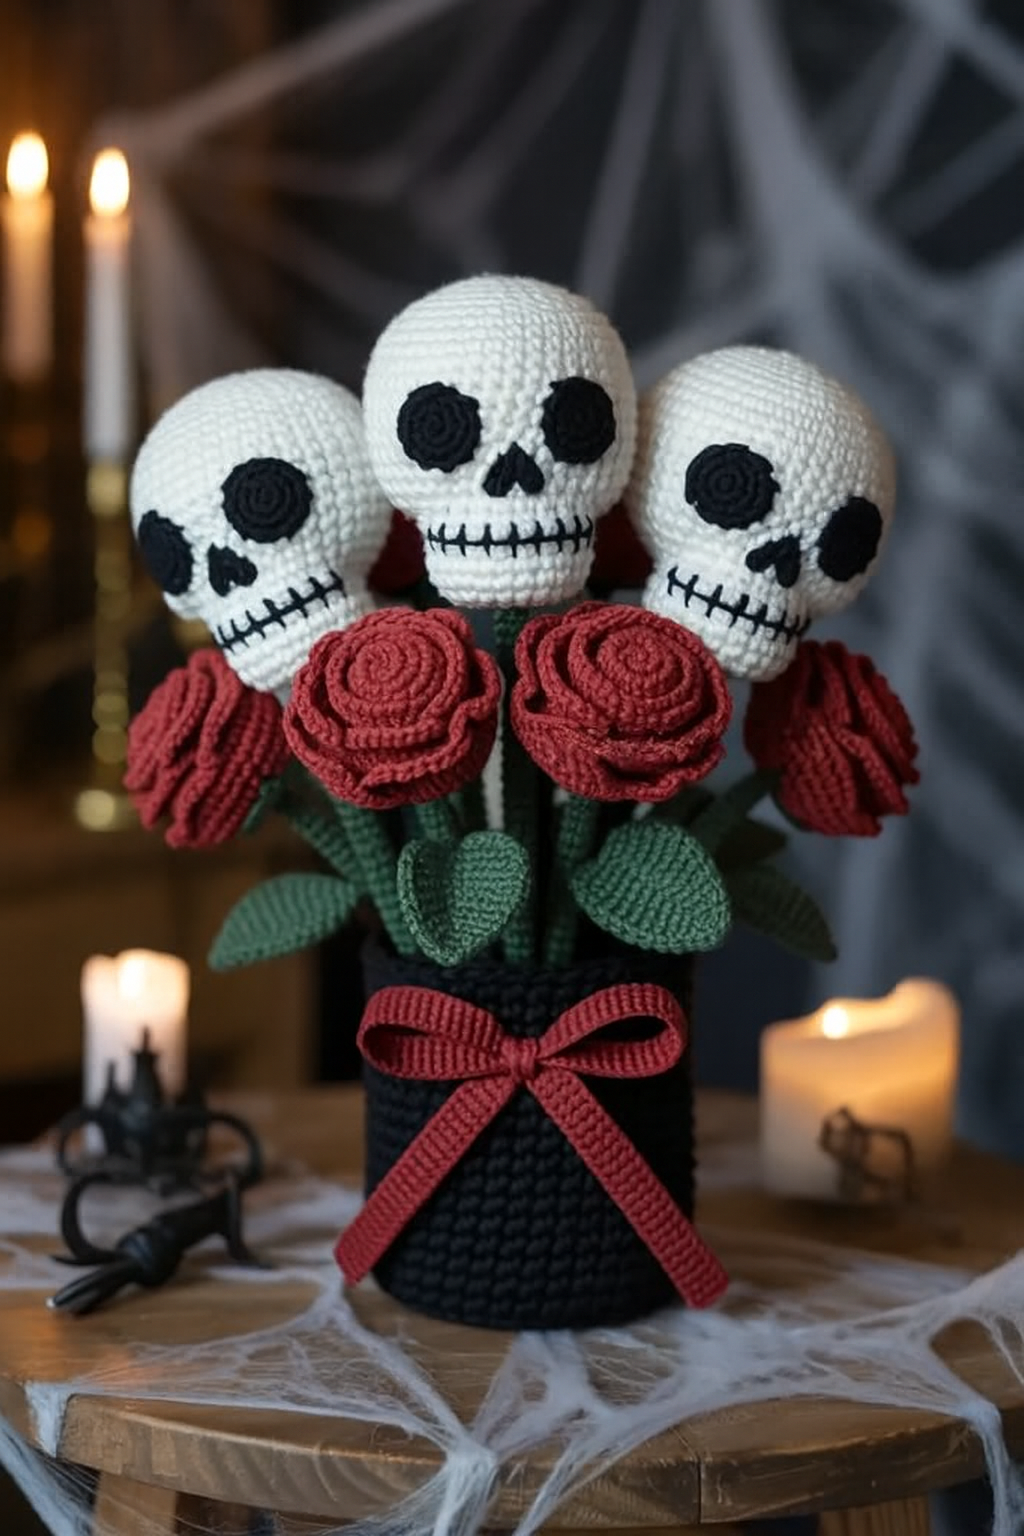
The Amigurumi Skull & Roses Bouquet – FREE Crochet Pattern is a truly unique project that combines the elegance of roses with the boldness of skull designs. Unlike traditional amigurumi, which often focuses on cute animals or simple toys, this bouquet blends edgy motifs with the softness of crochet art.
It’s a pattern that celebrates creativity, making it perfect for themed events, gifts, or even as a decorative piece for your home.
One of the main reasons crafters are drawn to the Amigurumi Skull & Roses Bouquet – FREE Crochet Pattern is the versatility it offers. You can use this pattern to create a gothic-inspired bouquet for Halloween, a quirky wedding bouquet for alternative celebrations, or even a fun display for your craft room.
By mixing roses with miniature skulls, you create something eye-catching that represents both beauty and strength.
This project also allows for personalization. The Amigurumi Skull & Roses Bouquet – FREE Crochet Pattern can be made in a variety of colors and sizes depending on your taste. Bright red roses paired with white skulls create a bold statement, while pastel shades of pink or lavender offer a softer, whimsical look.
No matter how you choose to style it, this pattern is an excellent way to showcase your crochet skills while making something memorable.
When starting the Amigurumi Skull & Roses Bouquet – FREE Crochet Pattern, it’s important to have all the necessary supplies prepared. This ensures the crafting process is smooth and enjoyable.
The most common yarn choice for this project is cotton yarn because it provides a firm stitch definition. This firmness helps the skulls hold their shape while also giving the roses a crisp, neat appearance. You can also use acrylic yarn if you prefer more flexibility and a wide range of color options.
A crochet hook size between 2.5 mm and 3.5 mm is usually ideal for amigurumi work. A smaller hook ensures tighter stitches, which keeps the stuffing securely inside the skulls and roses. Using a larger hook might make the stitches looser, causing gaps in the design.
For stuffing, polyester fiberfill works best. It’s lightweight, holds its shape well, and is easy to use when filling small crochet pieces. Always stuff the skulls firmly so they maintain their round structure.
You’ll also need black embroidery thread or yarn for adding facial details to the skulls, such as eyes, nose, and mouth. Safety eyes are another option if you want a playful or more cartoon-like appearance.
Other important tools include scissors, a yarn needle for sewing pieces together, and floral wire or sticks to give the bouquet structure. Wrapping the final bouquet in ribbon or lace adds a beautiful finishing touch.
The Amigurumi Skull & Roses Bouquet – FREE Crochet Pattern is built from two main components: the skulls and the roses. Once you create these pieces, you can assemble them into a complete bouquet.
Start by crocheting the skulls. Begin with a magic ring and work single crochet increases to form a small round ball. After a few rounds, continue without increases to build the middle portion of the skull. Before closing, add stuffing and embroider the facial features. Stitch simple black ovals or X shapes for eyes and a triangle for the nose. The mouth can be made with small lines resembling teeth.
Next, move on to the roses. Crochet a long strip with a repeating pattern of chains and double crochets. Once the strip is complete, roll it up tightly to form the rose shape and stitch the base together to secure it. Using different shades of yarn for the roses makes the bouquet more vibrant and realistic.
To create leaves, crochet small teardrop shapes with green yarn. Attaching these around the roses gives the bouquet a natural and fuller appearance.
Once the skulls, roses, and leaves are complete, attach them to sticks or floral wires. Wrap the wires in green yarn or floral tape to make them look cohesive. Then, arrange the elements into a bouquet shape.
Finally, tie the stems together with ribbon, lace, or fabric. This not only makes the bouquet easier to hold but also adds a polished finishing detail.
The Amigurumi Skull & Roses Bouquet – FREE Crochet Pattern offers endless possibilities for customization, making it one of the most exciting amigurumi projects to try.
For a gothic or Halloween theme, use black roses paired with white skulls. Adding dark green leaves will give the bouquet a dramatic, mysterious look perfect for seasonal décor.
If you’re making a wedding bouquet, consider using ivory skulls with soft pastel roses. This creates a whimsical and unconventional accessory that’s bound to leave a lasting impression on guests. Brides who enjoy alternative fashion will especially love this variation.
For a Day of the Dead theme, decorate the skulls with colorful embroidery. Adding bright designs around the eyes or on the forehead reflects the cultural celebration while making the bouquet cheerful and meaningful.
A playful version could include rainbow-colored roses paired with smiling skulls. This variation makes the bouquet lighthearted and fun, ideal for gifts to friends or as décor for a craft room.
If you’re creating the bouquet as a gift, think about the recipient’s favorite colors. Personalizing the roses and skulls makes the bouquet extra special and shows the thoughtfulness behind the handmade item.
Lastly, you can combine the bouquet with other amigurumi flowers, like tulips or daisies, to create a mixed arrangement. Adding different shapes and textures enhances the overall design and makes the bouquet even more eye-catching.
To get the best results from the Amigurumi Skull & Roses Bouquet – FREE Crochet Pattern, there are several helpful tips you can follow.
Always keep your stitches tight when working on amigurumi projects. Loose stitches can leave gaps where stuffing shows through, which reduces the polished look of the final piece.
When embroidering the skull faces, take your time to ensure symmetry. Even small differences in eye or mouth placement can change the entire expression, so it’s worth paying attention to detail.
For roses, experiment with yarn thickness. Thicker yarn creates fuller, bold roses, while thinner yarn gives a delicate, dainty appearance. Mixing both types can add depth to the bouquet.
If using floral wires, make sure they’re securely fastened inside the skulls and roses. This prevents pieces from wobbling or detaching when arranging the bouquet. Wrapping the wires with yarn makes them blend seamlessly into the design.
Blocking the roses before assembly can help them hold their spiral shape more effectively. Lightly shaping them with steam ensures they look even and elegant.
Finally, consider presentation. Wrapping the finished bouquet in decorative paper or lace enhances its beauty and makes it perfect for gifting. A little extra effort in presentation goes a long way.
Is this project beginner-friendly?
Yes, beginners can attempt this pattern, but some familiarity with basic amigurumi stitches is helpful for best results.
How long does it take to complete the bouquet?
On average, it can take 8 to 12 hours depending on the number of skulls and roses you include in the arrangement.
What yarn is best for this project?
Cotton yarn is highly recommended because it gives a firm structure to the skulls and roses, but acrylic yarn works as well.
Can I make the bouquet without floral wire?
Yes, but floral wire adds stability. Without it, the bouquet may not hold its structured shape as effectively.
Is this pattern suitable for special occasions like weddings?
Absolutely. With the right color choices, the bouquet can be styled for weddings, anniversaries, or themed parties.
Can I sell finished bouquets made from this pattern?
Yes, many crafters sell handmade bouquets. Always check for proper credit if using someone else’s base pattern, but free patterns usually allow selling finished items.
The Amigurumi Skull & Roses Bouquet – FREE Crochet Pattern is a creative and versatile project that blends bold motifs with delicate crochet artistry. From gothic styles to romantic pastel themes, this bouquet can be customized for almost any occasion. You’ve learned about the materials needed, the step-by-step process, creative variations, and tips to perfect your work.
Now it’s your turn to bring this unique bouquet to life. Try experimenting with different colors, themes, and embellishments to make it your own. I’d love to hear your honest opinions and suggestions—what colors or themes would you use for your own amigurumi skull and roses bouquet? Share your ideas and inspire other crafters!


