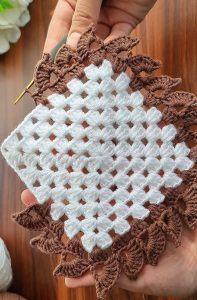
Crochet Pig In A Granny Square Blanket Pattern


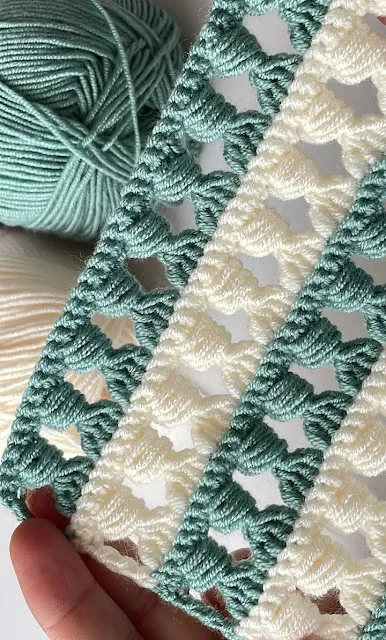
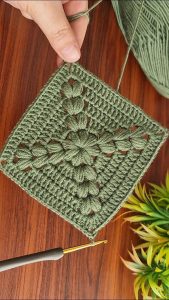
The Bead Stitch – Free Crochet Pattern is one of the most elegant and textured stitches you can learn as a crocheter. This beautiful stitch creates a soft, raised design that looks like small beads lined up neatly across your project.
The Bead Stitch is perfect for blankets, scarves, hats, and even home décor items because of its cozy texture and intricate appearance.
What makes this stitch stand out is how it combines simple crochet techniques with a slightly advanced twist, allowing even intermediate beginners to achieve a stunning result.
Learning how to make the Bead Stitch is not just about creating texture—it’s about adding personality to your crochet work. Whether you’re creating a statement blanket or a warm beanie, the stitch gives every project a touch of handmade artistry.
Even though it looks complex, once you understand the rhythm of the stitch, it quickly becomes repetitive and relaxing to make. It’s also an excellent stitch to mix with others, such as the half double crochet or the puff stitch, for creative patterns.
In this free crochet pattern, you’ll learn step-by-step how to create the Bead Stitch with ease. The stitch uses common techniques like yarn over, pull through, and working around the post of previous stitches. Once you practice a few rows, you’ll see how beautifully the beads pop out, giving your fabric a rich, dimensional look. This article will walk you through everything you need to know—from the materials required to tips for mastering this textured stitch—so you can use it in your next project with confidence.
The Bead Stitch is a textured crochet stitch that creates small bead-like bumps across your fabric. It’s worked by wrapping the yarn several times around the hook and then pulling through to form the signature rounded “bead” look. Unlike bobble or puff stitches, the Bead Stitch has a more elongated and elegant texture, making it a favorite for those who enjoy refined crochet designs.
The stitch is typically made by alternating a double crochet and a bead stitch across each row. This creates a balanced pattern where the beads stand out evenly across the surface. The rows of beads are slightly raised, giving your work both texture and depth. Because of this, it’s an excellent choice for projects where you want a luxurious, tactile finish.
Another advantage of the Bead Stitch is that it works well with multiple yarn types. You can use cotton yarn for a structured, defined texture or soft acrylic yarn for a more plush look. Many crocheters love using variegated yarns, as the changing colors make the bead pattern even more eye-catching.
When it comes to difficulty, the stitch sits between beginner and intermediate levels. You’ll need to know basic stitches like the double crochet (dc) and single crochet (sc), as well as how to yarn over multiple times. Once you’ve practiced a few rows, the stitch becomes second nature and can be completed smoothly and rhythmically.
Finally, the Bead Stitch can be used for an endless range of projects. Blankets, pillow covers, shawls, scarves, and hats all look stunning with this stitch. It’s also a fantastic way to add borders or accents to otherwise simple crochet designs, giving them a professional and artistic touch.
Before you begin your Bead Stitch – Free Crochet Pattern, make sure you have all your materials ready. You don’t need any special tools—just your usual crochet essentials. The right choice of yarn and hook will make your stitch look neat and defined.
Start with a medium weight (worsted) yarn, as it allows you to clearly see your stitches and helps the beads form nicely. Cotton yarn is a great choice for projects that need structure, while acrylic yarn adds warmth and softness.
You’ll also need a crochet hook suitable for your yarn weight. Most medium-weight yarns work well with a 5.0 mm (H/8) hook, but always check the yarn label for guidance. Having a yarn needle for weaving in ends and scissors for trimming is also helpful.
If you’re practicing the stitch for the first time, start with a small swatch rather than a full project. This allows you to get comfortable with the motion of wrapping and pulling the yarn before committing to a large piece.
To keep your tension consistent, hold the yarn loosely as you form the bead stitch. Pulling too tightly can make the stitch difficult to work into, while too loose tension can make it look uneven. With a bit of practice, you’ll find the perfect balance.
Lastly, remember that the Bead Stitch uses more yarn than basic stitches like single or double crochet because of its wrapped texture. It’s a good idea to have extra yarn on hand, especially if you’re making a large project like a blanket or scarf.
Now that you have your materials ready, let’s dive into the step-by-step process of making the Bead Stitch. Once you master this, you’ll be able to incorporate it into any project with confidence.
After a few rows, you’ll see the beads forming a lovely textured surface. Practice maintaining even tension and making the wraps consistently to ensure the beads look uniform throughout your work.
If you prefer a more dramatic texture, you can make the bead stitch with extra wraps. For example, instead of wrapping the yarn five times, you can do six or seven for larger beads. However, keep in mind that this will use more yarn and make your fabric heavier.
Even though the Bead Stitch looks impressive, it’s quite forgiving and easy to fix if you make a mistake. The following tips will help you achieve a professional finish every time.
First, maintain consistent tension. The bead stitch relies on even wraps and pulls. If your tension changes too much, some beads will look smaller or tighter than others. Keep your hand relaxed while crocheting and take short breaks if your hands start to tighten.
Second, block your project when it’s finished. Blocking helps to even out your stitches and makes the bead texture stand out beautifully. Simply pin your finished piece to a flat surface, spray it lightly with water, and let it dry naturally.
Third, use a smooth yarn rather than a fuzzy or novelty type. Smooth yarns make it easier to see each bead and create a cleaner look. Fuzzy yarns can hide the texture of the stitch, which is the main attraction of this pattern.
Fourth, experiment with color changes. Alternating colors every few rows can make your beads pop visually, creating a striking striped effect. It’s a fun way to personalize your project and make it unique.
Lastly, don’t be afraid to mix the Bead Stitch with other crochet stitches. It pairs beautifully with single crochet, half double crochet, or shell stitches. Combining different textures can elevate your crochet work to a whole new level of artistry.
1. Is the Bead Stitch good for beginners?
Yes! While it looks advanced, the Bead Stitch is suitable for confident beginners who already know basic stitches like the double crochet. It just takes a little practice to get comfortable with the wraps.
2. What kind of yarn works best for the Bead Stitch?
Smooth yarns like cotton or acrylic blends are best. They highlight the bead texture beautifully without making the fabric too bulky.
3. How much yarn does the Bead Stitch use?
It uses slightly more yarn than standard stitches due to the extra wraps. Always buy one extra skein, especially for large projects.
4. Can I use the Bead Stitch for wearable items?
Absolutely! It’s perfect for scarves, hats, and cardigans. Just remember that it creates a thicker fabric, so it’s great for cozy, warm pieces.
5. Why do my beads look uneven?
Uneven beads usually come from inconsistent tension or not wrapping the yarn the same number of times for each stitch. Slow down and make sure your wraps are uniform.
6. How do I make the Bead Stitch look neater?
Blocking your project helps a lot. Also, try counting your wraps and keeping your hook movements consistent with each stitch.
The Bead Stitch – Free Crochet Pattern is an elegant and versatile stitch that adds beauty, dimension, and charm to any crochet project.
Whether you’re making a cozy blanket, a stylish scarf, or a decorative pillow, this textured stitch transforms simple yarn into art. With a bit of patience and practice, you’ll find that the bead stitch quickly becomes one of your favorites.
Now that you know how to create it from start to finish, take your yarn and hook and start experimenting with colors and textures. Don’t forget to share your honest opinion and suggestions below—your feedback helps inspire more creative crochet tutorials like this one!


