Crochet Pig In A Granny Square Blanket Pattern


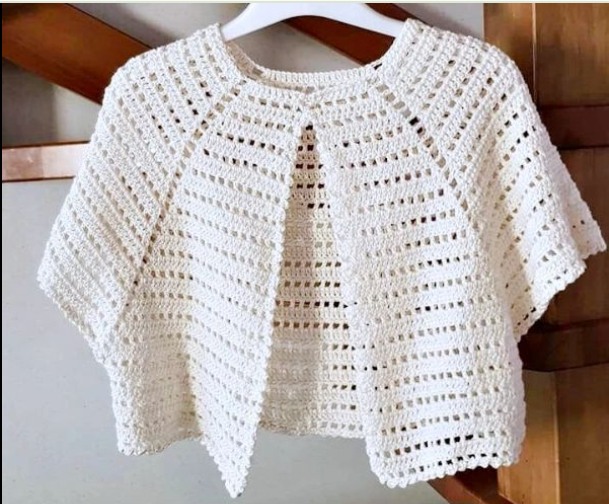
Beautiful Bolero with Graphic patterns are a timeless trend in the world of crochet fashion, combining elegance and creativity in a simple, handmade garment.
A crochet bolero is the perfect piece for those who want to add a delicate touch to any outfit without the weight of a full cardigan or jacket.
Whether you’re dressing up for a special event or simply want to enhance your everyday wardrobe, a beautiful bolero is both versatile and stylish.
The use of graphic patterns in crochet brings a unique charm, transforming ordinary stitches into eye-catching designs that highlight your craftsmanship.
Crocheting a Beautiful Bolero with Graphic is not only enjoyable but also deeply satisfying. It allows you to explore different stitch patterns, yarn textures, and color combinations to create a piece that reflects your personal style. This type of project is great for beginners who want to practice following a pattern, as well as for experienced crocheters seeking a quick yet impressive project. What makes this garment stand out is its balance between sophistication and simplicity—ideal for layering over dresses, blouses, or even casual tops.
In this Beautiful Bolero with Graphic tutorial, you’ll learn the essential steps to create a stylish crochet bolero from start to finish. We’ll go through choosing the right materials, understanding crochet symbols and diagrams, and assembling your bolero with precision. You’ll also find tips for customization, color inspiration, and finishing touches to make your design truly unique. Let’s begin this creative journey and craft a bolero that you’ll love to wear for years to come.
To start your Beautiful Bolero with Graphic, gather all the basic materials before you begin. Having everything prepared will make your crocheting process smoother and more enjoyable. This project doesn’t require many supplies, but using quality materials will enhance the final look and feel of your bolero.
First, select your yarn. Cotton or lightweight acrylic yarn is ideal for crochet boleros since it provides structure while keeping the piece breathable. Choose colors that match your wardrobe or create a statement with contrasting tones. Lighter shades are perfect for summer wear, while deeper hues add warmth for cooler days.
Next, choose the appropriate crochet hook. Most bolero patterns use hook sizes between 3.0mm and 4.5mm, depending on the yarn thickness. Always check your yarn label for the recommended hook size to maintain even tension. A smaller hook will give your stitches a tighter look, ideal for defined graphic designs.
You’ll also need scissors, a tapestry needle for weaving in loose ends, and stitch markers to help you keep track of your work. Optional materials include decorative buttons or ribbons for closure, depending on your chosen design. Keep your crochet graphic pattern or chart nearby as a visual reference throughout the project.
Once you have your tools and materials ready, set up a comfortable workspace with good lighting. This will make following the Beautiful Bolero with Graphic pattern easier, especially when reading the symbols and stitch directions. With everything in place, you’re ready to begin crocheting your stunning new bolero.
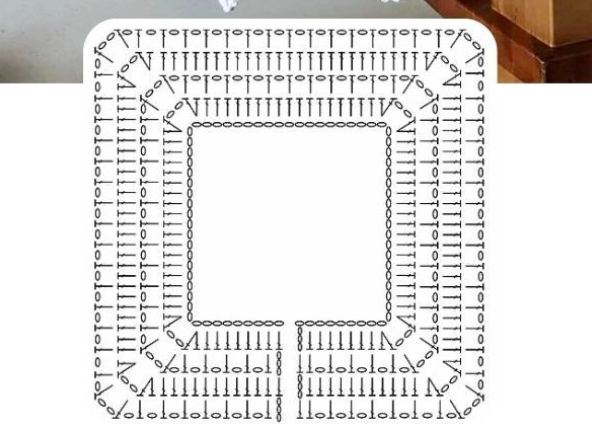
Before you start stitching, it’s essential to understand how to read a Beautiful Bolero with Graphic pattern. Crochet graphics, or charts, are visual guides that use symbols to represent different stitches. They allow you to see the design layout, repeat sequences, and direction of your work. Learning to read these charts will help you crochet more accurately and efficiently.
Each symbol in a crochet graphic corresponds to a specific stitch, such as chain, single crochet, double crochet, or treble crochet. The pattern usually starts from the center or bottom of the diagram and works outward in rows or rounds. Pay attention to arrows or numbers that indicate the direction of each row.
To practice reading the chart, try crocheting a small sample swatch first. This will help you get used to the stitch combinations before working on the actual bolero. Make sure your tension matches the gauge indicated in the pattern so your finished piece fits perfectly.
Once you feel comfortable with the symbols and layout, begin the main piece of your Beautiful Bolero with Graphic. Most boleros are worked in panels—back, front, and sleeves—that are later sewn together. Some modern designs are crocheted in one piece, reducing seams for a smoother finish. Follow your chart carefully and keep checking your work for consistency.
As you crochet, don’t rush. Take your time to ensure your stitches remain even and your design looks neat. Graphic crochet patterns often feature repeating motifs like flowers, shells, or geometric shapes that give your bolero a sophisticated appearance. With patience and attention to detail, your piece will turn out beautifully.
When you’ve completed all the panels, block each one gently to even out the stitches. Blocking helps define the pattern and ensures all pieces are the correct size before assembly.
Now that you’ve finished crocheting the individual parts, it’s time to assemble your Beautiful Bolero with Graphic. This stage transforms your flat crochet pieces into a wearable garment. Start by laying all sections on a flat surface, right side facing up. Make sure the edges align properly before sewing.
Use a yarn needle and matching yarn to join the shoulder seams first. Then, attach the front panels to the back, and finally, sew the sleeves into place. Use small, invisible stitches to create a seamless appearance. Avoid pulling the yarn too tightly so your bolero remains flexible and comfortable to wear.
After sewing, try on your bolero to check the fit. Adjust if necessary by adding or removing stitches in the side seams or sleeve edges. Once satisfied, weave in all loose ends neatly with a tapestry needle.
To enhance the look of your Beautiful Bolero with Graphic, consider adding a decorative border. You can crochet a simple shell or picot edging along the neckline, cuffs, and hem. This small detail adds elegance and polish to your design.
If your pattern includes a closure, now is the time to attach it. Sew on buttons, ribbons, or ties as indicated in your chosen pattern. For a modern touch, you can also leave it open-fronted for a relaxed, flowing style.
Finally, give your finished bolero a light steam or wet block to smooth the seams and shape it perfectly. Once dry, it’s ready to wear—a stunning handmade creation that reflects both your skill and creativity.
One of the joys of making a Beautiful Bolero with Graphic is that you can personalize it endlessly. The versatility of this garment makes it suitable for many occasions and outfits. Whether you’re dressing for a wedding, a dinner, or a casual day out, your bolero can elevate your entire look.
For an elegant evening style, crochet your bolero in a metallic or silky yarn. Pair it with a dress or gown to add sophistication and shimmer. For casual wear, opt for soft cotton yarns in pastel shades that match your favorite jeans or summer tops.
You can also play with sleeve lengths and shapes. Short sleeves create a lightweight summer piece, while three-quarter or long sleeves make it suitable for cooler weather. Some designs even include bell sleeves or lace cuffs for a vintage aesthetic.
Color variations are another fun way to personalize your Beautiful Bolero with Graphic. Try using ombré yarns for a subtle gradient effect or mix contrasting colors for a bold statement. Graphic motifs can also be highlighted using different yarn shades to make the design pop.
Adding embellishments like pearls, beads, or lace trim can transform your bolero into a true fashion statement. Just remember to keep it balanced—less is often more when it comes to elegant handmade garments.
Most importantly, wear your bolero with pride. Handmade clothing has a warmth and individuality that store-bought fashion simply can’t match. Each stitch represents your time, effort, and creativity—making your crochet bolero truly one of a kind.
1. Is a crochet bolero suitable for beginners?
Yes! A Beautiful Bolero with Graphic is perfect for beginners who know basic stitches. Many graphic patterns are simple to follow once you understand the chart symbols.
2. What type of yarn works best for a crochet bolero?
Cotton, bamboo, or lightweight acrylic yarns are excellent choices because they provide structure while keeping the bolero comfortable and breathable.
3. Can I adjust the size of the bolero easily?
Absolutely. You can adjust the number of stitches or pattern repeats according to your body measurements. Always check your gauge before starting.
4. How long does it take to crochet a bolero?
Depending on your skill level and the pattern complexity, it can take anywhere from one to three days to complete a Beautiful Bolero with Graphic.
5. How should I wash and care for my crochet bolero?
Hand wash gently in cold water and lay flat to dry. Avoid wringing or hanging to prevent stretching.
6. Can I sell my finished crochet boleros?
Yes, you can! Handmade Beautiful Bolero with Graphic designs are popular in craft markets and online shops. Just make sure to give credit if you used someone’s pattern.
Creating a Beautiful Bolero with Graphic is a rewarding project that combines artistry, skill, and personal expression. You’ve learned how to select the right materials, read crochet charts, assemble your garment, and customize it to your style.
Each stitch brings you closer to a one-of-a-kind piece that adds elegance and charm to your wardrobe. Now it’s your turn to pick up your hook and start crafting your own crochet masterpiece.
Don’t forget to share your experience and leave your honest opinion or suggestions about this tutorial—your feedback inspires new ideas and helps others on their crochet journey.


