Crochet Pig In A Granny Square Blanket Pattern


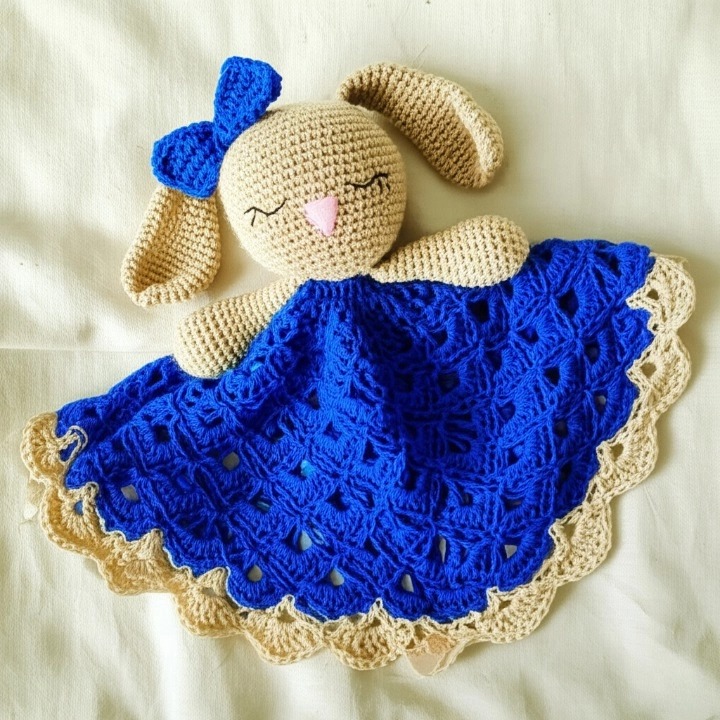
A Bunny Lovey is a soft, comforting, and adorable handmade toy that combines the charm of a stuffed animal with the soothing comfort of a small blanket.
Learning to create a Bunny Lovey using the free pattern for parts and pieces is an ideal project for crocheters and sewists alike. Whether you are making one for a baby, a toddler, or as a heartfelt gift, this DIY project offers endless opportunities to customize colors, textures, and accessories.
The beauty of a Bunny Lovey lies in its versatility. It serves as a cuddly companion for children, a decorative nursery accessory, and even a keepsake that can be cherished for years.
By breaking the project down into parts and pieces, you can focus on perfecting each component—from the soft bunny head to the comforting blanket square—ensuring a polished and professional result.
Creating a Bunny Lovey begins with understanding its fundamental parts and pieces. Typically, a Bunny Lovey consists of a bunny head, ears, facial features, and a blanket base. Each piece can be made individually and then carefully attached to form the final lovey.
The head is usually made using amigurumi techniques, working in rounds to shape a soft, rounded form. This section often includes increases and decreases to achieve a natural head shape. Safety eyes or embroidered eyes can be added depending on the recipient’s age and safety considerations.
Ears are another crucial component. They can be worked flat or in rounds and then sewn to the head. Some designs feature long, floppy ears, while others use short, perky styles. The ear design contributes greatly to the character and personality of your Bunny Lovey.
The blanket base provides the comfort aspect of the lovey. Usually a small square or rectangle, it can be made using various stitch patterns, textures, and colors. Some crafters like to add borders, scallops, or ruffles to the blanket to enhance its appeal.
Facial features and embellishments bring the bunny to life. Embroidered mouths, noses, and blush details add character and charm. Optional accessories, such as bows, ribbons, or small appliques, allow for further personalization.
To start your Bunny Lovey, begin with the head. Using the free pattern, crochet in rounds to shape the head, making sure to maintain consistent stitch tension. Insert safety eyes or leave space for embroidery. Stuff the head lightly with polyester fiberfill to achieve a soft, cuddly shape.
Next, crochet the ears. Depending on the design, you may create them in a single layer or fold them for extra thickness. Sew the ears securely to the top of the head, making sure they are evenly positioned. This ensures a symmetrical and professional appearance.
Once the head and ears are complete, move on to the blanket portion. Follow the free pattern to create the desired square or rectangle, using your preferred stitch pattern. Keep the stitches even, and consider adding a border to prevent curling and enhance durability.
Attach the head to the blanket base by sewing or crocheting it securely. Ensure the head is centered and stable, so it does not tip or become loose during use. Reinforce the attachment with multiple stitches if necessary.
Finally, add facial features and optional embellishments. Embroider the nose and mouth using yarn or thread, and add blush or other details to personalize your Bunny Lovey. Optional bows or appliques can be sewn onto the blanket or head for extra charm.
Check all pieces for secure attachment, trim any excess threads, and your Bunny Lovey is complete. The result is a soft, comforting, and visually appealing handmade toy that can be treasured for years.
There are countless ways to personalize your Bunny Lovey Parts & Pieces. For example, you can use pastel yarns for a soft, classic look, or choose bright, playful colors for a modern, cheerful design. Mixing textures, such as smooth cotton and fuzzy acrylic, adds depth and tactile interest.
Ears can be customized by adding stripes, spots, or embroidery. Floppy ears can be lined with contrasting fabric, while shorter ears can include decorative stitches. These small adjustments make each Bunny Lovey unique.
The blanket portion also allows for creativity. You can create textured stitch patterns, chevrons, or lace effects depending on your skill level. Adding a ruffled edge or scalloped border enhances the aesthetic and gives a polished finish.
Facial expressions can be modified to match the personality you envision. A smiling, sleepy, or mischievous bunny can be embroidered, making each lovey one-of-a-kind. Small accessories like bows, tiny flowers, or hearts add charm and provide opportunities for personalization.
Bunny Loveys can also be themed. Seasonal designs—like Easter bunnies with pastel blankets—or holiday versions with festive colors make wonderful gifts. The combination of parts and pieces allows crafters to experiment and create a collection of customized loveys.
Additionally, mixing and matching different patterns for head, ears, and blanket creates visually interesting contrasts. For example, a striped blanket paired with a solid-colored head and patterned ears results in a dynamic, eye-catching design.
To ensure your Bunny Lovey turns out perfectly, start by organizing your materials. Have yarn, crochet hooks, fiberfill, safety eyes, needles, and scissors ready before you begin. This makes the assembly process smoother.
Check your gauge, especially for the head and blanket. Consistent stitch size ensures all parts fit together correctly and the lovey maintains a balanced shape.
Handle delicate yarns carefully to avoid fraying or splitting. Using a smaller hook can help create tighter stitches, which is particularly important for small amigurumi pieces like ears or heads.
Secure attachments are essential. Reinforce the head, ears, and facial features with extra stitches to prevent them from becoming loose, ensuring your Bunny Lovey is safe and durable for children.
Blocking the blanket portion is optional but recommended for smoother edges and even stitches. Gently pin and lightly dampen the blanket to shape it perfectly.
Finally, patience is key. Creating a Bunny Lovey with multiple parts and pieces takes time, but the result is a unique, handmade toy that offers comfort and joy to its recipient. Each step, from shaping the head to adding embellishments, contributes to a professional, charming finish.
What is a Bunny Lovey?
A Bunny Lovey is a small, soft toy that combines a bunny head with a blanket, providing both comfort and playfulness for children.
Do I need advanced skills to make one?
No, this project is suitable for beginners and experienced crafters alike. The free pattern breaks down the lovey into simple parts and pieces for easy assembly.
What yarn is best for a Bunny Lovey?
Soft, washable yarns like acrylic or cotton are ideal. Pastel or neutral colors are popular, but bright colors can also be used.
Are safety eyes necessary?
For babies and young children, embroidery is recommended instead of safety eyes for safety reasons. Safety eyes can be used for older children or decorative purposes.
Can I customize the Bunny Lovey?
Yes! You can adjust colors, textures, facial expressions, and accessories to make each lovey unique.
How do I attach the head to the blanket?
Use sturdy stitching, sewing the head securely to the center of the blanket. Reinforce with multiple stitches for durability.
Is the Bunny Lovey machine washable?
It depends on the yarn used. Many acrylic and cotton yarns can be machine washed on a gentle cycle, but always check yarn care instructions.
Creating a Bunny Lovey using the free pattern for parts and pieces is a fun, rewarding, and customizable project. By carefully crafting each component—from the head and ears to the blanket and embellishments—you can produce a soft, comforting, and unique toy that children will adore. This project is perfect for gifting, personal use, or even starting a small handmade toy business.
Now it’s your turn! Try making a Bunny Lovey and share your thoughts, feedback, and creative ideas. Your insights can inspire other crafters to explore this adorable project and create their own cherished loveys.


