Crochet Pig In A Granny Square Blanket Pattern


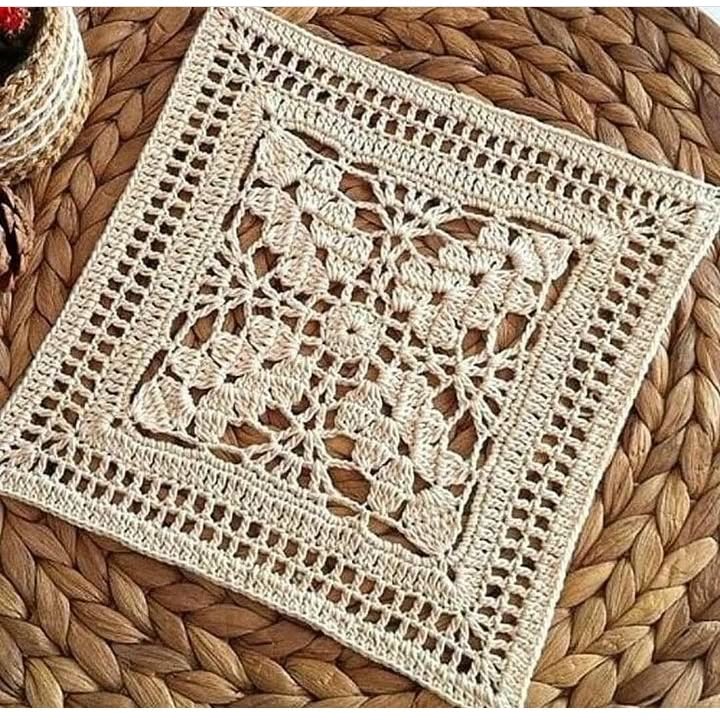
If you enjoy delicate and elegant crochet projects, this Classic Lace Crochet Square – Tutorial is perfect for you. Lace squares are a versatile addition to any crochet project, from blankets and table runners to shawls and home décor.
With intricate patterns and openwork stitches, they create a timeless, airy design that looks both sophisticated and charming. This tutorial will guide you step by step to make beautiful lace squares, even if you are new to crochet or have never worked with lace before.
Creating a classic lace crochet square requires attention to detail, but it is incredibly rewarding. Each stitch contributes to a delicate pattern that comes together gradually, revealing intricate designs as you progress.
By following this Classic Lace Crochet Square – Tutorial, you’ll gain confidence in reading lace patterns, counting stitches accurately, and finishing your work neatly.
In this Classic Lace Crochet Square – Tutorial, we will cover everything from the materials you need to the finishing touches that make your squares look polished and professional. You will learn how to start your square, work through multiple rounds of lace stitches, and maintain an even tension throughout. By the end of this guide, you’ll be able to create multiple lace squares that can be joined together to make larger projects or enjoyed individually as decorative pieces.
To start this Classic Lace Crochet Square – Tutorial, gather a few essential materials. You will need fine crochet thread or lightweight yarn, a matching crochet hook, a yarn needle, and scissors. Using the right tools ensures that your lace squares turn out neat and uniform.
Select thread in a color that highlights the lace pattern. White or pastel shades are classic choices, but feel free to experiment with vibrant colors for a modern look. Lightweight yarn can also be used if you prefer a softer, more flexible square.
A comfortable crochet hook is essential for even stitches. Check your yarn or thread label to determine the recommended hook size. Using a hook that is too large or too small can affect the appearance and size of your square.
You’ll also need a yarn needle to weave in ends neatly. A blunt-ended needle works best for delicate threads without splitting the yarn. Keep scissors nearby for trimming and managing loose ends.
Before starting, decide on the finished size of your square. This helps you plan the number of rounds and the overall dimensions to suit your project. Accurate sizing ensures that all squares match when joined.
Having a smooth workspace with good lighting is helpful. Lace crochet requires close attention to detail, so a comfortable environment makes the process easier and more enjoyable.
Understanding the basic techniques is key to mastering this Classic Lace Crochet Square – Tutorial. Begin with a foundation chain or magic ring to form the center of your square. This central ring anchors your lace pattern and sets the shape for subsequent rounds.
Each round typically consists of chain spaces and combinations of single, double, or treble crochet stitches. Pay close attention to pattern instructions, counting stitches carefully to maintain symmetry and consistency.
Corners of lace squares are formed by working multiple stitches into a single space, often separated by chains. This creates the square shape while keeping the lace design open and airy.
Changing colors in lace squares can be done at the start of a round. This adds dimension and variety to your squares. Make sure to secure the ends neatly to avoid loose threads.
Blocking your lace squares after finishing helps even out stitches and define the pattern. Pin the square to a blocking mat and gently steam or wet it to hold the shape.
Practice patience. Lace crochet requires careful attention, but the intricate patterns and elegant results make it worthwhile. Repetition improves your speed and accuracy with each square.
To follow this Classic Lace Crochet Square – Tutorial, start with a small center ring and work outwards. Begin with chain stitches to form the first cluster of stitches, typically a combination of double crochet and chain spaces.
Round by round, build the lace design according to the pattern. Make sure to maintain consistent tension to avoid warping or uneven edges. Count each stitch carefully to ensure accuracy.
Corners are created by adding multiple clusters in one space, separated by chains. These are the key to forming a perfect square while maintaining the lace pattern.
Adjust the number of rounds based on your desired square size. You can make small squares for coasters or large ones for blankets and shawls.
As you progress, check the square on a flat surface to make sure it maintains a true square shape. Uneven edges can be trimmed or corrected before finishing.
Finish the square by fastening off the yarn and weaving in all ends. Neat finishing enhances the overall appearance of your lace square and prepares it for joining or display.
Once you’ve completed multiple squares following this Classic Lace Crochet Square – Tutorial, you can join them to create larger projects. Use slip stitches or a crochet join technique for seamless connections.
Plan the layout before joining. Arrange squares in a way that balances color and pattern repetition, creating a harmonious design across your project.
Lace squares can be used individually as decorative coasters, doilies, or wall hangings. Their lightweight and delicate structure make them versatile for many applications.
For blankets, join squares in rows and columns, adding borders if desired. A scalloped or simple crochet edge enhances the overall lace effect.
Decorate with small crochet motifs or beads for added texture and visual interest. These touches personalize your project and make it unique.
Always block your joined squares to ensure a uniform appearance. Proper finishing keeps your lace squares flat and polished, giving your project a professional touch.
Achieving flawless results in this Classic Lace Crochet Square – Tutorial requires attention to detail and consistent practice. Begin with accurate counting and stitch placement.
Keep your tension even throughout to avoid puckering or uneven edges. This is especially important in lace crochet, where openwork can exaggerate mistakes.
Use high-quality thread and hooks suitable for delicate yarn. Cheaper materials may fray or split, impacting the final appearance.
Practice new stitches or complex patterns on scrap thread before incorporating them into your square. This reduces errors and improves confidence.
Take breaks during longer sessions. Working on lace squares requires focus, and fatigue can lead to mistakes.
Document your process. Keeping notes or taking photos of completed rounds helps replicate patterns and improves consistency in future squares.
1. Can beginners make lace crochet squares?
Yes. While lace crochet requires attention, beginners can follow this Classic Lace Crochet Square – Tutorial to create beautiful squares with practice.
2. What yarn works best for lace squares?
Fine crochet thread or lightweight yarn is ideal. Cotton and blends maintain shape and highlight intricate stitches.
3. How do I maintain even tension?
Consistent hand placement and gentle, controlled pulling of yarn help maintain even tension throughout the square.
4. Can I join lace squares without gaps?
Yes. Use slip stitches or joining techniques that match the pattern, ensuring neat and seamless connections.
5. How do I block lace squares?
Pin the square to a flat surface and steam or wet it. Allow it to dry fully to hold shape.
6. Can lace squares be used for blankets?
Absolutely. Multiple squares can be joined to make blankets, throws, or larger decorative items.
7. How do I add color variations?
Change colors at the start of a round and weave in ends neatly. Alternating colors can create striking patterns.
Following this Classic Lace Crochet Square – Tutorial, you’ve learned how to make elegant, delicate crochet squares from start to finish.
You can now create individual squares or join multiple ones for larger projects. Lace crochet is a skill that combines precision with creativity, resulting in beautiful handmade pieces.
Practice, patience, and attention to detail make your squares flawless and versatile. Share your creations, leave a sincere opinion, and provide suggestions to inspire others who follow this tutorial.
Throughout this article, we’ll explore the supplies needed, provide a breakdown of the stitches and steps, offer creative ways to use your squares, and share troubleshooting tips for common mistakes.


