Crochet Pig In A Granny Square Blanket Pattern


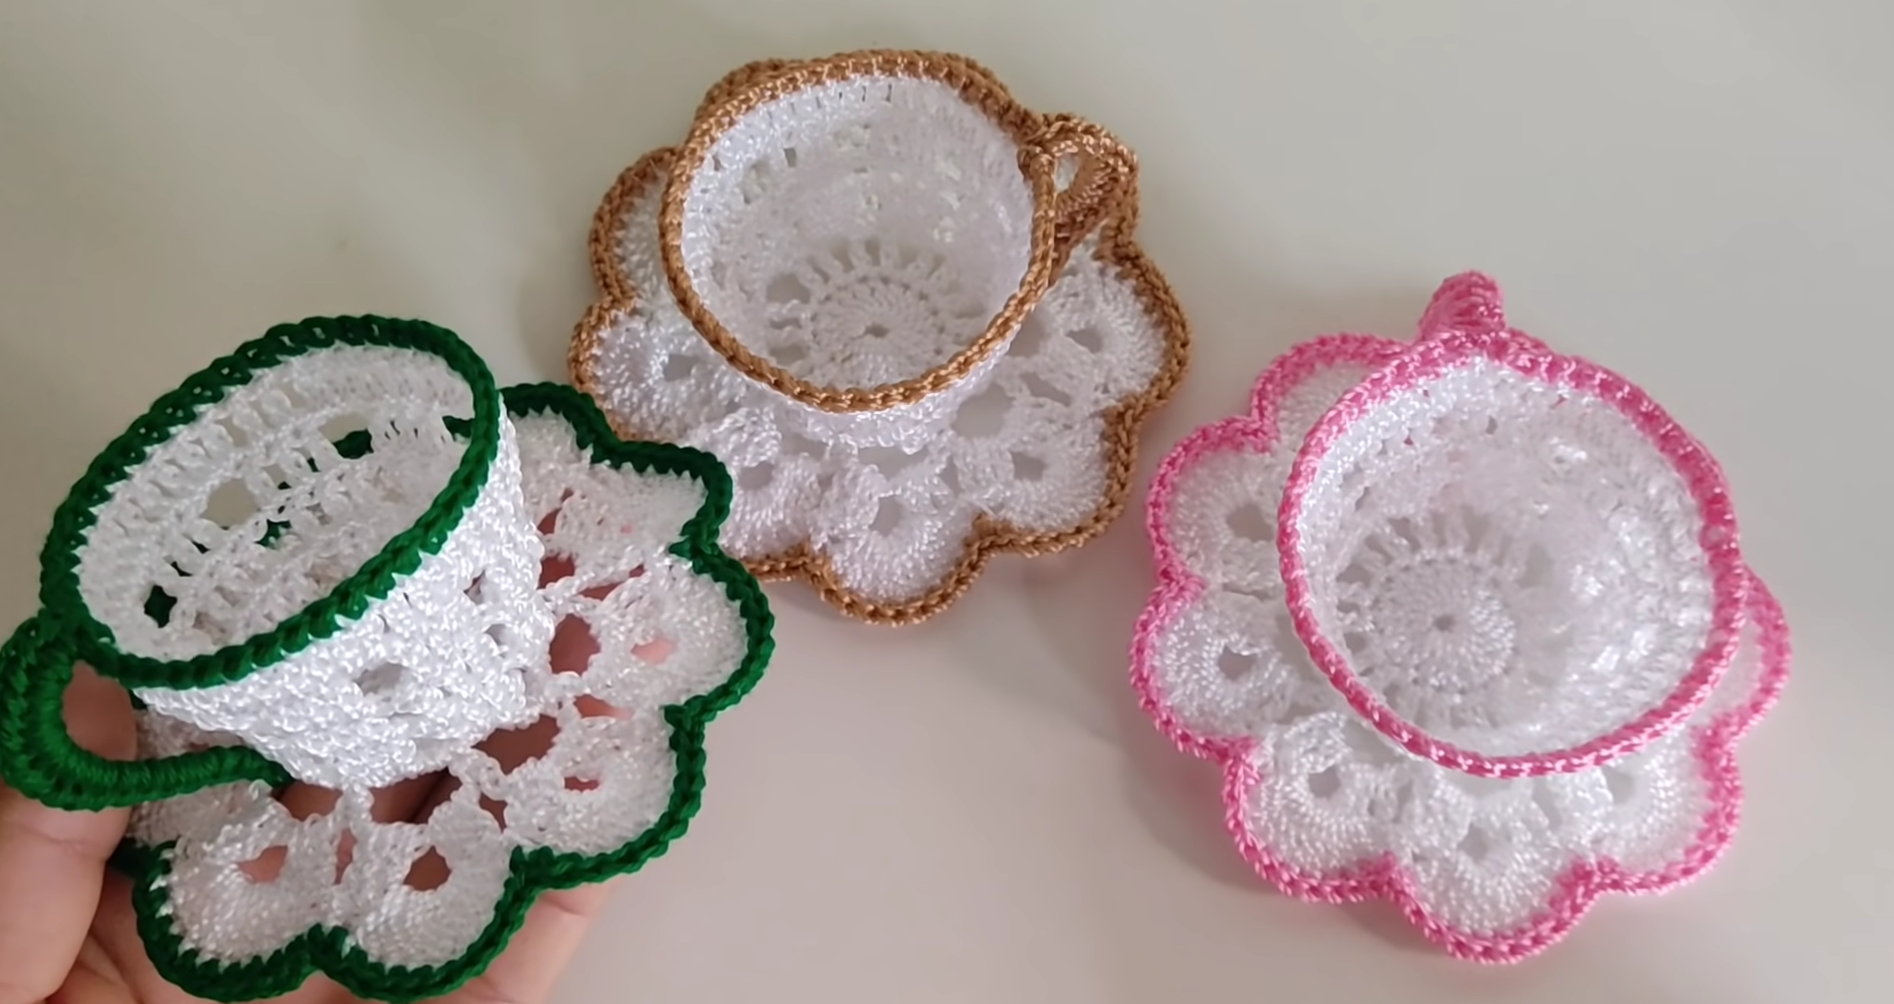
Creating your own crochet cups can be a fun, quick, and satisfying project. With this Crochet Cups – Quick and Easy Tutorial, even beginners can make adorable, functional crochet cups that can serve as decorative items, small storage solutions, or charming gifts.
The beauty of these crochet cups is that they are highly customizable. You can choose your favorite yarn colors, experiment with patterns, and adjust the size to suit your needs.
Using simple crochet stitches, this quick and easy tutorial helps you create a durable cup that maintains its shape and style. The process is straightforward and doesn’t require any advanced skills.
Whether you are a beginner who wants a manageable project or an experienced crocheter looking for a relaxing and creative activity, making crochet cups offers both practicality and artistic expression.
In this Crochet Cups – Quick and Easy Tutorial, you will learn step by step how to create a crochet cup from scratch. We’ll cover everything from selecting materials to finishing touches. By following this guide, you’ll understand the construction process, improve your crochet skills, and end up with a beautiful handmade cup that reflects your creativity.
To start your Crochet Cups – Quick and Easy Tutorial, gather a few basic supplies. You’ll need medium-weight yarn, a crochet hook suitable for your yarn, scissors, and a yarn needle for finishing. Selecting soft, durable yarn ensures that your cups hold their shape while remaining flexible.
You can mix and match colors to create fun designs or stick to a single color for a minimalist look. Using leftover yarn from previous projects is an excellent way to reduce waste and create something practical.
A comfortable crochet hook makes stitching easier and more consistent. Pay attention to tension—too tight may make your cup stiff, and too loose may cause it to lose shape.
The yarn needle is essential for weaving in loose ends and closing the cup’s bottom neatly. Blunt-ended needles work best for this purpose.
Scissors will be used frequently to trim yarn during color changes or finishing. Keeping them sharp helps achieve clean edges.
Lastly, measure the desired height and diameter of your cup before starting. This ensures that your finished product meets your functional or decorative needs.
The key to making a successful cup is following the stitches accurately. Begin your Crochet Cups – Quick and Easy Tutorial by making a magic ring or chaining four and joining with a slip stitch to form a circle. Work six single crochets into the center to form the cup’s base.
Continue in rounds, increasing stitches gradually to expand the base evenly. This ensures a flat bottom that will support the cup structure. Use stitch markers to mark the beginning of each round for accuracy.
Once the base reaches the desired diameter, stop increasing and work in rounds without adding stitches to build the sides. This gives the cup its vertical shape. Maintaining even tension is essential at this stage to avoid wobbling sides.
If you want to add texture or decorative patterns, alternate stitch types like half double crochet or double crochet. Small changes in stitch patterns can make your cup look unique and visually appealing.
After reaching the desired height, fasten off the yarn and use a yarn needle to weave in all loose ends securely. Make sure the bottom is fully closed to prevent any gaps.
Finally, lightly block the cup if necessary. This step helps even out stitches and gives the cup a polished, professional appearance.
One of the joys of this Crochet Cups – Quick and Easy Tutorial is how easily you can customize your cups. Color choices, stitch variations, and decorative accents allow you to personalize every piece.
Experiment with contrasting yarn colors for a striped effect or subtle tone-on-tone shades for an elegant look. Each round can be a new color or pattern to highlight your creativity.
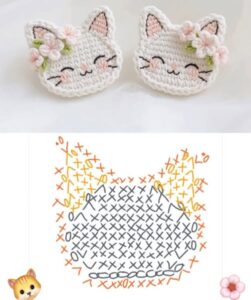
You can also crochet small motifs such as flowers or hearts and sew them onto the cup for additional decoration. This makes your cups perfect as gifts or party favors.
In the next round, you’ll increase. Place 2 SC into each stitch around, ending with 12 SC. Continue increasing in each round by evenly spacing the increases. For example, in round 3: 1 SC, 2 SC in next stitch around to get 18 SC.
Once your base is the desired size, stop increasing and begin building the sides of the cup. To do this, work 1 SC in each stitch around without increasing. This will naturally start curving the fabric upward to form a cup shape.
Adjust the cup size for different purposes. Small cups can hold jewelry, keys, or coins, while larger cups can be used for holding pens, utensils, or small plants.
Adding a handle is another option. Simply crochet a strip and attach it securely to the side, transforming your cup into a miniature mug for decorative use.
Finishing touches like edging or scallops along the rim add a professional flair and make the cup look polished and complete.
Creating a functional cup requires attention to detail. Follow these tips in this Crochet Cups – Quick and Easy Tutorial to ensure durability and practicality.
Use tightly spun yarn for strength. Avoid yarn that is too soft or loose, as it may cause the cup to sag over time.
Maintain consistent stitch tension throughout your work. Uneven tension can make sides bulge or curve undesirably.
Reinforce the bottom with extra rounds or a slightly tighter stitch pattern to support the cup’s weight. This prevents sagging and improves stability.
Consider adding a base lining with felt or fabric for extra support. Simply cut a circle to fit and sew it into the bottom for a reinforced structure.
Avoid overly complicated stitch patterns that may distort the shape. Simple designs often create the best-looking and most functional cups.
Finally, always finish by weaving in all ends carefully. Secure ends prevent unraveling and keep your cup neat for long-term use.
1. Can beginners make crochet cups?
Yes, this Crochet Cups – Quick and Easy Tutorial is beginner-friendly. The stitches are simple and easy to follow.
2. What type of yarn is best?
Medium-weight cotton or acrylic yarn is ideal for durability, flexibility, and ease of handling.
3. Can the size be adjusted?
Absolutely. Increase or decrease the base diameter and height by adding or reducing rounds.
4. How do I keep the cup from collapsing?
Maintain tight, consistent stitches and optionally reinforce the bottom with extra rounds or fabric lining.
5. Can I make decorative cups with patterns?
Yes, you can add stripes, textures, or small motifs to make your cups visually unique.
6. Are crochet cups washable?
Most crochet cups made from acrylic or cotton yarn can be hand-washed with mild soap and laid flat to dry.
7. Can handles be added to crochet cups?
Yes, simply crochet a small strip or loop and attach it securely to create a miniature mug effect.
Following this Crochet Cups – Quick and Easy Tutorial allows you to create charming, handmade cups suitable for decoration, storage, or gifting.
You’ve learned how to crochet the base, build the sides, and add finishing touches for a professional appearance. These cups are versatile, functional, and a perfect way to showcase your creativity. Share your results, provide feedback, and suggest improvements to inspire others in their crochet journey. Happy crocheting!


