Crochet Pig In A Granny Square Blanket Pattern


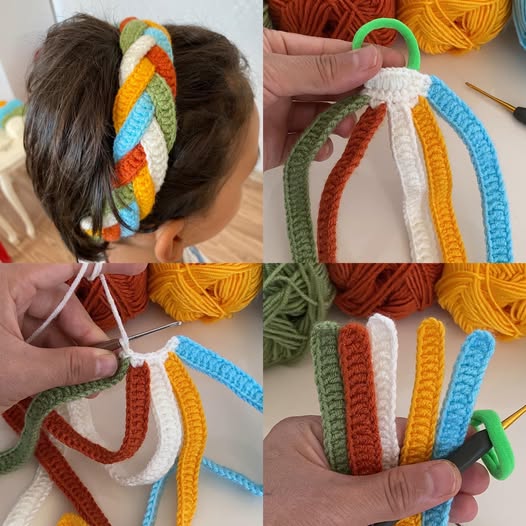
Crochet Headband Pattern designs have become a favorite among crafters who want a quick, stylish, and customizable accessory to wear or gift. In this article, you will find a complete and well-structured guide that explains how to make the most of a bold, modern, and practical Crochet Headband Pattern, while also learning tips for choosing yarn, mastering stitches, and improving your overall crochet skills. Because this is a versatile project, beginners and experienced makers alike can follow along without difficulty. Throughout the text, you will see key terms highlighted in bold to reinforce the SEO focus and ensure clarity.
Working with any Crochet Headband Pattern gives you the freedom to play with textures, colors, and techniques while creating a useful accessory that suits all seasons. Whether you prefer a simple band, a twist-style headband, or a wide, ear-warmer design, this type of project is perfect for using leftover yarn or experimenting with new fibers. In addition, handmade headbands are thoughtful gifts, easy to customize for children, teens, and adults. By understanding how patterns work and how to adapt them, you can create endless variations that reflect your personal style.
The goal of this article is to help you use a Crochet Headband Pattern effectively, whether you want something quick to make in an hour or a more textured, elegant style that takes additional time and precision. You will learn how patterns are structured, what materials work best, and how to troubleshoot common mistakes. The sections below are designed to guide you step-by-step, providing humanized explanations, beginner-friendly instructions, and professional insights to elevate your crochet experience.
A great Crochet Headband Pattern begins with clear instructions, suitable stitch choices, and a structure that fits comfortably on the head. Patterns that explain gauge and provide multiple size options are ideal because they accommodate different head circumferences. Proper measurements help the headband stay snug without feeling too tight or too loose.
Another essential part of any good Crochet Headband Pattern is the choice of stitch. Some stitches create stretch, while others provide texture or warmth. Ribbing stitches, for example, naturally stretch and can shape themselves comfortably. Meanwhile, shell stitches and puff stitches produce decorative looks that elevate the style of the headband.
A pattern should also offer yarn recommendations, since the fiber you choose affects comfort, durability, and appearance. Acrylic yarn offers flexibility and is budget-friendly, while cotton provides breathability and a soft finish. Wool blends are excellent for winter headbands, offering warmth and elasticity.
When reading any Crochet Headband Pattern, it is important to understand the abbreviations used. Familiarizing yourself with standard terms like SC (single crochet), DC (double crochet), HDC (half double crochet), and SL ST (slip stitch) allows you to follow instructions confidently. Many patterns also include explanations or stitch diagrams to help beginners.
The best patterns are adaptable. Sometimes you might want to add a twist to the front, make the band thicker, or incorporate color changes for a striped look. A flexible Crochet Headband Pattern gives space for creativity without causing confusion.
Finally, a strong pattern provides finishing instructions. Proper sewing, weaving in ends, and shaping are essential for a professional final result. Good finishing enhances durability and ensures that the headband looks polished and handmade with care.
Every project begins with choosing the correct materials. Using the appropriate yarn weight is crucial to achieving the right texture and stretch in your Crochet Headband Pattern. Most headbands use worsted weight or bulky yarn to create a warm, sturdy structure that maintains shape.
The hook size also influences your results. Patterns typically list the best hook size to maintain the correct gauge. Using a larger hook produces a softer, more flexible headband, while a smaller hook results in a denser, tighter fabric. Beginners should always check their tension to make sure it matches what the pattern recommends.
You will also need measuring tape to ensure accurate sizing. Measuring the head circumference of the person who will wear the headband helps create a perfect fit. Patterns often provide measurements instead of stitch counts alone to make adjustments easier.
A tapestry needle is essential for weaving in yarn ends and sewing seams. While it might seem like a simple tool, proper finishing makes a significant difference in the durability and appearance of your piece. Always choose a needle with a large eye that accommodates your yarn.
Stitch markers may also be useful for keeping track of rounds, especially in patterns worked in the round. They help maintain alignment and consistency, preventing mistakes that are difficult to fix later.
Finally, prepare your workspace with good lighting and a comfortable environment. Crocheting is more enjoyable when you can clearly see your stitches and work without strain.
One of the most enjoyable parts of working with a Crochet Headband Pattern is the ability to customize it. Changing yarn colors can transform a simple design into something vibrant and eye-catching. You can create stripes, gradients, or color blocks depending on your personal taste.
Texture is another way to personalize your headband. By substituting the stitch used in the pattern, you can create a completely different look. For example, ribbed stitches add elasticity, while bobble stitches offer a fun, playful style.
Adding decorative elements can give your headband a unique touch. Some people like to attach buttons, faux fur trims, or even crocheted flowers. These embellishments can elevate a simple project and make it perfect for gifting.
Adjusting the width of your headband is also simple. Wider bands work well as ear warmers in cold seasons, while thinner bands are great accessories for everyday wear. You can easily modify width by adding or removing rows in your Crochet Headband Pattern.
If you want a twist front design, you can follow a short sewing technique where the ends are folded and stitched together in a specific way. This creates a stylish crossed appearance that is very popular and modern.
Lastly, consider adding lining or elastic if you want extra sturdiness. While not required, these additions help the headband maintain shape and comfort during regular wear.
Even with an easy Crochet Headband Pattern, beginners sometimes encounter challenges. One common issue is the headband turning out too tight or too loose. This usually happens when the gauge is incorrect. Always measure your gauge swatch before starting your project to avoid size problems.
Another problem occurs when stitches appear uneven. This can happen due to inconsistent tension. Try relaxing your hands and maintaining a steady rhythm while crocheting. With practice, your stitches will naturally become more uniform.
Sometimes the seam of the headband looks bulky or misaligned. To fix this, use a slip stitch seam or mattress stitch, which creates a cleaner and more invisible join. A well-made seam makes a big difference in the overall appearance of the finished headband.
Color changes can also cause issues if not done correctly. When switching colors in your Crochet Headband Pattern, always leave enough yarn tail to weave in securely. This prevents unraveling and gives the headband a cleaner finish.
Another frequent issue is curling at the edges. This typically happens when the stitch used has little elasticity or the tension is too tight. Using a looser hook or adding a row of single crochet can help stabilize the edges.
Lastly, if your headband stretches too much over time, consider using a yarn with better elasticity or adding a ribbed section to improve the overall fit.
What yarn is best for a Crochet Headband Pattern?
Worsted weight or bulky yarn is ideal because it provides warmth, stretch, and structure. Cotton works well for lightweight headbands, while wool blends are perfect for winter.
How long does it take to make a crochet headband?
Most headbands take between 30 minutes and 2 hours depending on the design, yarn, and stitch complexity.
Can beginners follow a Crochet Headband Pattern?
Yes, headbands are excellent beginner projects because they use basic stitches and simple construction.
How do I know what size to make?
Measure the head circumference and subtract a small amount (usually 2–3 cm) for a snug fit. Always check the pattern’s size chart.
Can I customize the width of my headband?
Absolutely. Adding or removing rows allows you to make the band wider or thinner to suit your style.
Why does my headband look uneven?
Uneven tension, skipping stitches, or incorrect stitch counts are common causes. Practice helps improve consistency.
Creating a beautiful piece using a Crochet Headband Pattern is rewarding, fun, and accessible for all skill levels. In this article, you learned how patterns work, the best materials to use, customization tips, and solutions to common issues. With these insights, you can confidently create unique, stylish headbands that fit perfectly and look professionally made. I hope this guide helped you feel more prepared and inspired—please leave your sincere opinion and suggestions so I can continue improving the content for you!


