Crochet Pig In A Granny Square Blanket Pattern


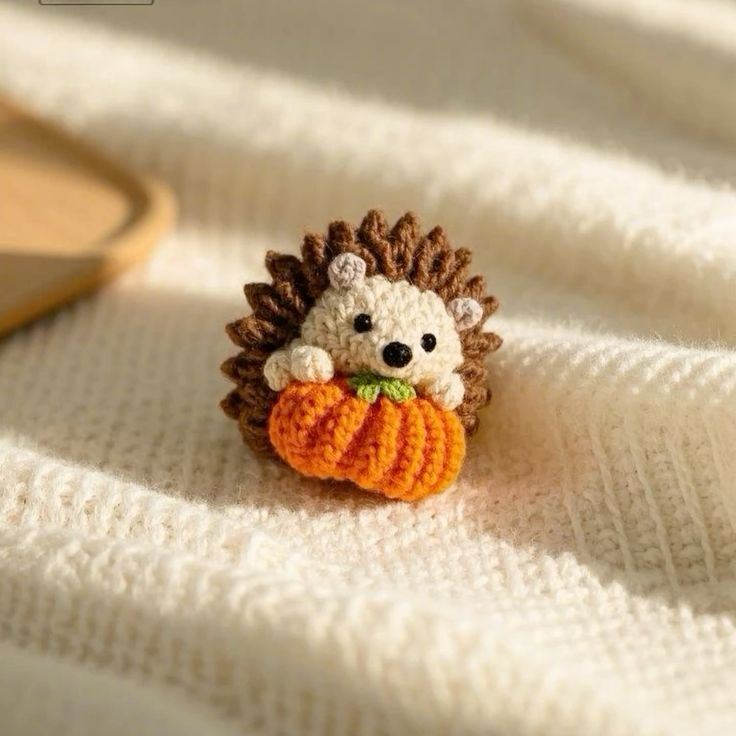
The Crochet Hedgehog with Pumpkin – Pattern is one of those adorable handmade projects that combine creativity, charm, and the warm feeling of fall.
When working on a Crochet Hedgehog with Pumpkin – Pattern, it is important to remember that amigurumi projects are not only about technique but also about storytelling.
In this article, we will break down everything you need to know to successfully make your own Crochet Hedgehog with Pumpkin – Pattern.
To start making your Crochet Hedgehog with Pumpkin – Pattern, you’ll need a few essential supplies. The right tools and materials not only make the process easier but also ensure that your finished hedgehog looks polished and durable. Choosing soft, high-quality yarn will give your project a professional appearance and a cozy touch.
First, consider the yarn type. Acrylic yarn is a common choice because it is affordable and widely available, while cotton yarn gives your hedgehog a neat and sturdy look. For the pumpkin, warm shades of orange, rust, or even mustard work beautifully. For the hedgehog’s body, shades of brown, beige, or gray create a natural look, but you can always experiment with playful colors.
Second, pay attention to the crochet hook size. A smaller hook, usually between 2.5mm to 3.5mm, is ideal for amigurumi projects like this one. The goal is to keep the stitches tight so that the stuffing doesn’t show through. Always check the yarn label for guidance, but don’t hesitate to adjust based on your personal preference.
Third, don’t forget about safety eyes or embroidery thread for facial details. Safety eyes make the hedgehog look cute and expressive, while embroidery gives you full control if you prefer not to use plastic components. A little blush or fabric paint can also add character to the face.
Stuffing material is another must-have. Polyester fiberfill is lightweight and easy to use, allowing you to shape the hedgehog and pumpkin firmly. Make sure to stuff evenly to avoid lumps, especially in small parts like the arms and the pumpkin stem.
Lastly, keep handy some accessories such as stitch markers, yarn needles, and scissors. Stitch markers will help you track rounds, which is especially useful when working in continuous spirals. A yarn needle is crucial for sewing the parts together neatly and securely.
By preparing all your materials before starting, you’ll ensure a smooth crocheting experience. Having everything organized also makes it easier to enjoy the creative process and stay motivated until your hedgehog and pumpkin are complete.
Creating a Crochet Hedgehog with Pumpkin – Pattern begins with building the hedgehog’s body. Typically, amigurumi starts with a magic ring to keep the stitches tight and secure at the beginning of the project. The body is shaped in rounds, gradually increasing and decreasing to form the oval shape of the hedgehog.
The head and body are usually crocheted as one continuous piece, which gives the hedgehog a seamless and smooth look. Using simple stitches such as single crochet, increases, and decreases, you can build the base form. Consistency in stitch tension is important here to avoid uneven shapes.
Once the body is done, you can work on the back, which gives the hedgehog its signature spiky look. This can be achieved using textured stitches or special yarns that mimic fur. Loop stitches, brushed yarn, or faux fur yarn are popular options. The spiky back is where your creativity shines, as you can make it fluffy, neat, or even multicolored.
After finishing the body, it’s time to crochet the arms, legs, ears, and tiny snout. These small parts may seem tricky at first, but they are what give your hedgehog its personality. Attaching them carefully with a yarn needle ensures the hedgehog looks well-balanced and charming. Make sure to position the arms in a way that they can hold the pumpkin securely.
Facial features bring the hedgehog to life. Whether you use safety eyes or embroider them, adding a small nose and gentle smile makes the hedgehog look friendly and welcoming. This step is where you add character, so don’t rush it.
By following these steps patiently, you will see your hedgehog slowly come together. Each stitch contributes to the final adorable figure, reminding you of the joy of handmade crafts and the satisfaction of completing a project with your own hands.
The pumpkin is the centerpiece that complements your Crochet Hedgehog with Pumpkin – Pattern. To make it, you’ll start with a small round shape using orange yarn. Like the hedgehog, the pumpkin is created in rounds, starting with a magic ring and gradually increasing in size.
Once the base sphere is finished, the magic of shaping begins. By weaving a yarn needle through the pumpkin and pulling tightly, you can create the characteristic ridges that make it look realistic. This technique gives the pumpkin its iconic texture without requiring complicated stitches.
The stem is a simple yet important detail. Using green or brown yarn, crochet a short cylinder and attach it to the top of the pumpkin. For added realism, you can crochet tiny leaves or vines to give the accessory a more natural look. This little detail enhances the overall charm of the hedgehog holding its pumpkin.
The size of the pumpkin can be adjusted depending on your preference. A small pumpkin looks delicate, while a larger one makes a bolder statement. Either way, it perfectly matches the cozy autumn vibe of the hedgehog.
Once the pumpkin is complete, sew it carefully into the hedgehog’s arms. Position it so it looks like the hedgehog is hugging it, which adds to the cuteness factor. This combination of animal and seasonal element creates a unique decoration piece.
With the hedgehog and pumpkin assembled, your project now becomes more than just an amigurumi figure—it transforms into a seasonal symbol of warmth and creativity, perfect for fall displays or thoughtful handmade gifts.
The Crochet Hedgehog with Pumpkin – Pattern is versatile and allows for endless customization. You can adapt the colors, sizes, and details to suit your personal taste or seasonal themes. For instance, using pastel yarns can give the hedgehog a spring-like look, while traditional earthy colors emphasize the autumn spirit.
This project is also perfect for seasonal décor. Imagine a group of hedgehogs with pumpkins displayed on a mantel, dining table, or windowsill during the fall season. They bring a handmade, cozy touch that store-bought decorations simply cannot replicate.
If you enjoy gifting handmade items, this crochet pattern makes a thoughtful choice. A hedgehog holding a pumpkin symbolizes care, creativity, and warmth. It’s a perfect present for birthdays in autumn, Thanksgiving gatherings, or even as a surprise for someone who loves woodland animals.
You can also personalize the pumpkin by adding small embroidered initials, beads, or glittery thread. These details make your project one-of-a-kind and can even become family keepsakes passed down through generations.
For those who love teaching crochet, this project can be a fantastic workshop piece. It covers basic amigurumi techniques while offering room for creativity. Students can experiment with colors and accessories, learning the joy of creating unique crochet art.
Ultimately, the inspiration behind this project comes from nature and the comfort of handmade crafts. Each hedgehog with its pumpkin becomes a small reminder of the beauty of autumn, the creativity of crochet, and the power of handmade art to bring joy to everyday life.
1. Is the Crochet Hedgehog with Pumpkin – Pattern beginner-friendly?
Yes, it can be suitable for beginners who are familiar with basic stitches like single crochet, increases, and decreases. The small parts require patience, but the project is very rewarding.
2. What yarn works best for the hedgehog’s spiky back?
Textured yarns such as faux fur, boucle, or brushed acrylic work beautifully. You can also use loop stitches with regular yarn for a handmade spiky effect.
3. Can I make the hedgehog without the pumpkin?
Absolutely. The hedgehog looks cute on its own, and you can replace the pumpkin with other accessories like a mushroom, flower, or tiny book.
4. How long does it take to complete the project?
Depending on skill level, it usually takes between 6 to 12 hours to finish the hedgehog and pumpkin. Beginners may need a little extra time.
5. Can I wash the finished hedgehog?
Yes, but hand washing is recommended. Use mild soap and cold water, then let it air dry to maintain the shape and details.
6. Can children play with the Crochet Hedgehog with Pumpkin – Pattern?
It can be used as a toy if you avoid small detachable parts like safety eyes. For children under three, embroidery for facial features is a safer choice.
The Crochet Hedgehog with Pumpkin – Pattern is more than just a crochet project—it’s a celebration of creativity, coziness, and seasonal charm.
From selecting materials to shaping the hedgehog and crafting the pumpkin, every step allows you to explore your artistic side and enjoy the relaxing process of crochet.
This article guided you through the essentials, step-by-step tips, and creative inspiration to help you succeed with this adorable pattern. Now it’s your turn to create a hedgehog full of personality and warmth.


