Crochet Pig In A Granny Square Blanket Pattern


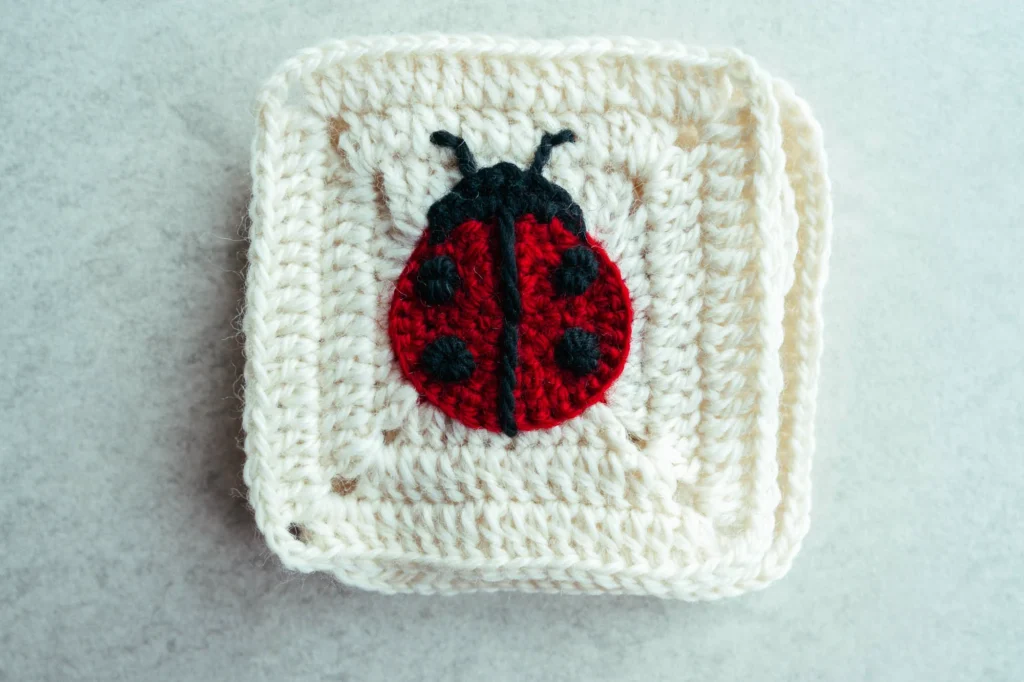
Crochet Ladybug Granny Square Pattern is a charming and versatile motif that brings color, texture, and personality to any handmade project. Whether you are a beginner discovering the joy of crochet or an experienced crafter seeking a fun new design, this adorable pattern is a wonderful way to add a playful touch to blankets, bags, clothing, and decor. Throughout this article, we will explore everything you need to know about creating a beautiful piece using the Crochet Ladybug Granny Square Pattern, using SEO-friendly guidance and clear explanations to help you achieve stunning results.
Crafting with themed granny squares has become increasingly popular, and the Crochet Ladybug Granny Square Pattern stands out for its sweetness and simplicity. Ladybugs symbolize luck, happiness, and protection, which makes this pattern perfect for gifting and personal projects alike. When combined with the classic granny square technique, the ladybug motif creates a delightful blend of tradition and modern creativity. Before we move into the technical aspects, it’s important to understand why this specific design is so beloved by crocheters around the world.
Using the Crochet Ladybug Granny Square Pattern offers endless possibilities. Because this design is worked in square form, it can be easily joined with other motifs or repeated to form larger pieces. The bold contrast of red and black ladybug details adds visual interest, while the granny square structure ensures stability, structure, and durability. With the right yarn, hook size, and technique, you can create decorative motifs that are not only visually pleasing but also long-lasting. Now, let’s dive deeper into the steps, materials, and tips that will help you craft the perfect ladybug square.
To create the Crochet Ladybug Granny Square Pattern, the first step is gathering the right materials. Choosing high-quality yarn can make a significant difference in the final appearance and durability of your square. Most crocheters prefer worsted-weight cotton or acrylic yarn because it holds shape well and offers vibrant color options. Red, black, and white are the most common shades for a classic ladybug design, though you can explore playful variations.
A suitable crochet hook is equally important. The recommended hook size may vary depending on your yarn choice, but many crafters use a 4mm or 4.5mm hook for even stitches. Ensuring that your hook and yarn pair well will help create a smooth and consistent tension. This is especially important when working on circular shapes such as the ladybug body.
Stitch markers can be extremely helpful when following the Crochet Ladybug Granny Square Pattern, particularly in the beginning rounds. They help you keep track of your stitches, making the pattern easier and preventing mistakes. A small tapestry needle will also be needed for weaving in ends and sewing embellishments afterward.
You may also choose optional accessories to enhance your design. Safety eyes, for example, can give your ladybug a more realistic appearance, though embroidered eyes are a safer alternative for baby items. Felt pieces, beads, or embroidered spots can further personalize the pattern while keeping the structure intact.
Before beginning, make sure you have a flat and comfortable workspace. Good lighting makes it easier to see stitch placement, especially when working with darker yarns like black. Having your materials organized and within reach will make crafting the Crochet Ladybug Granny Square Pattern much more enjoyable.
Finally, always start by reading through the entire pattern before crocheting. This ensures that you understand the sequence of steps, required stitches, and finishing instructions. Preparation may seem simple, but it can dramatically improve both your speed and the final outcome.
The ladybug motif itself is the highlight of the Crochet Ladybug Granny Square Pattern, and working it correctly will give your square its unique charm. Typically, the body of the ladybug begins with a magic ring or a small chain loop. This allows you to create a tightly closed center and ensures the motif looks clean and professional.
After forming the ring, you will usually work several rounds of stitches to create the body shape. These rounds often include double crochet or half-double crochet stitches to build height and structure. Maintaining even tension is essential, as uneven stitches may distort the ladybug’s circular form. Taking your time with these first steps will set the foundation for a beautiful motif.
Once the body is complete, it’s time to add the signature ladybug details. This may include black spots, a line down the center, and the small head. These details can be crocheted directly into the design or added later with surface stitching. Both options work beautifully, so choose whichever approach matches your skill level and preference.
When the ladybug motif is finished, the next step is transforming it into a granny square. This is done by working several rounds around the ladybug to give it a square frame. These additional rounds usually include chains, double crochets, and corner increases. The contrast between the rounded ladybug and the square border is what makes this design visually appealing.
As you complete your square, check for symmetry. Granny squares should always lie flat and have even sides. If your work begins to ripple or curl, a slight adjustment in tension or stitch count may help. Blocking the finished square can also improve its shape and give your project a polished finish.
Finally, repeat the square as many times as needed for your larger project. Whether you’re making a blanket, pillow, or bag, the Crochet Ladybug Granny Square Pattern can be duplicated effortlessly once you master the motif.
One of the best parts of working with the Crochet Ladybug Granny Square Pattern is the ability to produce clean and consistent results with the right techniques. Blocking is one such technique that can elevate your work. Lightly stretching your finished square and pinning it in place helps even out the stitches, making your granny squares look uniform.
Choosing the correct tension throughout your project is equally important. Beginners often struggle with stitches being too tight or too loose. Ideally, you want a balanced tension that allows your hook to glide smoothly while maintaining neat stitch definition. Practicing a few sample squares can help you get comfortable before starting your main project.
Another helpful tip is to weave in your yarn ends securely. Patterns with multiple colors, such as the Crochet Ladybug Granny Square Pattern, involve frequent color changes. Leaving long tails and weaving them neatly on the backside will keep your project tidy and durable over time.
For a cleaner appearance, consider using the invisible join method when finishing rounds. This technique avoids bulky knots and helps blend the end of your round seamlessly into your work. It’s ideal for projects where appearance matters, especially when creating decorative motifs.
Color placement is also a crucial factor. Although traditional ladybugs are red and black, you can experiment with pastels, vibrant hues, or contrasting borders. Try planning your color layout before crocheting multiple squares to ensure your final project looks cohesive.
Finally, keep your squares consistent by counting stitches regularly. Skipping or adding a stitch accidentally can affect the overall shape, so checking your work frequently can save you from having to redo entire sections.
The Crochet Ladybug Granny Square Pattern is incredibly versatile, making it suitable for a wide range of creative projects. Many crafters love incorporating it into baby blankets because of its cheerful appearance and soft texture. A blanket made entirely of ladybug squares is not only adorable but also makes a heartfelt handmade gift.
You can also use this pattern to create decorative pillows. By crafting two squares of equal size and stitching them together, you can easily make a charming pillow cover. This adds a pop of color to any room and makes a lovely handmade addition to your home.
Another popular project idea is tote bags. Using sturdy yarn and lining the inside of your bag can transform your granny squares into a functional and stylish accessory. The ladybug motif makes the bag eye-catching and fun.
For smaller projects, consider coasters, wall hangings, or appliqués. The versatility of the Crochet Ladybug Granny Square Pattern allows you to scale the design to your needs. Even a single square can serve as a decorative piece on its own.
Crafters also enjoy combining ladybug squares with other themed motifs. Flower squares, leaf designs, and nature-inspired patterns pair beautifully with the ladybug theme. Mix and match to create a personalized and cohesive project.
Finally, these squares make wonderful gifts. Whether for birthdays, baby showers, or holidays, handmade items carry a special warmth and thoughtfulness. The bright and joyful ladybug design is sure to be appreciated by anyone who receives it.
1. Is the Crochet Ladybug Granny Square Pattern suitable for beginners?
Yes, many beginners can successfully make this pattern. While the ladybug motif may require slight attention to detail, the granny square portion is beginner-friendly.
2. What yarn works best for this pattern?
Worsted-weight cotton or acrylic yarn is ideal because it holds its shape well and offers vibrant colors, especially for the red and black ladybug details.
3. Can I make the ladybug without using safety eyes?
Absolutely. You can embroider the eyes using black yarn or thread, which is especially recommended for baby projects where safety is a concern.
4. How many squares do I need for a blanket?
The number depends on the size of the blanket you want. A baby blanket might need 20–30 squares, while a large throw could require 60 or more.
5. Why is my granny square curling at the edges?
Curling usually occurs due to tight tension or missed stitches. Try loosening your tension slightly and double-check your stitch counts.
6. Can I mix this pattern with other themed granny squares?
Yes, the ladybug square pairs beautifully with floral, leaf, and nature-inspired motifs for a cohesive and creative project.
The Crochet Ladybug Granny Square Pattern is a delightful and versatile design that allows you to combine creativity, color, and traditional crochet techniques. Throughout this article, we explored materials, steps, tips, and project ideas to help you create beautiful squares with confidence. If you enjoyed this guide, feel free to leave your sincere opinion and share suggestions for future articles. Your feedback helps make each new tutorial even better!


