Crochet Pig In A Granny Square Blanket Pattern


Crochet lizard curtain tieback Pattern designs have become a charming and creative way to personalize home décor, especially for those who love adding handmade touches to their living spaces. This delightful project combines practicality and aesthetics, allowing you to keep curtains neatly tied back while showcasing a fun and unique crochet piece. In this article, you will learn everything about creating your own Crochet lizard curtain tieback Pattern, from essential materials to key techniques. The goal is to help you craft a piece that not only looks beautiful but is also functional, durable, and easy to adapt to your style.
Many crochet enthusiasts enjoy working on projects that serve a decorative purpose, and this pattern is perfect for crafters of all skill levels. Whether you are a beginner exploring new ideas or an experienced maker in search of inspiration, a Crochet lizard curtain tieback Pattern offers both versatility and creative freedom. With a bit of patience and attention to detail, you can create a friendly lizard-shaped accessory that brings personality and charm into any room of your home.
Throughout this guide, we will focus on providing a clear, well-structured explanation optimized for SEO and aligned with Google AdSense guidelines. You will find step-by-step tips, helpful insights, and thoughtfully organized information to guide you through your project with confidence. Each section of this article explores different aspects of the Crochet lizard curtain tieback Pattern, ensuring you understand not only how to make it but also how to customize and maintain it for long-lasting use.
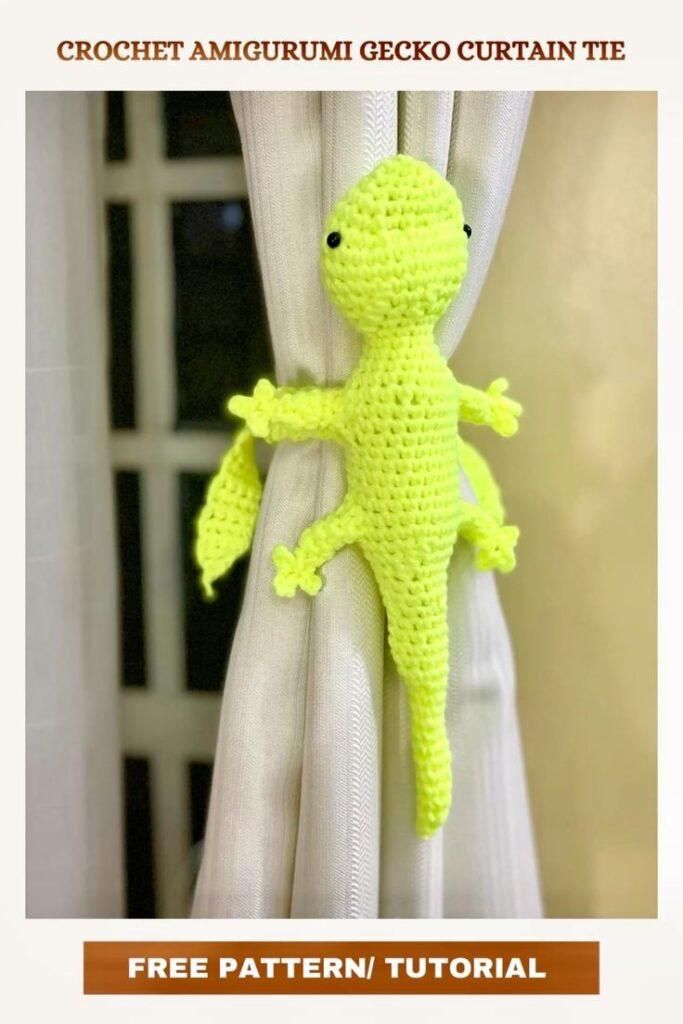
The first step in mastering a Crochet lizard curtain tieback Pattern is understanding its basic structure. A typical lizard tieback includes a long, flexible body, detailed head, tail, and small legs or decorative elements that help bring the piece to life. Each part can be made separately and then attached, or crocheted continuously, depending on your preferred method.
When crafting the body, most patterns use simple stitches such as single crochet or half-double crochet to create a firm and consistent texture. This helps the tieback maintain its shape while still being flexible enough to wrap around the curtain. The use of color changes can enhance the lizard’s natural appearance, making it more realistic or whimsical depending on your vision.
The head tends to be the most detailed part of the Crochet lizard curtain tieback Pattern. Using increases and decreases, you can shape the snout and define subtle features. Some crafters like to add safety eyes, while others prefer embroidered eyes for a softer look. This gives you the freedom to customize the expression of your crochet lizard.
Another essential component is the tail, which can be long and curled or straight and simple. Many creators enjoy experimenting with textures or adding decorative spikes along the back. This small detail can transform the overall design and make your project stand out.
Legs and feet are optional but highly recommended if you want your lizard to look even more charming. These can be crocheted as tiny extensions or made separately and stitched onto the body. Adding different colors or playful designs can help your lizard match the style of your existing home décor.
Finally, the method of attaching the tieback to the curtain may vary. Some use simple loops, while others craft a button closure or wraparound style. This practical choice depends on your curtain thickness and preferred functionality, making the Crochet lizard curtain tieback Pattern incredibly versatile.
When preparing to craft a Crochet lizard curtain tieback Pattern, gathering the right materials ensures your project turns out sturdy and visually appealing. Yarn selection is one of the most important considerations. Most crafters choose medium-weight yarn for a balance of durability and flexibility.
Cotton yarn is often preferred because it provides excellent stitch definition and holds its shape well. Acrylic yarn works too, especially if you want a softer or more colorful tieback. The most important aspect is selecting a yarn that complements your existing décor and suits the look you want for your crochet lizard.
Choosing the right crochet hook size is also essential. Hooks between 3.0 mm and 4.0 mm are typically recommended for this type of project. Using a smaller hook creates tighter stitches, which helps the lizard maintain structure and prevents stuffing from showing through the stitches.
Stuffing material is necessary for shaping certain parts of the lizard, such as the head or thicker sections of the body. Polyester fiberfill is commonly used because it is lightweight, washable, and easy to shape. You can adjust the amount of stuffing to give your lizard a firm or soft feel.
Other helpful tools include a yarn needle for sewing pieces together, stitch markers for keeping track of rows, and scissors for cutting yarn. Safety eyes or embroidery thread can be added depending on your preferred finishing touches. These small additions elevate the overall appearance of your Crochet lizard curtain tieback Pattern.
Lastly, having a clear workspace and a pattern reference sheet can improve your crafting experience. Keeping all materials within reach allows you to focus entirely on the creative process, ensuring a smoother and more enjoyable project.
Once you have gathered your materials, it’s time to begin working on your Crochet lizard curtain tieback Pattern. Start by crocheting the body, which is typically worked in rounds or rows depending on your chosen look. Maintaining consistent tension helps create a smooth, professional-looking surface.
As you shape the body, use stitch markers to track your progress. This is especially helpful when following increases or decreases, preventing mistakes that could affect the final shape. Taking your time during this stage ensures your lizard will look even and well-crafted.
Next, move on to creating the head. This part involves more shaping techniques, such as increasing to widen the base and decreasing to form the snout. Be patient and follow the pattern closely to achieve a balanced and detailed appearance.
Once the head is complete, attach the eyes and any facial details. If using safety eyes, insert them before closing the head to secure them properly. For embroidered eyes, leave plenty of tail yarn to stitch expressive and neat features.
The tail can be crocheted as an extension of the body or made separately. Many patterns allow you to shape the tail gradually to create a natural taper. Adding decorative elements like spikes or stripes can enhance the lizard’s personality and style.
After completing all parts, stitch them together carefully. Ensure that each leg, detail, and appendage is firmly attached. This final assembly step brings your Crochet lizard curtain tieback Pattern to life, ready to wrap around your curtains and brighten your space.
One of the best features of a Crochet lizard curtain tieback Pattern is the endless customization possibilities. You can choose colors that match your room’s décor, ranging from natural greens and browns to vibrant rainbow combinations for a playful touch.
Experimenting with textures is another fun way to personalize your lizard. Fuzzy or variegated yarn can give your project a unique and eye-catching appearance. You can even add stripes or spots to mimic different lizard species.
Adding accessories is another creative option. Some crafters like to include tiny crocheted flowers, hats, or decorative beads to give the lizard extra charm. These small touches add personality and make your tieback truly one-of-a-kind.
If you enjoy embroidery, consider adding sewn-on details such as scale patterns or decorative outlines. A few simple stitches can completely change the final appearance and make the lizard look more detailed and artistic.
Those who prefer a minimalist look can focus on clean stitching and subtle colors. A simple monochrome lizard can look elegant and modern, blending seamlessly with any interior style.
Children’s rooms also benefit from a playful lizard tieback. Bright colors, cartoonish features, and fun expressions can make this piece a delightful addition to a child’s space, adding joy and imagination.
What skill level is needed to make a Crochet lizard curtain tieback Pattern?
This project is suitable for beginners who understand basic stitches, as well as intermediate crocheters who enjoy shaping techniques.
How long does it take to complete a crochet lizard tieback?
Depending on your skill level, it typically takes between a few hours and one full day to complete.
Can I use different yarn weights?
Yes, but keep in mind that heavier or lighter yarn will affect the size and flexibility of the final piece.
Is stuffing necessary?
Stuffing is optional but recommended for the head and thicker body areas to maintain structure.
Can I wash the crochet lizard tieback?
Yes, as long as your yarn is washable. Hand washing is generally recommended for handmade items.
How do I attach the tieback to the curtain?
You can use loops, buttons, or simply wrap the lizard’s body around the curtain depending on your preferred style.
Creating a Crochet lizard curtain tieback Pattern is a rewarding and enjoyable project that brings creativity, functionality, and beauty into your home décor. Throughout this article, you learned about materials, crafting techniques, and customization ideas to help you make a unique and charming tieback. If this tutorial inspired you, feel free to share your sincere opinion and leave suggestions for future topics. Your feedback helps improve the crafting experience for everyone!


