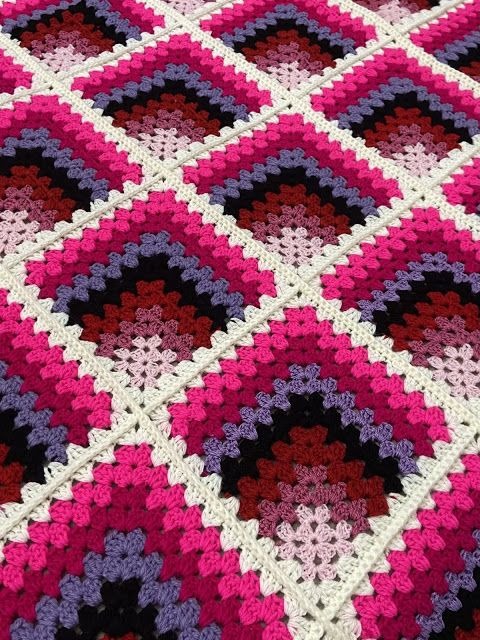
Crochet Pig In A Granny Square Blanket Pattern


Crochet Mitered Granny Squares Step By Step Pattern is one of the most versatile and creative techniques in the world of crochet, offering beautiful geometric results while remaining beginner-friendly. This classic method allows crafters to create colorful squares that decrease from one corner, producing clean lines and visually stunning angles. In this article, we will explore a complete step by step pattern, along with helpful tips, clear explanations, and SEO-friendly guidance using a natural, humanized writing tone. Whether you are new to crochet or already experienced, learning how to make Crochet Mitered Granny Squares will open the door to countless project possibilities—from blankets to bags and decorative pieces.
These squares are loved for their clean structure and flexible design, making them great for both minimalist and colorful layouts. Working with a Crochet Mitered Granny Squares Step By Step Pattern helps you maintain even tension, understand decreasing techniques, and explore creative color changes without overwhelming complexity. This method is also excellent for using scrap yarn, creating lightweight motifs, and assembling projects of any size. With the right yarn and hook combination, you can achieve professional and stylish results.
Before diving into the instructions, it’s essential to understand that consistency and patience are key when working with this technique. Each square builds outward from a corner, giving you plenty of control over the final shape and size. Throughout this article, you’ll find helpful tips, clear explanations, and practical insights designed to help you master Crochet Mitered Granny Squares quickly and confidently. Now let’s explore the technique in depth, starting with choosing your materials and understanding how the stitch structure works.
When beginning a Crochet Mitered Granny Squares Step By Step Pattern, the first concept to learn is how the square is constructed. Unlike traditional granny squares made in circular rounds, the mitered version grows diagonally from the corner. This creates crisp, geometric lines that form a natural decrease point at the center. Many crafters find this diagonal construction intuitive because it allows the square to expand symmetrically as you work row by row.
Another essential element is learning how to work chain spaces and clusters in a way that maintains even angles. The balance between increases on two sides and the decrease in the center is what shapes the mitered look. By following the step by step pattern, you will become comfortable with these repeated movements. As your muscle memory develops, the squares become faster and easier to complete.
Choosing colors is also an enjoyable part of the process. You can create a solid-colored square for a modern look or combine multiple colors to create a more traditional effect. Many crocheters enjoy using gradient yarns to produce soft transitions that highlight the geometric structure. This makes Crochet Mitered Granny Squares a fantastic choice for blankets, shawls, and baby projects.
Pay attention to tension as you work because it has a strong influence on the final shape. If your tension is inconsistent, the squares might pull inward or stretch too much. A consistent gauge ensures that all your motifs will fit together perfectly when joining them into a final project. This is particularly important for large items like afghans.
Finally, before moving into the detailed steps, gather your materials. You can use almost any yarn weight, but worsted or DK yarn tends to provide the best stitch definition for this pattern. Pair it with a hook appropriate for your yarn, keep your scissors nearby, and get ready to explore a beautiful technique that can elevate your crochet skills.
To begin your Crochet Mitered Granny Squares Step By Step Pattern, create a slip knot and chain four stitches. This small foundation is the anchor of your first row. After joining the chain to form a ring, you will start building the cluster stitches that form the structure of the square. This foundational step is essential because a secure center keeps the whole piece balanced.
Next, work your first row of double crochet clusters. These clusters give the granny square its iconic texture. In a mitered design, the first row is small, but it sets the framework for all your future repeats. Take your time and ensure your stitches are evenly placed. Using bold or contrasting yarn colors can help you visualize the pattern formation more clearly.
As you continue to the following rows, you will introduce the key element of a mitered square: the center decrease. This is achieved by skipping stitches or working into a chain space in a way that creates a sharp angle. This decrease is responsible for shaping the signature diagonal effect. Each row should mirror the previous one, maintaining the same structure while expanding outward.
One helpful tip is to use stitch markers along the center decrease line. This prevents confusion and ensures that your diagonal seam stays straight. Many crocheters find this especially useful when using multiple colors or textured yarns. Following the Crochet Mitered Granny Squares Step By Step Pattern carefully ensures that each square remains uniform.
As you grow your square, keep checking that all sides are even. A quick visual check after each row helps prevent mistakes from accumulating. If you notice any gaps or uneven stitches, it’s best to adjust them early rather than later. This attention to detail results in cleaner, more professional-looking motifs.
Once your square reaches the desired size, simply fasten off and weave in your yarn ends. At this point, you can block the square to refine its shape. Blocking is optional but highly recommended because it enhances the crisp geometry of mitered designs. With practice, each square will become smoother and more symmetrical.
One of the most exciting aspects of Crochet Mitered Granny Squares is their incredible versatility. You can combine them to make blankets, table runners, scarves, or even garments. Because each square grows from one corner, the color flow across a large project can appear strikingly dynamic. This makes the technique perfect for bold, modern designs.
Many crocheters enjoy making baby blankets using this method. The soft structure and smooth angles make the final piece both functional and visually appealing. Using soft pastels or bright primary colors can help personalize the blanket for any theme. The step by step pattern ensures consistency across all squares.
Bags are another excellent project option. Mitered squares are sturdy and maintain their shape well, making them ideal for tote bags or market bags. When sewn together, they form beautiful patchwork designs that stand out. You can line the inside for extra strength or add decorative tassels for a personalized touch.
Home décor items such as pillow covers also work beautifully with this pattern. Creating a set of matching or contrasting squares can instantly transform a plain pillow into a handmade statement piece. Using textured yarn gives the final product even more character and dimension.
Wearable items such as ponchos, vests, and shawls can also be constructed with these squares. Because each square can be made in different sizes, you have total control over the fit and style of the garment. This flexibility appeals to crocheters who enjoy customizing their creations.
Finally, smaller mitered squares make excellent coasters, placemats, or decorative motifs. You can turn them into ornaments, appliqués, or even wall hangings. With limitless possibilities, this pattern remains a favorite among all skill levels.
For the best results when working with a Crochet Mitered Granny Squares Step By Step Pattern, focus on the tension of your stitches. Even tension ensures that every side of the square grows uniformly. If your squares curl or appear uneven, switching to a hook one size smaller or larger can help you achieve the ideal balance.
Color changes can also elevate the overall design. If you want clean transitions between colors, switch yarns at the beginning of a new row. Be sure to secure your yarn tail by weaving it neatly into the underside of your work. This prevents loose ends and keeps the inside of your project tidy.
Another important tip is blocking. Even experienced crocheters find that blocking improves the symmetry of mitered squares. Lightly shaping your motifs using steam or water allows them to lie flat and maintain crisp, geometric lines. Just be careful to follow your yarn’s care guidelines.
Using stitch markers can be a game changer. Placing markers at the center decrease point and corners helps maintain accuracy. This prevents accidentally increasing or decreasing stitches on the wrong side, which can distort the shape.
Yarn choice also affects your final result. Smooth fibers highlight stitch definition, while textured yarns create a cozier appearance. Select the yarn based on your project’s purpose. For example, blankets benefit from soft fibers, while bags may require sturdier yarn.
Finally, practice makes perfect. The more squares you make, the more natural the technique becomes. Over time, your speed will increase, and your stitches will become more consistent. Every crocheter improves with repetition and patience.
What are Crochet Mitered Granny Squares?
They are variations of traditional granny squares that are worked diagonally from one corner, creating a mitered or angled effect through strategic decreases.
Are Mitered Granny Squares good for beginners?
Yes, they are beginner-friendly because the stitches are simple, and the pattern follows a repetitive structure that is easy to memorize.
What projects can I make with these squares?
You can create blankets, bags, garments, pillow covers, table runners, coasters, and decorative items.
What yarn works best for this pattern?
Worsted and DK yarns are the most common choices, offering good stitch definition and a balanced thickness for most projects.
Do I need to block the squares?
While blocking is optional, it helps improve the overall shape and gives the squares a clean, professional finish.
Can I change colors in the pattern?
Absolutely! Color changes are common and can be done at the beginning of new rows to create bold or subtle visual effects.
In this detailed guide, we explored how to work with Crochet Mitered Granny Squares Step By Step Pattern, from understanding their structure to mastering the technique and applying it to creative projects. This pattern is accessible to both beginners and experienced crocheters looking for a fresh, geometric approach to classic granny squares. Take your time, practice consistently, and enjoy experimenting with colors, textures, and project ideas. I hope this article has helped clarify the process and inspired you to create your own beautiful designs. Please feel free to leave a sincere opinion or share suggestions to help improve future content.


