Crochet Pig In A Granny Square Blanket Pattern


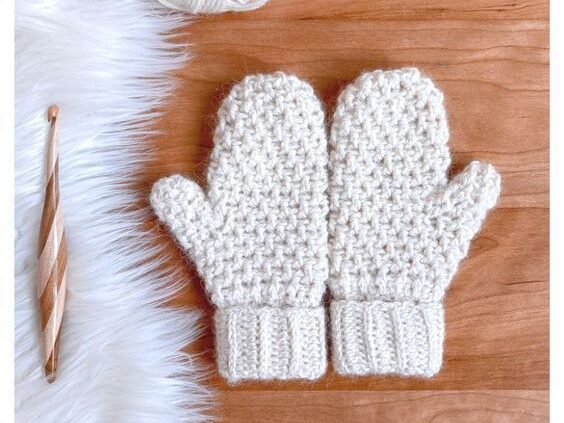
Crochet Mittens Step By Step Pattern is one of the most accessible and rewarding projects for beginners and experienced crocheters alike. Whether you are preparing cozy accessories for winter, creating personalized handmade gifts, or simply exploring new crochet techniques, learning how to make mittens is a delightful journey. Throughout this article, you will discover a detailed and easy-to-follow guide to crafting your own mittens from scratch. Using bold keywords such as Crochet Mittens Step By Step Pattern will help you better understand and memorize the process while ensuring this article stays optimized for SEO.
Crocheting mittens allows you to combine comfort, creativity, and practicality in one beautiful piece. With just a few essential materials and basic stitches, anyone can craft mittens that fit perfectly and look stunning. This project is also wonderfully customizable, allowing you to adjust colors, patterns, lengths, and finishing touches to suit your style. By following a Crochet Mittens Step By Step Pattern, you can focus on technique while developing confidence in your skills.
Before diving into the detailed sections ahead, keep in mind that consistency and patience are key to creating smooth, well-shaped mittens. Each paragraph in this tutorial will guide you through the process with clarity so that even beginners feel empowered to complete the project. Whether this is your first time making mittens or you are looking to refine your technique, this Crochet Mittens Step By Step Pattern will help you achieve beautiful, professional-looking results with ease.
Crochet mittens may look complex at first, but breaking the project into manageable steps makes the process both simple and enjoyable. The first thing you need to understand is how the mitten is structured. Typically, mittens begin at the cuff, move up toward the palm, and then expand at the thumb area. Using a reliable Crochet Mittens Step By Step Pattern ensures you stay on track as the design progresses. Each section builds upon the last, helping your hands become familiar with tension and stitch flow.
Before you begin crocheting, gather essential materials such as medium-weight yarn, an appropriate hook size, a yarn needle, and stitch markers. Choosing high-quality yarn enhances comfort and durability, making your mittens both soft and long-lasting. If you are new to crocheting, opt for light-colored yarns, as they make it easier to see individual stitches while following the Crochet Mittens Step By Step Pattern.
Understanding gauge is another important step. Gauge determines how tight or loose your stitches are, directly influencing the final size of your mittens. Making a small swatch before starting helps you adjust tension accordingly. This foundational step avoids fit issues later on and helps your mittens look polished and symmetrical.
Next, familiarize yourself with the basic stitches commonly used in mitten patterns. These may include chain stitches, single crochet, half double crochet, and slip stitches. Each of these stitches contributes to the structure and elasticity of the mittens. Reviewing these techniques before starting ensures a smoother experience as you follow the Crochet Mittens Step By Step Pattern.
You will also want to understand the concept of crocheting in the round, as mittens are usually created in a circular manner instead of flat. Working in rounds creates seamless edges and a more professional finish, making the mittens comfortable to wear. This technique may feel unusual at first, but with practice, it becomes one of the most enjoyable aspects of crocheting mittens.
Finally, keep your workstation organized. Having all materials within reach and your pattern printed or visible helps you crochet efficiently. Crocheting is meant to be relaxing, and staying organized allows you to enjoy the experience while completing your Crochet Mittens Step By Step Pattern with confidence.
To begin your mittens, you will start at the cuff, which provides the foundation of the entire piece. The cuff is usually made with ribbing to offer flexibility and comfort. A stretchy cuff ensures your mittens stay secure around your wrists while keeping cold air out. Starting here allows you to become familiar with the pattern rhythm before moving on to more complex sections.
Begin by creating a foundation chain that matches the desired length of your cuff. This measurement usually wraps comfortably around your wrist without feeling too tight. After forming your chain, work back and forth rows of single crochet or half double crochet, depending on your chosen Crochet Mittens Step By Step Pattern. This creates the ribbed texture that defines most mitten cuffs.
Once the cuff reaches the correct width, join the short ends together to form a tube. This closure marks the transition from working in rows to working in rounds. A slip stitch seam is commonly used here and creates a smooth connection without bulk. Following the Crochet Mittens Step By Step Pattern, you will then begin crocheting along the top edge of the cuff to build the body of the mitten.
With your cuff complete, the next step is creating the base that extends toward the palm and fingers. This stage involves increasing stitches evenly around the first few rounds to shape the mitten. Proper stitch count and even tension help ensure a comfortable fit. Using stitch markers makes it easier to keep track of your rounds and stay aligned with the pattern.
As you continue crocheting upward, check your progress by gently slipping the cuff over your hand. This helps you gauge fit and tension early on. Adjustments can still be made at this stage if needed. The simplicity and flexibility of this stage help build confidence as you continue following your Crochet Mittens Step By Step Pattern.
Completing the cuff is a major milestone in your project. It sets the stage for the main body and thumb, and once this part is done, the rest of the process becomes even more exciting. With your cuff looking neat and uniform, you’re ready to move forward and shape the mitten itself.
The thumb is one of the most distinctive features of a mitten, and shaping it correctly is essential for comfort. Many beginners find the thumb area intimidating, but with a clear Crochet Mittens Step By Step Pattern, the process becomes surprisingly manageable. You will typically work increases at a specific point in each round to form the thumb gusset, which allows for natural hand movement.
As the gusset grows, your stitches will begin to form a triangular shape on the side of the mitten. This expansion creates the space needed to house the thumb. Following your Crochet Mittens Step By Step Pattern, you will eventually separate these thumb stitches from the rest of the mitten by placing them on a stitch holder. This allows you to continue shaping the main body without interruption.
Once the thumb stitches are set aside, continue crocheting the main body of the mitten in the round. This stage builds up the palm and finger area, forming the main compartment that keeps the rest of your hand warm. Depending on your preferred fit, you can add more rounds for extra length or stop earlier for a snug design.
After completing the main section, the top of the mitten is typically decreased in a controlled manner. These decreases form a rounded shape that accommodates the curve of your fingers. The key here is maintaining a smooth decrease pattern to avoid bumps or uneven shaping. A well-written Crochet Mittens Step By Step Pattern will guide you carefully through this section.
Once the top is fully closed, you will return to the thumb stitches that were set aside earlier. Attach your yarn and begin working in rounds to complete the thumb. This mini-section works up quickly, typically requiring only a few rounds before being closed at the top. The thumb should feel snug but not tight, providing both warmth and mobility.
Completing the thumb brings your mitten to life. At this point, your project truly resembles a finished piece. All that remains are small details, like weaving in yarn ends and adding embellishments if desired. With the main structure complete, you can proudly admire your work and begin the second mitten, using the same Crochet Mittens Step By Step Pattern for consistency.
Once your mittens are fully crocheted, it’s time to add the finishing touches that make them uniquely yours. Start by weaving in all loose ends using a yarn needle. This step gives your mittens a clean and polished appearance. Pay special attention to areas around the thumb and cuff, ensuring everything is secure and neatly tucked away.
Blocking is another optional step that enhances the final look of your mittens. Lightly misting them with water and shaping them by hand can help the stitches settle into place. If your yarn allows, you may even pin them down while they dry for a more uniform shape. This enhances the cohesiveness of the stitches and gives your mittens a professional finish.
Personalization is where creativity shines. You can add decorative elements like embroidered flowers, surface slip stitches, or contrasting cuffs for a bold look. Some crocheters even add buttons, appliqués, or textures to make their mittens stand out. Following your Crochet Mittens Step By Step Pattern ensures that the structure remains consistent while allowing room for design flair.
Consider experimenting with colorwork techniques such as stripes, ombré yarn blends, or two-tone patterns. These variations can make your mittens uniquely stylish without altering the main pattern. Color choices have a significant visual impact and can transform a simple mitten into a sophisticated statement accessory.
Adding linings is another way to enhance comfort and warmth. Soft fleece or flannel linings make mittens extremely cozy, especially for colder climates. While this step requires basic sewing skills, it complements the mitten design beautifully and provides extra insulation.
Finally, take time to try on your finished mittens and admire the result of your hard work. Handcrafted pieces bring a sense of satisfaction that store-bought accessories simply cannot match. With your mittens complete, you can enjoy the warmth and beauty of your handmade creation or gift them to someone special.
1. Are crochet mittens beginner-friendly?
Yes! Using a Crochet Mittens Step By Step Pattern makes the process accessible even for beginners. Starting with simple stitches and clear instructions helps build confidence.
2. What type of yarn is best for crochet mittens?
Medium-weight yarn is a popular choice because it provides warmth, durability, and easy stitch visibility.
3. How long does it take to crochet a pair of mittens?
The time varies depending on skill level, but many crafters finish a pair within a few hours to a couple of days.
4. Do I need to make a gauge swatch?
Yes, doing a gauge swatch ensures the mittens will fit correctly. Skipping this step may lead to mittens that are too large or too small.
5. Can I customize the mitten size?
Absolutely. Adjusting stitch counts or rounds allows you to create mittens for children, teens, or adults easily.
6. Is crocheting in the round difficult?
Not at all! Once you get used to the technique, crocheting in the round feels natural and creates seamless, comfortable mittens.
7. Can I use different stitches in my mittens?
Yes, you can modify patterns with textured stitches as long as the structure of the Crochet Mittens Step By Step Pattern remains consistent.
Creating your own mittens using a Crochet Mittens Step By Step Pattern is a rewarding and enjoyable project for all skill levels. Throughout this guide, you learned the essential steps—from the cuff to the thumb and finishing touches—ensuring your mittens turn out beautifully. Now that you have the knowledge and confidence to make your own pair, feel free to share your final thoughts. Leave your honest opinion and suggestions so we can continue improving future guides and tutorials.


