Crochet Pig In A Granny Square Blanket Pattern


If you are looking for a fun and adorable crochet project, this Crochet Paw Print Granny Square Pattern Free tutorial is perfect for you.
Creating your own paw print granny squares allows you to combine creativity with practicality, making charming designs for blankets, pillows, or gifts for animal lovers.
Whether you are a beginner or an experienced crocheter, this pattern is accessible, enjoyable, and results in a project you can proudly display.
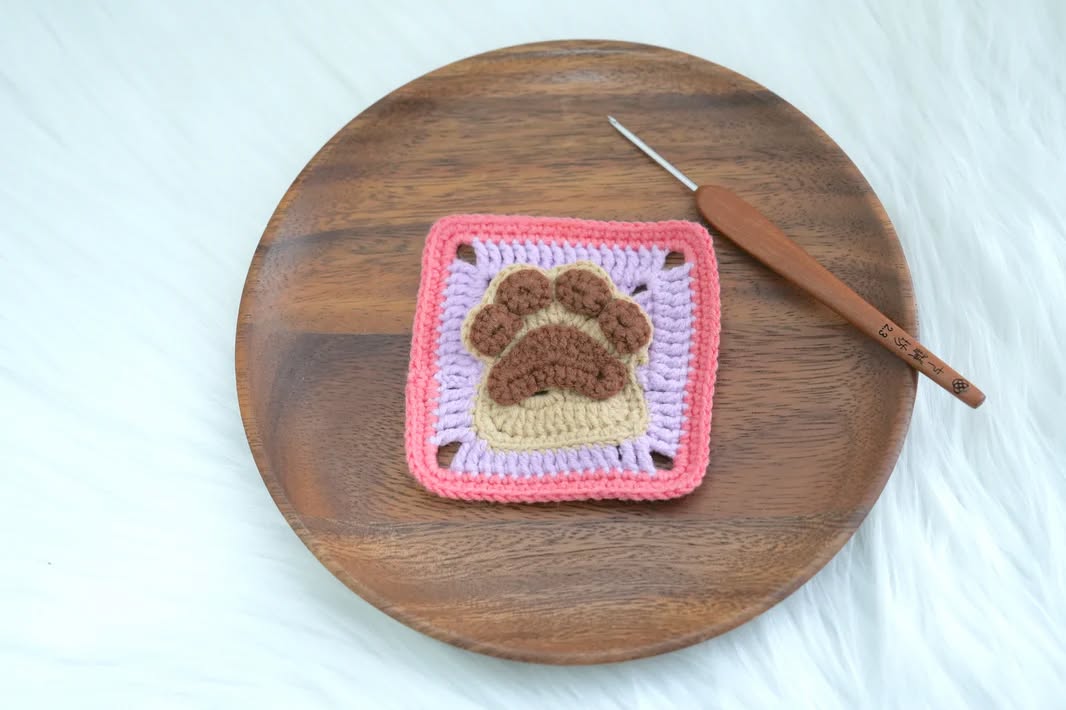
The beauty of this paw print granny square pattern is in its versatility and simplicity. Each square features a cute paw print design, adding personality to your crochet creations.
You can mix and match colors for the background and the paw print to suit your style or theme. This free pattern uses basic stitches and follows a step-by-step guide, making it easy to follow even if you have never made a granny square with a motif before.
In this Crochet Paw Print Granny Square Pattern Free guide, you’ll learn how to create each element of the paw print, assemble your squares, and join them into a larger project. With this tutorial, you can produce a professional-looking granny square that is both fun and functional. By the end, you will have a set of beautiful squares ready to become blankets, cushions, or even a special gift for someone who loves pets.
To start the Crochet Paw Print Granny Square Pattern Free, gather your materials. You will need medium-weight yarn in at least two colors: one for the background and one for the paw print. Cotton or acrylic yarn works best for durability and ease of handling.
Choose a crochet hook that matches your yarn’s recommendation. A comfortable hook ensures even stitches and prevents hand fatigue. For beginners, slightly larger hooks can make stitching easier.
You’ll also need a yarn needle for weaving in ends and joining squares together. Keeping ends secure will give your project a clean and professional finish.
Scissors are essential for trimming yarn, and a stitch marker can help you keep track of rounds, especially when working in the round for the paw print.
Measuring tape or ruler helps ensure your squares are consistent in size. Consistency is key when joining multiple squares for blankets or other larger projects.
Optional: blocking tools or pins can help shape your granny squares perfectly, making joining easier and ensuring uniformity across all squares.
The core of this Crochet Paw Print Granny Square Pattern Free is creating the paw print itself. Begin by crocheting a magic ring or chain four and join to form a circle for the paw’s base.
Work the paw pads in small circles inside the magic ring, adjusting colors as needed. Typically, you’ll create one large pad for the main paw and four smaller pads for the toes.
Use single crochets, half-double crochets, or double crochets depending on your chosen yarn thickness. Each stitch helps define the shape of the paw print clearly against the background.
Once the paw pads are complete, switch back to the background color to create the granny square border. Work in rounds, increasing evenly to maintain a square shape around your motif.
Ensure all corners are made correctly by using the standard granny square method: clusters of three stitches separated by chain spaces. This technique keeps your square flat and symmetrical.
After completing the rounds, fasten off and weave in all ends carefully. Each square should now feature a distinct paw print that stands out beautifully against the background.
After creating multiple squares from this Crochet Paw Print Granny Square Pattern Free, it’s time to join them into a larger project. Lay your squares flat and plan the arrangement to ensure a balanced look.
You can join squares using whip stitch, slip stitch, or single crochet along the edges. Choose a method that complements your project and provides durability.
Match corners and sides carefully during joining to avoid misaligned seams. Proper alignment ensures a polished and professional appearance.
For larger projects, consider joining squares in rows first and then connecting the rows. This approach simplifies the assembly process and makes handling easier.
Once all squares are joined, check for loose ends or gaps along the seams. Secure any weak spots to make your project strong and long-lasting.
Finally, block the entire piece if desired. Blocking helps even out stitches, relaxes the yarn, and gives your finished project a crisp, clean look.
The Crochet Paw Print Granny Square Pattern Free is versatile and can be adapted for numerous projects. Create a blanket for a pet, a pillow cover, or even a wall hanging to showcase your paw print squares.
Mix and match colors for a playful or elegant look. For example, use pastel tones for a soft baby blanket or bright primary colors for a vibrant statement piece.
Combine paw print squares with traditional granny squares for added texture and variety. This creates a unique quilt-like effect that highlights the paw motif.
Small projects like coasters, placemats, or tote bags can also benefit from this adorable pattern. Each paw print adds charm and a personalized touch.
Consider gifting completed paw print projects to friends and family who love animals. Handmade gifts with a paw print motif are thoughtful and memorable.
Experiment with yarn types and textures. Chunky yarn gives a plush feel, while cotton offers durability for everyday use. The possibilities are endless with this free pattern.
1. Can beginners follow this paw print granny square pattern?
Yes, this Crochet Paw Print Granny Square Pattern Free is designed for beginners. Basic stitches like single, half-double, and double crochet are used, with clear step-by-step instructions.
2. What yarn works best for paw print granny squares?
Medium-weight acrylic or cotton yarn is recommended. Choose colors that contrast well to make the paw print stand out.
3. How do I make the paw print look clean and defined?
Use precise stitch counts, change colors carefully, and keep consistent tension. Blocking the square after finishing also helps define the paw print.
4. How many squares do I need for a blanket?
It depends on the blanket size. A small lap blanket may need 20-30 squares, while a large bedspread could require 50 or more squares.
5. Can I join these squares with other granny square patterns?
Absolutely. Mixing paw print squares with traditional or solid granny squares creates a unique and eye-catching design.
6. Can I customize the size of the squares?
Yes. Adjust hook size or the number of rounds to make squares larger or smaller according to your project needs.
7. How do I finish the edges of the blanket or project?
Add a border in a single color or multiple rounds to frame your project neatly. Use single crochet or shell stitches for a polished edge.
Creating this Crochet Paw Print Granny Square Pattern Free project allows you to make adorable and functional crochet items while practicing your skills.
From learning the paw motif to joining squares and assembling larger projects, this pattern provides step-by-step guidance for both beginners and experienced crocheters.
Each paw print adds charm and personality to your work, making it perfect for gifts or home décor. Share your creations, leave feedback, and suggest ideas to inspire others to try this fun and versatile pattern.


