Crochet Pig In A Granny Square Blanket Pattern


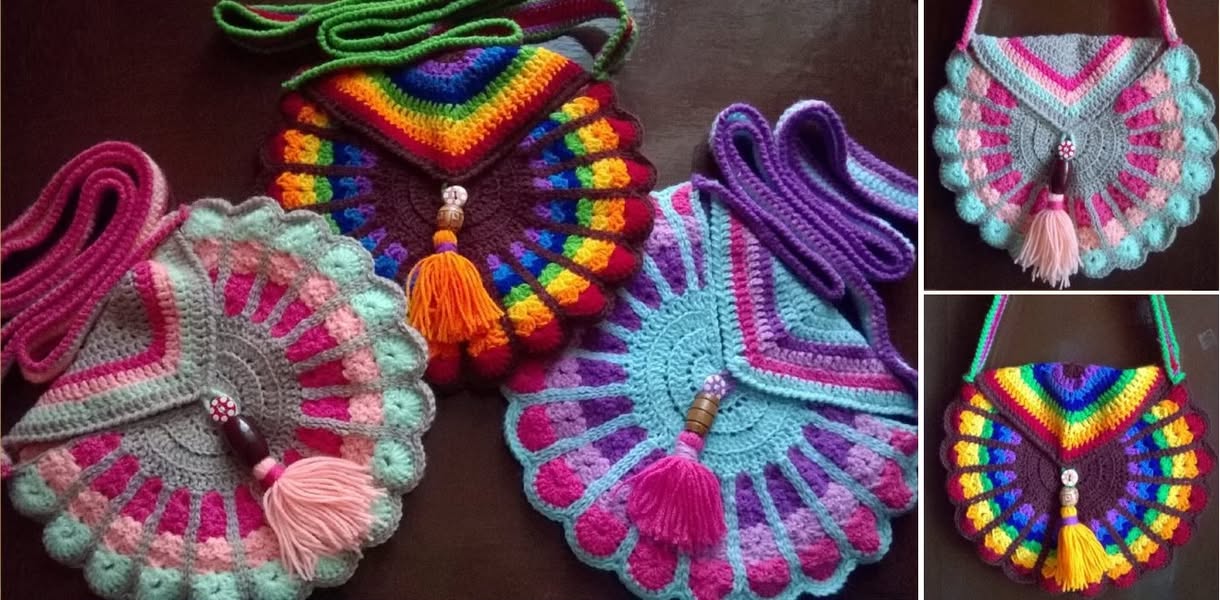
Crochet Peacock Bag – Step by Step Guide is the ultimate project for anyone looking to combine elegant design with practical functionality.
This tutorial will guide you through creating a stunning peacock-inspired crochet bag that is perfect for everyday use, special occasions, or as a unique handmade gift. Using vibrant yarns and detailed crochet techniques, this bag stands out for its intricate patterns and eye-catching colors.
Crocheting a peacock bag allows you to explore various stitches and design methods while building a functional accessory. Unlike store-bought bags, your handmade bag can be customized in size, color, and embellishments, making it a one-of-a-kind piece.
The Crochet Peacock Bag project is suitable for intermediate crocheters, though ambitious beginners can follow along with patience and attention to detail.
Creating this bag also provides a sense of accomplishment and artistic satisfaction. Watching the peacock-inspired patterns emerge stitch by stitch is both calming and rewarding. With this step-by-step guide, you will learn not only the technical aspects of crochet but also tips for combining colors and textures to achieve a professional-looking handmade bag.
Before starting your Crochet Peacock Bag, it is essential to gather all necessary materials. You will need high-quality yarn in shades that reflect the vibrant colors of a peacock, such as blues, greens, and golds. A crochet hook suitable for your chosen yarn, scissors, yarn needle, and optional lining fabric are also required. Using the right materials ensures your bag is durable, visually appealing, and comfortable to carry.
Choosing the appropriate yarn weight is crucial for the structure and appearance of your bag. Thicker yarns create a sturdier bag, while lighter yarns allow for delicate details. Combining different textures can also enhance the peacock-inspired look. Ensure your materials match your vision for both style and functionality.
Organizing your workspace before starting will make the process smoother. Keep your yarns untangled, your crochet hook easily accessible, and your pattern within sight. A clean, well-prepared environment helps maintain focus and prevents mistakes during complex sections.
Paying attention to color selection is vital when creating the peacock motif. Gradually blending shades or using complementary colors can make the feathers pop and add depth to your design. Experimenting with color placement before committing to stitches ensures a harmonious final piece.
Additional accessories, such as buttons, beads, or decorative tassels, can enhance the aesthetic appeal of your bag. Consider adding these elements to emphasize the peacock theme, but avoid overcrowding to maintain elegance.
Finally, understanding the basic crochet stitches required for this bag is essential. Familiarity with double crochet, half-double crochet, and chain stitches will help you navigate the pattern efficiently. Taking time to practice tricky stitches beforehand can prevent frustration during assembly.
Starting your Crochet Peacock Bag begins with creating the base. Using your chosen yarn and hook, follow the pattern to establish a solid foundation. The base needs to be even and strong to support the weight of the bag and any items inside.
Next, begin building the body of the bag. Use a combination of stitches to create texture and dimension. The peacock-inspired pattern often involves layered motifs or fan-like shapes that mimic feathers.
As you progress, check your stitch count regularly. This ensures that your bag maintains its shape and that the peacock design remains symmetrical. Correcting mistakes early prevents larger issues later.
After completing the main body, add details such as feather tips, edging, or decorative borders. These finishing touches enhance the overall visual appeal and give your bag a professional appearance.
Consider adding a lining for additional durability and a polished look. The lining can be sewn in place using a yarn needle or by stitching with fabric thread. A lining prevents stretching and protects your items inside.
Finally, attach handles or straps according to your preference. Whether short for hand-carry or long for a shoulder bag, secure attachment is key for usability and longevity. Reinforce stress points to prevent wear and tear.
Customizing your Crochet Peacock Bag allows you to express personal style. Start by experimenting with colors that complement your wardrobe. Vibrant jewel tones work well, but pastels can create a softer look.
Adjusting the size of the bag is another effective way to personalize your creation. Larger bags are practical for shopping or school, while smaller versions are ideal for casual outings or evening events.
Incorporating different yarn textures can enhance the design. Smooth yarns provide a sleek finish, while boucle or metallic threads add interest and sparkle. Mixing textures carefully ensures a cohesive appearance.
Adding embellishments such as beads or sequins can emphasize the peacock feathers. However, balance is important; too many decorations can make the bag look cluttered rather than elegant.
Experiment with stitch patterns to create unique effects. Fans, shells, and clusters are excellent for mimicking the natural feather shapes of a peacock. Alternating patterns creates depth and visual interest.
Finally, consider functional features like pockets or closures. Buttons, zippers, or magnetic clasps improve practicality while maintaining the artistic design of your Crochet Peacock Bag.
A common mistake when making a Crochet Peacock Bag is uneven tension. Maintaining consistent tension ensures the bag keeps its shape and looks professional.
Skipping steps or ignoring stitch counts can lead to asymmetry. Follow the pattern closely and double-check your work regularly.
Using the wrong yarn weight may result in a floppy or overly stiff bag. Match your materials to the intended design for optimal results.
Neglecting finishing touches, such as edging and handles, can reduce durability. Reinforce critical areas to prevent damage over time.
Overloading the bag with embellishments can detract from the peacock motif. Focus on key accents to highlight the design without overwhelming it.
Lastly, failing to block your bag can cause irregular shapes. Blocking helps even out stitches and creates a polished final product.
Q: Can beginners make a Crochet Peacock Bag?
A: Yes, beginners can attempt this project by following the step-by-step instructions carefully and practicing basic stitches first.
Q: What yarn is best for this bag?
A: Medium-weight yarn works well, but you can also experiment with textures and colors to enhance the peacock design.
Q: How do I maintain the shape of my bag?
A: Consistent tension, proper base construction, and optional lining all help keep the bag sturdy.
Q: Can I add pockets inside the bag?
A: Absolutely! Adding pockets improves functionality without compromising the design.
Q: How long does it take to complete the bag?
A: Depending on experience, the project can take several hours to a few days. Planning and patience are key.
Q: How can I clean the bag?
A: Hand wash in cold water and lay flat to dry to maintain the shape and colors. Avoid machine washing if possible.
Creating a Crochet Peacock Bag combines artistry, skill, and practicality. By following this guide, you can produce a beautiful, functional bag that reflects your personal style.
You have learned how to select materials, follow step-by-step instructions, customize designs, and avoid common mistakes.
Your handmade bag will not only be a fashion statement but also a testament to your creativity. Leave your honest opinion and suggestions about this project, and share your unique experiences with the Crochet Peacock Bag to inspire others.


