Crochet Pig In A Granny Square Blanket Pattern


Crochet Pig Phone Pouch – Step by Step is a fun, practical, and adorable crochet project that combines creativity with everyday functionality.
This tiny, pig-themed pouch is perfect for holding your smartphone, small essentials, or even as a cute gift for friends and family.
Its charming design makes it a standout accessory, and the project itself is simple enough for beginners while still enjoyable for experienced crocheters. With this tutorial, you’ll learn how to make a Crochet Pig Phone Pouch from scratch in just a few hours.
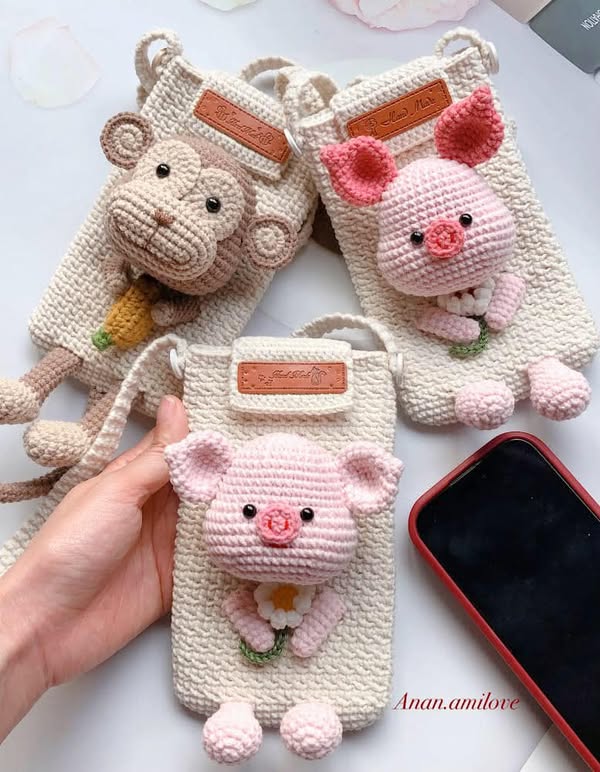
The beauty of the Crochet Pig Phone Pouch – Step by Step lies in its customization. You can choose the colors, yarn texture, and size to perfectly fit your phone or personal style.
The pig design can be modified to add cute features like a little snout, ears, and embroidered eyes, giving each pouch its own personality. This project is ideal for making gifts, adding charm to your own accessories, or even selling at craft fairs or online.
In this Crochet Pig Phone Pouch – Step by Step tutorial, we’ll cover the materials you’ll need, basic stitches and techniques, step-by-step instructions, and ideas for personalizing your pouch. By the end, you’ll have a unique, handmade item that’s both functional and irresistibly cute.
Before starting your Crochet Pig Phone Pouch – Step by Step, gather all necessary supplies. You won’t need much, and most materials are easy to find at local craft stores or online.
You’ll need medium-weight yarn (category 3 or 4) in pink for the pig’s body. Optional colors like white, black, or a darker pink can be used for the snout, eyes, or decorative accents. Choose cotton or acrylic yarn for durability and easy maintenance.
Select a 2.5 mm to 4 mm crochet hook, depending on your yarn thickness. Additional tools include scissors, a yarn needle for weaving ends, fiberfill stuffing for shaping the pig features, and safety eyes or beads for the eyes. A keychain ring or strap can also be added to turn your pouch into a wearable accessory.
Optional decorations like small ribbons, embroidery thread, or felt pieces can enhance your pig’s features. Preparing all these materials before starting ensures a smooth, enjoyable crafting session.
The Crochet Pig Phone Pouch – Step by Step uses basic crochet stitches, making it accessible even to beginners. The primary stitches you’ll need are chain stitch (ch), single crochet (sc), increase (inc), and decrease (dec). These stitches allow you to create a tight, even fabric suitable for a phone pouch.
Start your project with a magic ring to create the base of the pig or its features. Working in rounds helps form a neat, compact shape without visible seams. Use a stitch marker to keep track of your rounds for consistent results.
For extra details, you’ll create small pieces like ears, snout, and tail separately and sew them onto the main pouch. Using tight stitches ensures the structure holds and your phone fits snugly inside. Once you master these techniques, you can create not only this pouch but other cute amigurumi-style accessories as well.
Pick up some safety eyes or small black buttons for the pig’s eyes. Alternatively, you can embroider them if the pouch is for a child or if you prefer a softer look.
You’ll also need a yarn needle for weaving in ends, scissors for trimming, and some light pink and dark pink yarn for the pig’s snout, ears, and cheeks.
Optional items include a snap button or Velcro to close the top of the pouch, and a strap if you want to wear it crossbody or hang it from your bag.
Make sure you have your phone nearby to measure the size of the pouch. It should fit snugly without being too tight or too loose.
Follow these steps to create your Crochet Pig Phone Pouch – Step by Step:
Step 1: Create the Base
Start with a foundation chain matching the width of your phone. Work in single crochet rows until the rectangle reaches the phone’s height.
Step 2: Form the Pig Body
Work around the edges in rounds to make the sides more sturdy. Continue crocheting in rounds until the pouch reaches the desired depth. Leave the top open for easy phone access.
Step 3: Make the Snout
Using pink yarn, start with a magic ring of 6 sc. Increase evenly to make a small circle, then work a few rows without increasing. Lightly stuff the snout and sew it to the center front of the pouch. Embroider nostrils using black thread.
Step 4: Create the Ears
Make two small triangular ears with a few sc stitches in a magic ring. Crochet 2–3 rows, fasten off, and attach to the top sides of the pouch.
Step 5: Add the Eyes and Tail
Attach safety eyes or beads above the snout. For the tail, create a small chain and twist it into a curly shape, then sew it to the back.
Step 6: Finishing Touches
Weave in all loose ends with a yarn needle. Optionally, add a keychain ring or small strap to the top for portability. Your Crochet Pig Phone Pouch is now complete and ready to use!
One of the most fun aspects of the Crochet Pig Phone Pouch – Step by Step is personalization. You can change the color of the yarn to create other animal-themed pouches, like a bunny, cat, or bear. Different yarn textures, such as fluffy or velvet, can give your pouch a plush, soft feel.
Add embellishments like bows, hearts, or tiny felt accessories for a unique touch. You can also make a larger version for tablets or a smaller one for cards and coins. Creating sets of different animal phone pouches makes a fun gift collection or market product.
The pig design itself can be adjusted: change ear shape, snout size, or even expression to make your crochet pouch truly one-of-a-kind. Each pouch will reflect your creativity and personal style.
How long does it take to crochet a pig phone pouch?
Typically, 3–5 hours depending on your skill level and attention to detail.
What yarn is best for durability?
Medium-weight cotton or acrylic yarn ensures the pouch is sturdy and easy to clean.
Can beginners make this project?
Yes, it’s beginner-friendly with basic stitches and clear instructions.
How do I attach a keychain ring?
Sew a small loop at the top and securely attach the keychain ring or lobster clasp.
Can I make it larger or smaller?
Absolutely! Adjust the foundation chain and the number of rows to fit different phone sizes.
Is it safe for children?
Use embroidered eyes instead of beads for small children to ensure safety.
In this Crochet Pig Phone Pouch – Step by Step, you learned how to make a functional, adorable, and personalized phone accessory. From creating the base to adding cute pig features, this project is both practical and fun. Perfect for gifts, personal use, or even selling, it combines crochet skills with creativity to make a delightful item.
Try your own variations of the Crochet Pig Phone Pouch, experiment with colors, textures, and embellishments. Share your honest opinion and suggestions — your feedback inspires more creative crochet tutorials for everyone who loves making handmade accessories.


