Crochet Pig In A Granny Square Blanket Pattern


Crochet the Cutest Baby Shoes from the Square Stitch: A Beginner-Friendly Tutorial is a heartwarming and simple project perfect for anyone who loves creating handmade baby accessories.
These tiny crochet shoes are not only adorable but also incredibly practical and comfortable for little feet. With the square stitch technique, beginners can easily make beautifully textured baby shoes that look intricate yet are surprisingly simple to create.
Whether you are making them for your own baby, as a thoughtful handmade gift, or to sell in your small craft business, this tutorial will guide you every step of the way.

One of the best things about crocheting baby shoes using the square stitch is how versatile this pattern can be. You can experiment with different colors, yarn types, and decorative elements such as ribbons, buttons, or pom-poms.
Each pair of baby shoes becomes unique, filled with your creativity and care. The square stitch provides a firm yet soft structure, giving the shoes the ideal shape to keep little toes warm and snug without being too tight.
This Crochet the Cutest Baby Shoes from the Square Stitch: A Beginner-Friendly Tutorial will teach you everything you need to know — from choosing your materials to finishing the final stitches. You’ll also learn helpful tips to adjust the pattern for different baby sizes and styles. Get ready to crochet your way to the cutest handmade baby accessory that everyone will adore!
Before you begin your project, it’s important to gather all your materials. The great thing about Crochet the Cutest Baby Shoes from the Square Stitch is that it requires only a few basic tools that every crocheter likely already has. Preparing these in advance will help you work comfortably and smoothly throughout the tutorial.
You’ll need soft baby yarn — lightweight cotton or acrylic blends work best because they’re gentle on delicate baby skin. Choose pastel shades like pink, blue, white, or mint green for a classic baby look, or go bold with modern color combinations. For the crochet hook, a size 3.0mm or 3.5mm hook usually works perfectly for baby-sized projects.
You’ll also need a yarn needle for weaving in ends, a pair of scissors, and optional decorative items like small buttons or bows. A stitch marker can be helpful if you’re new to crocheting in rounds or need to keep track of your stitches. Having these tools ready will make your crocheting experience enjoyable and stress-free.
Finally, make sure your working space is well-lit and comfortable. Set aside a small tray or basket to keep your yarn and hook organized — it helps prevent tangling and saves time. With everything ready, you’re all set to begin this beginner-friendly crochet project that’s as fun as it is adorable.
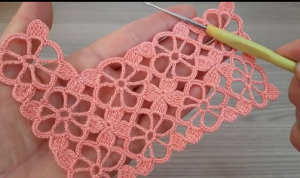
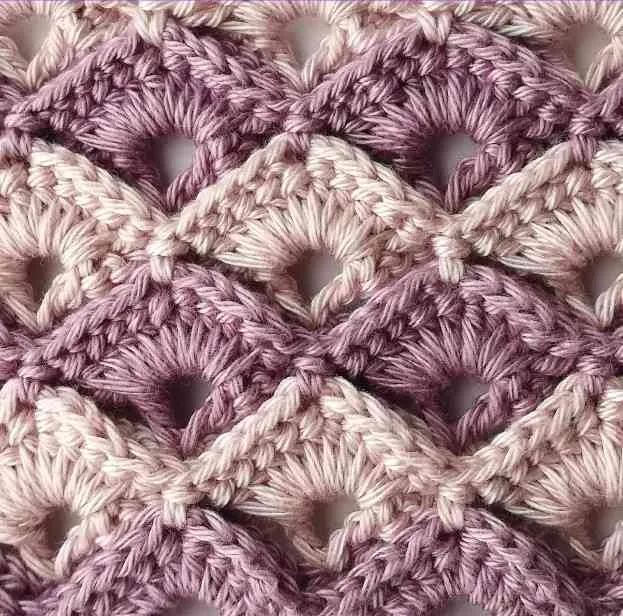
The foundation of this project lies in mastering the square stitch, which is both beautiful and easy to learn. This stitch creates a textured grid pattern that looks sophisticated but is simple enough for beginners. It’s often used in blankets, scarves, and slippers — and now, in these cute baby shoes!
To begin, chain an even number of stitches. The first row is made of double crochets across the foundation chain. Once you’ve completed the first row, chain two and turn your work. For the next row, alternate between one double crochet and one chain stitch, skipping a stitch after each chain. This creates the small “squares” that form the distinctive grid texture.
Repeat this pattern for several rows until you reach the desired height. The resulting fabric will be flexible yet structured — perfect for shaping into tiny shoes. The square stitch is not only visually appealing but also adds comfort and stretch to the baby shoes, making them easy to put on and take off.
Once you’ve crocheted your rectangular piece using the square stitch, you’ll fold and shape it into a shoe form. The next steps will teach you how to transform this simple square into the cutest baby footwear ever!
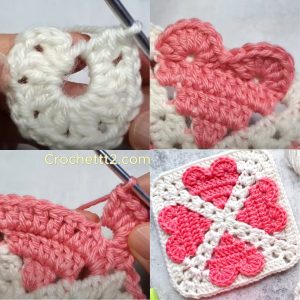
Now that your square stitch panels are ready, it’s time to assemble the shoes. This part is where your project truly comes to life! You’ll see how a flat crochet piece turns into a soft, wearable, and absolutely adorable baby shoe in just a few simple steps.
Start by folding your crocheted square in half lengthwise, matching the edges. Using your yarn needle, sew one of the short edges together — this forms the heel of the shoe. Be sure to use small, tight stitches so the seam is secure but not bulky.
Next, fold the remaining open end to form the front of the shoe. Using your hook and matching yarn, crochet slip stitches along the edge while gradually tightening the opening to shape the toe area. You can adjust how round or pointed the shoe front looks depending on how many stitches you pull together.
Once the toe is shaped, you’ll have a small, slipper-like shoe. Add a few extra rows of single crochet around the ankle area to create a soft and stretchy cuff. This makes the shoes easy to slip on while keeping them comfortably in place. Your Crochet the Cutest Baby Shoes from the Square Stitch design is now almost complete!
The final step is where your creativity can shine. There are endless ways to personalize your crocheted baby shoes, turning them into unique handmade treasures. Adding small embellishments or color details can elevate your design from simple to stunning.
You can sew on tiny buttons shaped like stars, flowers, or animals for a playful look. For extra cuteness, add a small bow at the front using a contrasting yarn color or a satin ribbon. Some crafters also like to crochet miniature flowers or hearts and attach them as appliqués on the shoe tops.
If you prefer a minimalist look, use a gradient or multicolored yarn to create a natural pattern without needing any decorations. You can also make matching baby accessories like a hat or blanket using the same square stitch pattern for a complete handmade set.
Remember to check that all decorations are securely attached to ensure baby safety. Avoid using small beads or parts that could come loose. Once done, give the shoes a light steam press or blocking to help them keep their shape.
1. Are these baby shoes suitable for complete beginners?
Yes! This pattern is designed for beginners. The square stitch is simple to learn, and the steps are clearly explained. Even if you’re new to crochet, you’ll find this project enjoyable and rewarding.
2. What yarn is best for crocheting baby shoes?
Use soft, hypoallergenic yarns such as baby cotton or fine acrylic blends. These materials are gentle on sensitive skin and provide a comfortable fit.
3. Can I make these shoes in larger sizes?
Absolutely. To make larger sizes, simply increase your initial chain length and number of rows when working the square stitch panel.
4. How can I decorate my crochet baby shoes?
You can use bows, buttons, crochet flowers, or embroidery. Just make sure all pieces are securely attached and baby-safe.
5. How do I wash crochet baby shoes?
Hand wash with mild soap and let them air dry. Avoid high heat or machine drying to preserve the shape and texture of the yarn.
Creating your own Crochet the Cutest Baby Shoes from the Square Stitch: A Beginner-Friendly Tutorial project is a beautiful and fulfilling experience.
You’ve learned how to crochet the square stitch, assemble the pieces into shoes, and decorate them with your unique style. These handmade shoes are not only practical but filled with love, care, and creativity.
If you enjoyed this tutorial, leave your honest opinion below and share any suggestions or tips you’d love to see in future crochet guides. Your feedback helps make every project even better!


