Crochet Pig In A Granny Square Blanket Pattern


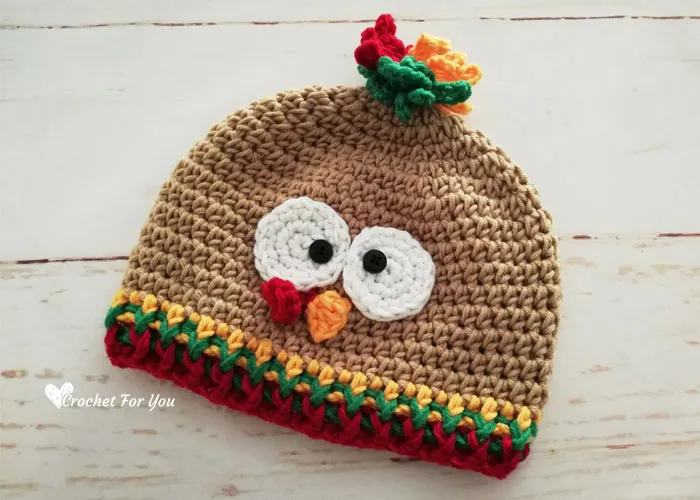
If you are looking for a fun and festive project, the Crochet Turkey Hat – Free Pattern is the perfect choice. This charming hat brings the warmth and creativity of handmade crochet into your wardrobe.
The Crochet Turkey Hat – Free Pattern not only serves as a functional headwear piece but also adds a playful and decorative touch.
Additionally, the Crochet Turkey Hat – Free Pattern is versatile and customizable. You can adjust the size, choose different colors for the feathers, or add embellishments to make your hat truly unique.
To start your Crochet Turkey Hat – Free Pattern, gather all the necessary materials. The primary materials include medium-weight yarn in various colors, a suitable crochet hook, scissors, a yarn needle, and stitch markers. Choosing the right yarn is crucial to achieve the desired texture and comfort. For the turkey’s body, warm brown tones work best, while vibrant reds, oranges, and yellows are ideal for feathers.
Using quality yarn ensures your Crochet Turkey Hat – Free Pattern remains durable and maintains its shape. Natural fibers such as cotton or a cotton blend are excellent choices because they are soft and breathable. Acrylic yarn is also a popular option due to its affordability and wide range of colors. Consider your preferences and the recipient’s comfort when selecting yarn types for your project.
A crochet hook in the recommended size is essential for achieving the correct gauge. Using a hook that is too large or too small can affect the hat’s fit and the overall appearance of your Crochet Turkey Hat – Free Pattern. Stitch markers are helpful to keep track of rounds and key points, especially when creating the detailed feathers and facial features of the turkey.
Having scissors and a yarn needle on hand allows you to cut yarn cleanly and weave in ends neatly. This ensures your Crochet Turkey Hat – Free Pattern looks professional and polished. Taking the time to prepare your materials before starting the project can save time and reduce frustration as you crochet.
Finally, patience and enthusiasm are key tools for completing the Crochet Turkey Hat – Free Pattern successfully. While it may take a few hours to finish, the process is enjoyable and rewarding. By preparing properly, you set yourself up for a fun and stress-free crafting experience.
The Crochet Turkey Hat – Free Pattern begins with creating the base of the hat. Start by forming a magic ring and crocheting in rounds to shape the crown. Increasing stitches gradually ensures a snug and comfortable fit for any head size. Pay close attention to stitch counts and rounds, as consistency is essential for the hat’s symmetry and overall structure.
Once the crown is complete, continue crocheting the sides of the hat in rounds until you reach the desired length. The body of the Crochet Turkey Hat – Free Pattern is typically worked in simple stitches like single crochet or half-double crochet, making it accessible for beginners. Remember to try the hat on as you go to ensure proper fit.
Next, create the turkey’s facial features, including the beak, wattle, and eyes. These elements are crocheted separately and sewn onto the hat. Using contrasting colors makes the details pop and enhances the festive appearance of your Crochet Turkey Hat – Free Pattern. Carefully position each feature to achieve a balanced and appealing look.
Feathers are the most decorative part of the Crochet Turkey Hat – Free Pattern. Crochet multiple feather shapes in various colors and attach them to the back of the hat. Layering the feathers and alternating colors adds depth and realism. This step allows you to showcase your creativity and personalize your hat with unique combinations of hues.
Finally, secure all loose ends and make any necessary adjustments to ensure the hat fits comfortably. Blocking the finished Crochet Turkey Hat – Free Pattern can help even out stitches and give the hat a polished finish. Your finished hat will be ready to wear or gift, bringing joy and festive cheer to anyone who sees it.
Creating the Crochet Turkey Hat – Free Pattern can be a delightful experience, especially if you follow helpful tips and tricks. One essential tip is to maintain consistent tension throughout your work. Consistent stitches ensure the hat maintains its shape and looks professional.
Another helpful tip for beginners is to count stitches carefully and use stitch markers. This keeps track of rounds and ensures the hat maintains symmetry, particularly when working on detailed features like the turkey’s face and feathers.
Experimenting with colors can also enhance the beauty of your Crochet Turkey Hat – Free Pattern. Try different combinations of warm fall colors to create vibrant, eye-catching feathers. This is where you can add a personal touch and make your hat unique.
If you encounter challenges, do not hesitate to refer to video tutorials or crochet guides for similar stitch techniques. These resources can provide visual support that complements the written instructions in your Crochet Turkey Hat – Free Pattern.
Remember to take breaks if your hands become tired. Crocheting can be relaxing, but overworking your hands may cause discomfort and affect the quality of your work. Enjoying the process ensures a better end result.
Finally, practice patience and perseverance. The Crochet Turkey Hat – Free Pattern may require several hours to complete, but the satisfaction of creating a festive, handmade hat is worth the effort. Celebrate each milestone and be proud of your creative achievement.
The Crochet Turkey Hat – Free Pattern is highly customizable, allowing you to personalize your project in various ways. You can adjust the hat’s size to fit children, teens, or adults. Measuring the head circumference before starting ensures a perfect fit.
Changing yarn textures can also transform the appearance of your Crochet Turkey Hat – Free Pattern. Soft, fluffy yarn gives a cozy and warm feel, while smoother yarn produces a sleek and polished look. Mixing textures can add visual interest to your creation.
Adding embellishments like buttons, beads, or ribbons can make your Crochet Turkey Hat – Free Pattern stand out. You can also experiment with different feather shapes, sizes, and colors to create a playful and dynamic effect.
Seasonal customization is another option. While this pattern is perfect for Thanksgiving, you can adapt it for other holidays by changing colors or adding themed decorations. This flexibility makes your Crochet Turkey Hat – Free Pattern a versatile addition to your wardrobe.
Gifting your finished hat is also a wonderful way to share your creativity. Handmade gifts like the Crochet Turkey Hat – Free Pattern are meaningful and unique, reflecting thoughtfulness and effort. Personalizing the hat for the recipient adds a special touch.
Finally, document your customization ideas. Keeping notes on color combinations, stitch variations, and embellishments helps you recreate or improve your Crochet Turkey Hat – Free Pattern in future projects. This ensures continuous learning and growth in your crochet journey.
Q1: Is the Crochet Turkey Hat suitable for beginners?
Yes, the Crochet Turkey Hat – Free Pattern is beginner-friendly. The instructions are clear, and basic stitches are used, making it accessible for anyone with basic crochet knowledge.
Q2: What yarn is recommended for this hat?
Medium-weight yarn in warm fall colors is recommended. Natural fibers like cotton or cotton blends are soft and breathable, while acrylic yarn offers affordability and color variety.
Q3: How long does it take to complete the hat?
The time depends on your experience and speed. On average, it may take 4–6 hours to complete the Crochet Turkey Hat – Free Pattern, including all details and embellishments.
Q4: Can the hat be customized for different sizes?
Absolutely! The pattern allows for size adjustments to fit children, teens, or adults. Measuring head circumference beforehand ensures a perfect fit.
Q5: How should I care for my crochet turkey hat?
Hand washing in cold water and air drying is recommended to preserve the shape and texture of the Crochet Turkey Hat – Free Pattern. Avoid wringing or using high heat.
Q6: Are there ways to make the feathers more realistic?
Yes, layering feathers, alternating colors, and experimenting with different shapes and lengths can create a more dynamic and realistic appearance.
Throughout this article, you learned how to prepare materials, follow step-by-step instructions, apply tips for beginners, and customize your hat to make it unique.
We hope this guide inspires you to pick up your crochet hook and start crafting your own Crochet Turkey Hat – Free Pattern. Don’t forget to share your experience, offer suggestions, and leave your honest opinion about the pattern.


