Crochet Pig In A Granny Square Blanket Pattern


The joy of crafting something handmade is unlike any other, and working on a Free Crochet Ghost Amigurumi Pattern with Tiny Pumpkin combines charm, creativity, and fun into one delightful project. Crochet amigurumi has become a favorite among crafters because it allows you to make adorable little figures that can be used as gifts, decorations, or even collectibles.
This particular project is perfect for seasonal crafting and offers a wonderful way to celebrate the magic of fall and Halloween.
When you start working with the Free Crochet Ghost Amigurumi Pattern with Tiny Pumpkin, you not only create a playful character but also practice essential amigurumi techniques. From crocheting in the round to shaping details like eyes, arms, and accessories, this project gives you a complete experience.
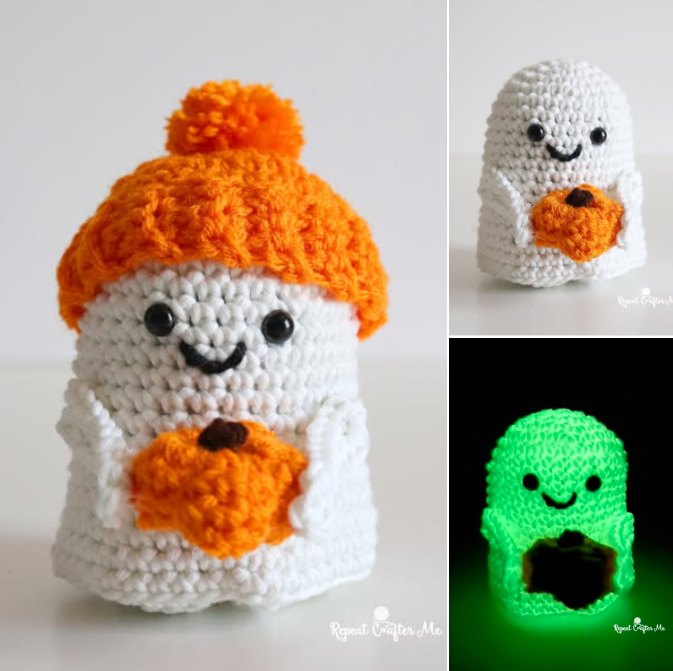
The ghost becomes a soft, lovable figure, while the tiny pumpkin adds a festive touch that makes it perfect for display during autumn celebrations.
Another great benefit of trying the Free Crochet Ghost Amigurumi Pattern with Tiny Pumpkin is that it’s suitable for crocheters of different skill levels. Beginners can learn from the step-by-step process, while more advanced crafters can personalize their ghost with creative variations.
Whether you make just one or create a whole collection, this pattern brings joy, charm, and creativity into your crafting journey.
Before you begin the Free Crochet Ghost Amigurumi Pattern with Tiny Pumpkin, gathering the right materials is essential. Having everything prepared ensures that your project flows smoothly from start to finish.
Start with yarn. For the ghost, soft white yarn works perfectly, while orange yarn is needed for the tiny pumpkin. You can choose different textures depending on whether you want a smooth or fluffy finish. Acrylic yarn is a popular choice because it is affordable and easy to work with.
Next, you’ll need a crochet hook that matches your yarn size. Most amigurumi patterns work best with slightly smaller hooks, as tighter stitches help keep the stuffing inside. Commonly, a 2.5 mm to 3.5 mm hook is ideal for this type of project.
Stuffing is another key material. Polyester fiberfill is widely used because it’s lightweight, washable, and keeps its shape. A small amount of stuffing will be used for both the ghost and the tiny pumpkin.
Safety eyes or small beads can be used to bring your ghost to life. If you prefer a softer option, you can embroider the eyes with black yarn or thread. This makes the toy safer for children and gives it a more handmade look.
For finishing touches, you may need a yarn needle for sewing pieces together, stitch markers to keep track of rounds, and scissors for cutting yarn ends. These tools are simple but essential for creating a polished amigurumi.
Finally, consider adding embellishments. A little green yarn for the pumpkin’s stem or a tiny bow on the ghost’s head can add personality. These small details make your project unique and give it extra charm.
Now that your materials are ready, let’s explore the process of making the Free Crochet Ghost Amigurumi Pattern with Tiny Pumpkin. This step-by-step approach makes the project easy to follow and enjoyable to complete.
Begin with the ghost’s body by crocheting in a round. Using the magic ring technique, you can create a neat and seamless base. Increase stitches gradually to form a round shape, which will eventually turn into the ghost’s body.
As you continue, maintain even tension to keep the stitches consistent. Once the base is wide enough, you can begin crocheting straight rounds without increases to build the height of the ghost. This gives the body a smooth and cylindrical shape.
To form the ghost’s flowing bottom edge, you can alternate between increases and decreases in specific rounds. This creates a wavy effect that makes the ghost appear like it’s floating. The shaping adds character and enhances the overall look.
Adding arms to the ghost involves making small crochet tubes or ovals. These are sewn onto the sides of the body. Position them evenly so the ghost looks balanced. The arms can be kept simple or adjusted for different poses.
Once the body and arms are finished, attach safety eyes or embroider the eyes with black yarn. This step gives your ghost a friendly or spooky expression, depending on your preference. You can also stitch a tiny smile to complete the face.
Finally, stuff the body with fiberfill before closing the top. Use your yarn needle to sew the final stitches securely, ensuring the stuffing remains inside. Your ghost is now complete and ready for its tiny pumpkin accessory.
The tiny pumpkin adds charm and detail to the Free Crochet Ghost Amigurumi Pattern with Tiny Pumpkin. It’s a small but important feature that enhances the ghost’s playful appearance.
Start the pumpkin the same way you began the ghost: with a magic ring. Work in rounds, gradually increasing the stitches until the piece reaches the desired size. Since it’s meant to be tiny, the pumpkin usually requires only a few rounds.
Once the pumpkin base is formed, continue with rounds of even stitches to build its body. The pumpkin shape comes from alternating increases and decreases, which help create ridges that mimic the natural curves of a pumpkin.
After shaping the pumpkin, stuff it lightly with fiberfill. Don’t overstuff, as it should remain small and slightly soft. Close the top securely, leaving a neat finish.
To create the stem, use green or brown yarn and make a short chain or small cylinder. Attach this to the top of the pumpkin with your yarn needle. The stem is a simple detail but adds authenticity.
You can sew the pumpkin to the ghost’s hand or leave it as a separate accessory. Both options work well, depending on how you’d like to display your finished amigurumi. A sewn pumpkin makes the ghost look like it’s carrying it, while a separate one allows for flexible decoration.
The tiny pumpkin can also be made in different colors for variety. Try making a white pumpkin for a more whimsical look or a darker orange shade for realism. Each variation brings a new personality to the project.
Working on the Free Crochet Ghost Amigurumi Pattern with Tiny Pumpkin is fun, but a few helpful tips can make the process even more successful and enjoyable.
First, keep your stitches tight. Amigurumi relies on firm stitches to prevent stuffing from showing through. Using a slightly smaller hook than recommended for your yarn helps achieve this effect.
Second, use stitch markers to track your rounds. Since amigurumi is worked in continuous spirals, it’s easy to lose count. A marker makes it simple to know where each round begins.
Third, don’t be afraid to customize your ghost. Add accessories like a tiny bow tie, hat, or scarf to give it personality. You can even make a family of ghosts, each with unique details.
Fourth, experiment with different yarns. While acrylic is common, using fluffy yarn can make your ghost look softer and more whimsical. Cotton yarn, on the other hand, provides a crisp, clean finish.
Fifth, if you’re new to embroidery, practice on a scrap piece of fabric before stitching the ghost’s face. This helps you get comfortable with the technique and ensures the final result looks neat.
Finally, remember that mistakes can add charm. A slightly uneven wave on the ghost’s bottom or a crooked smile can make it look even more unique. The beauty of handmade crafts lies in their imperfections.
Is this pattern beginner-friendly?
Yes, the Free Crochet Ghost Amigurumi Pattern with Tiny Pumpkin is great for beginners, as it uses basic stitches and simple shaping.
How long does it take to make the ghost and pumpkin?
On average, it can take between 3 to 6 hours, depending on your skill level and how detailed you want the accessories to be.
What yarn is best for this project?
Acrylic yarn is recommended for durability and affordability, but cotton yarn also works well for a more defined look.
Do I need safety eyes, or can I embroider the face?
Both options are suitable. Safety eyes give a polished look, while embroidery is safer for children and adds a handmade touch.
Can I make the pumpkin in other colors?
Absolutely! You can use white, yellow, or even multicolored yarns to create different variations of the pumpkin.
What can I use the finished amigurumi for?
The ghost and pumpkin can be used as decorations, toys, or gifts. They’re especially popular as seasonal décor during Halloween.
The Free Crochet Ghost Amigurumi Pattern with Tiny Pumpkin is a delightful project that blends creativity, fun, and functionality. From selecting the right materials to crocheting the ghost and crafting its tiny pumpkin accessory, each step allows you to explore the joy of handmade work. With tips, variations, and personalization, your ghost amigurumi becomes a unique piece that reflects your imagination.
Whether you are a beginner looking for an easy project or an experienced crafter wanting something festive, this pattern is a perfect choice. It teaches essential amigurumi techniques while giving you the freedom to customize and create.
We’d love to hear from you! Share your honest opinions, suggestions, and experiences with making this ghost amigurumi. Your feedback helps inspire other crafters and builds a stronger community of creators.


