Crochet Pig In A Granny Square Blanket Pattern


Creating a Granny Square With 3D Rose Tutorial is a delightful way to add charm and texture to your crochet projects. Whether you are a beginner or an experienced crocheter, mastering this technique allows you to craft unique and eye-catching pieces.
The beauty of this pattern lies in combining the classic granny square with a delicate 3D rose at the center, making your projects stand out. With this tutorial, you’ll learn how to crochet a floral centerpiece that can enhance blankets, cushions, or even wearable items like bags and scarves.
Understanding the basics of a Granny Square With 3D Rose Tutorial is essential for anyone looking to elevate their crochet skills.
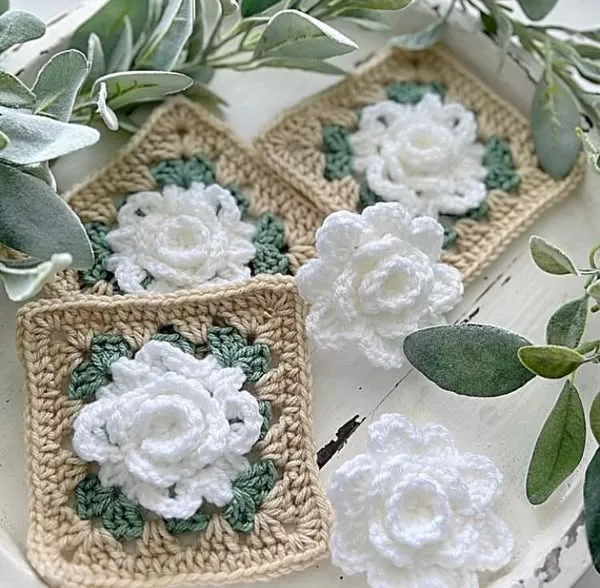
Granny squares are versatile motifs in crochet, traditionally made in a square shape with repeated stitches. By adding a 3D rose to the center, you introduce a three-dimensional effect that brings life and sophistication to your project.
This pattern is perfect for those who enjoy decorative details and want to practice advanced techniques while still following a clear, step-by-step process.
This Granny Square With 3D Rose Tutorial not only teaches you how to make a beautiful motif but also encourages creativity. You can customize the colors of your rose and the surrounding square, experiment with yarn types, and even combine multiple squares for larger projects. This guide will take you through the process patiently, ensuring that even beginners can follow along and create a stunning floral granny square that can be used in a variety of creative crochet projects.
Before starting your Granny Square With 3D Rose Tutorial, gathering the right materials is crucial. First, choose a soft, medium-weight yarn for both the square and the rose to ensure comfort and durability. Crochet hooks in sizes compatible with your yarn are necessary for achieving clean stitches and maintaining consistent tension. You will also need a yarn needle for weaving in ends and scissors for cutting the yarn after finishing your square.
It’s important to pick colors that complement each other when making a Granny Square With 3D Rose Tutorial. The rose should stand out from the background square, so consider choosing a vibrant color for the flower and a contrasting color for the surrounding granny square. Color planning is a fun part of this process and allows you to create visually stunning designs that reflect your personal style.
Other optional tools for this Granny Square With 3D Rose Tutorial include stitch markers to keep track of rounds, a blocking mat for shaping your finished squares, and a measuring tape to ensure consistency if you plan to create multiple squares for a blanket or cushion. Having these tools on hand will make your crochet experience smoother and more enjoyable.
Starting the rose in your Granny Square With 3D Rose Tutorial involves a few simple steps, but it requires patience. Begin by creating a magic ring and making a few initial chains. Work in tight stitches to form the center of the rose, gradually increasing the size to give it a three-dimensional appearance. Each petal is created by combining single, half-double, and double crochet stitches to achieve a layered effect.
Once your rose is complete, attach it to the center of your granny square. Begin the square by crocheting around the rose in rounds, following the traditional granny square pattern. Each corner is created with chains and clusters of stitches, while the sides are filled with evenly spaced stitches to maintain the square shape. This technique ensures that the rose stays centered and the square remains even.
Continuing with your Granny Square With 3D Rose Tutorial, you can add additional rounds to make larger squares. Experiment with color changes and stitch variations to make your squares more intricate. It’s important to keep consistent tension throughout, as uneven stitches can affect the overall shape and appearance of your finished piece.
After completing the square, weave in all loose ends using a yarn needle. Gently block your granny square if needed to ensure that it lays flat and the rose maintains its 3D shape. Blocking helps even out stitches and gives your finished piece a polished, professional look.
Practice makes perfect when following this Granny Square With 3D Rose Tutorial, so don’t hesitate to create multiple squares. You can assemble them into larger projects like blankets, cushion covers, or decorative wall hangings. Each square becomes a unique expression of your creativity.
One of the joys of a Granny Square With 3D Rose Tutorial is customization. You can vary the size of your rose by adjusting the number of stitches in each round, creating either a delicate small rose or a bold, prominent flower. Choosing different yarn textures can also add depth and interest to your design.
You can also experiment with color combinations to make your Granny Square With 3D Rose Tutorial more vibrant. Using gradient or variegated yarns can create a stunning visual effect, while sticking to solid colors can produce a classic, elegant look. Consider matching your squares to a theme, such as seasonal colors or room decor, to make your project cohesive.
Adding embellishments like beads, sequins, or embroidery to your Granny Square With 3D Rose Tutorial can enhance the 3D effect and add a personal touch. Carefully place these details on the petals or around the edges of the square to highlight your crochet skills without overwhelming the design.
Joining multiple squares allows you to create a cohesive project using this Granny Square With 3D Rose Tutorial. Whether you plan a blanket, scarf, or bag, arranging the squares thoughtfully will ensure a visually appealing result. Remember to block each square before assembly for best results.
Finally, practicing different stitch combinations can give your Granny Square With 3D Rose Tutorial a unique texture. Mixing shell stitches, popcorn stitches, or puff stitches can make each square distinct and enhance the three-dimensional quality of the rose at the center.
A frequent mistake when attempting a Granny Square With 3D Rose Tutorial is inconsistent tension. Uneven stitches can distort the rose or make the square look lopsided. Make sure to maintain steady tension throughout each round to achieve a uniform result.
Another common error is miscounting stitches while forming the granny square. Keeping track of each stitch is essential for maintaining the square shape and ensuring that the rose stays centered. Using stitch markers can help prevent this problem.
Choosing inappropriate yarn or hook sizes can also affect your Granny Square With 3D Rose Tutorial. Too thick or too thin yarn may distort the rose or make the square difficult to manage. Match your hook size to the yarn weight for the best results.
Skipping the blocking process can result in a granny square that doesn’t lay flat. Blocking is particularly important for a 3D rose, as it helps the petals maintain their shape and prevents curling or warping of the square edges.
Rushing through the rose petals can lead to a flat or misshapen flower. Take your time with each stitch, following the tutorial carefully to achieve the layered, three-dimensional effect that makes this pattern so special.
Lastly, neglecting to weave in ends properly can result in a messy, unfinished look. Always secure and trim yarn ends carefully to give your Granny Square With 3D Rose Tutorial a clean, polished appearance.
Q: Can beginners make a Granny Square With 3D Rose?
A: Yes! While the 3D rose adds complexity, following a step-by-step tutorial makes it accessible even for beginners. Start with simple petals and gradually practice layering techniques.
Q: What yarn works best for a 3D rose?
A: Medium-weight acrylic or cotton yarns are ideal. They provide structure while remaining soft and easy to work with.
Q: How do I join multiple granny squares with 3D roses?
A: Squares can be joined using slip stitches, single crochet seams, or even sewing them together. Always block squares before joining for uniformity.
Q: Can I use different colors for the rose and the square?
A: Absolutely! Contrasting colors make the rose stand out, while harmonious shades can create a subtler effect. Choose colors according to your project theme.
Q: How do I prevent my 3D rose from flattening?
A: Ensure proper tension while crocheting, use a suitable yarn weight, and consider lightly blocking the rose after finishing to maintain its shape.
Q: Is it possible to make larger or smaller roses?
A: Yes, adjust the number of stitches in each round to scale the rose up or down depending on your project needs.
This Granny Square With 3D Rose Tutorial has walked you through everything you need to know to create beautiful, textured granny squares with stunning floral centers.
From choosing the right materials to mastering the rose and assembling your squares, you now have the tools to elevate your crochet projects. By practicing and experimenting with colors, yarns, and stitches, you can make each square uniquely yours.
Share your creations, leave a sincere opinion, and offer suggestions to continue refining your crochet journey. Remember, each square is not just a piece of fabric—it’s a testament to your creativity and craftsmanship.
Whether you’re creating a blanket, cushion cover, or bag, the 3D rose adds a pop of dimension that will make your project stand out. This tutorial is perfect for intermediate crocheters, but beginners will also be able to follow along with the detailed instructions and helpful tips.


