Crochet Pig In A Granny Square Blanket Pattern


The Halloween Turtle No Sew Crochet Pattern is the perfect seasonal project for crafters who love combining creativity with festive charm
When working on a Halloween Turtle No Sew Crochet Pattern, one of the greatest advantages is the accessibility. Many crafters hesitate to finish projects because the sewing stage feels overwhelming.
Whether placed on a shelf, added to a candy bowl, or gifted to children and friends, the Halloween Turtle No Sew Crochet Pattern brings a personal touch to Halloween.
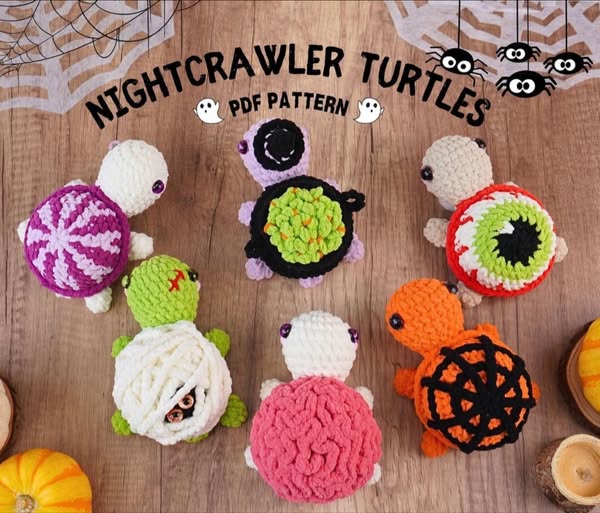
The first reason many people fall in love with the Halloween Turtle No Sew Crochet Pattern is its simplicity. Traditional crochet patterns often require sewing parts like legs, heads, or shells together. In contrast, this no-sew approach means every piece is seamlessly worked into the body, saving both time and frustration. Beginners especially appreciate this, as it allows them to finish a project without getting stuck on assembly.
Another reason to choose this pattern is the charm of seasonal crafting. When you work with themed designs, you feel more connected to the holidays and can share your creativity with others. This turtle pattern celebrates Halloween in a fun, cute way, letting you experiment with colors and add playful details like embroidered eyes, tiny pumpkins on the shell, or even a little witch hat crocheted on top. The possibilities for personalization are endless.
Additionally, this pattern is ideal for using leftover yarn. Since the turtle is small, you can combine scraps of orange, black, and purple without buying new skeins. This makes it a cost-effective project while also being eco-friendly. Many crafters find joy in reducing waste while still creating adorable seasonal items.
The no-sew aspect also makes the project travel-friendly. You can bring your yarn and hook anywhere—whether on a bus ride, during a lunch break, or at a Halloween gathering—and continue working on your turtle without worrying about losing small pieces for sewing later. It’s a perfect pattern for those who love on-the-go crafting.
Parents and teachers may also find this pattern useful. A small Halloween turtle can serve as a classroom decoration, a reward for students, or a handmade gift for trick-or-treaters. Because it’s soft and safe, children can handle it without concern. It’s a wholesome alternative to candy and adds charm to Halloween celebrations.
Finally, choosing this no-sew turtle pattern helps you practice important crochet skills. You’ll get better at shaping, color changes, and working in the round, all without the added complexity of sewing. By the end, you’ll have not only a cute turtle but also more confidence to tackle other amigurumi projects.
To begin your Halloween Turtle No Sew Crochet Pattern, gather some essential supplies. You’ll need yarn in Halloween colors such as orange, black, purple, and green. Acrylic yarn is a common choice, as it’s affordable, durable, and easy to wash. Cotton yarn can also be used if you prefer a sturdier texture with more stitch definition.
Next, choose the right hook size. Most amigurumi projects call for a smaller hook than usual, ensuring the stitches are tight and the stuffing does not show through. A 2.5mm to 3.5mm crochet hook is typically suitable, depending on your yarn thickness. Tight stitches are key for keeping the turtle’s shape neat and professional.
Stuffing is another essential material. Polyester fiberfill works well and gives the turtle a soft, squeezable feel. You’ll also need a yarn needle for weaving in ends, even though the no-sew aspect means you won’t be attaching separate pieces. Some crafters also like to use stitch markers to keep track of rounds, especially for beginners.
Safety eyes or embroidery thread will help give the turtle its face. Safety eyes add a polished look, while embroidered eyes are a safe choice if the toy is intended for young children. Whichever method you choose, make sure the face captures the fun, festive spirit of Halloween.
Optional decorations can take your turtle to the next level. Tiny crochet pumpkins, bats, or stars can be attached to the shell for extra detail. Alternatively, a small witch hat or a mini ghost companion can be crocheted to go along with the turtle, making it stand out as a centerpiece in your Halloween collection.
Finally, prepare scissors and a comfortable workspace. Crocheting a turtle may take only a few hours, but having everything organized ensures a smooth crafting experience. Once you’ve gathered your materials, you’re ready to bring your Halloween turtle to life.
Start by creating the turtle’s body. Most no-sew turtle patterns begin with a magic circle, where you crochet in the round to form the main base. This circular technique is essential for shaping both the body and the shell. By adjusting stitch counts, you can build the turtle’s head, limbs, and shell without ever needing to sew.
The next step involves color changes. For a Halloween turtle, you might begin the shell in black and add stripes of orange and purple. Switching colors adds vibrancy and creates the iconic Halloween theme. Keep your tension consistent during color changes to avoid gaps or uneven stitches.
Once the body and shell are established, you’ll shape the limbs. The no-sew method means you crochet the legs and arms directly onto the body by strategically adding stitches in the right places. This ensures the turtle looks neat and the limbs are firmly attached.
The face comes next. Adding safety eyes or embroidered eyes gives your turtle personality. For a Halloween twist, consider using green or yellow thread for embroidery, making the eyes glow like spooky lights. A small embroidered smile or fangs can also add a playful character to your design.
Stuff the turtle carefully with polyester fiberfill as you go. Avoid overstuffing, which can stretch the stitches, but make sure it’s firm enough to hold shape. The even stuffing helps the turtle look balanced and keeps it durable for handling.
Finally, finish by adding any extra details. A mini witch hat crocheted separately can be slipped on top, or you can attach a small crocheted pumpkin onto the shell. These finishing touches transform your turtle into a true Halloween masterpiece.
One creative use for the Halloween Turtle No Sew Crochet Pattern is making it a seasonal gift. Friends and family members will appreciate the thoughtfulness of a handmade turtle, especially one with a festive design. It’s small, lightweight, and easy to package, making it ideal for mailing as well.
Another fun idea is to create a set of turtles in different Halloween themes. For example, one turtle could have a pumpkin-inspired shell, another could wear a witch hat, and a third could feature ghostly white and black stripes. Displaying them together creates an adorable Halloween collection.
These turtles also make excellent decorations for parties. Place them on tables, candy bowls, or shelves, and they instantly enhance the Halloween mood. Guests often find handmade items charming and may even ask you to create turtles for them.
Parents may want to give these turtles as treats instead of candy. Since they are reusable and safe for children, they can become keepsakes that last well beyond the holiday. Teachers, too, can use them as classroom prizes or themed decorations.
Another creative idea is to turn your turtle into a keychain or bag charm. By adding a simple keyring or clip, you can take your Halloween turtle with you everywhere. It’s a great conversation starter and adds festive flair to everyday items.
Lastly, consider selling your turtles at craft fairs or online during Halloween season. Handmade, no-sew crochet items are highly sought after, especially when tied to holidays. This could turn your hobby into a fun side business while spreading Halloween joy.
1. Is the Halloween Turtle No Sew Crochet Pattern beginner-friendly?
Yes, this pattern is perfect for beginners because it eliminates sewing and focuses on simple stitches.
2. How long does it take to complete the turtle?
On average, it takes about 2 to 4 hours depending on skill level and added details.
3. Can I use any type of yarn?
Acrylic yarn is most common, but cotton yarn also works well. The key is to use yarn that matches your chosen hook size.
4. Do I need special tools for the no-sew pattern?
No special tools are required. A crochet hook, yarn, stuffing, and optional safety eyes are all you need.
5. Can I customize the Halloween turtle?
Absolutely. You can change yarn colors, add accessories like hats, or stitch on Halloween details such as pumpkins or bats.
6. Is the turtle safe for children?
Yes, as long as you avoid small safety eyes for very young children and instead embroider the eyes for safety.
The Halloween Turtle No Sew Crochet Pattern is a charming, beginner-friendly project that brings together the fun of amigurumi with the festive spirit of Halloween.
With no sewing required, it saves time while allowing for plenty of creativity and customization. From decorations to gifts, this turtle adds warmth and joy to the spooky season.
Now that you’ve learned how to create this Halloween turtle, I’d love to hear from you. Share your honest opinion about this project and suggest ideas for future patterns.


