Crochet Pig In A Granny Square Blanket Pattern


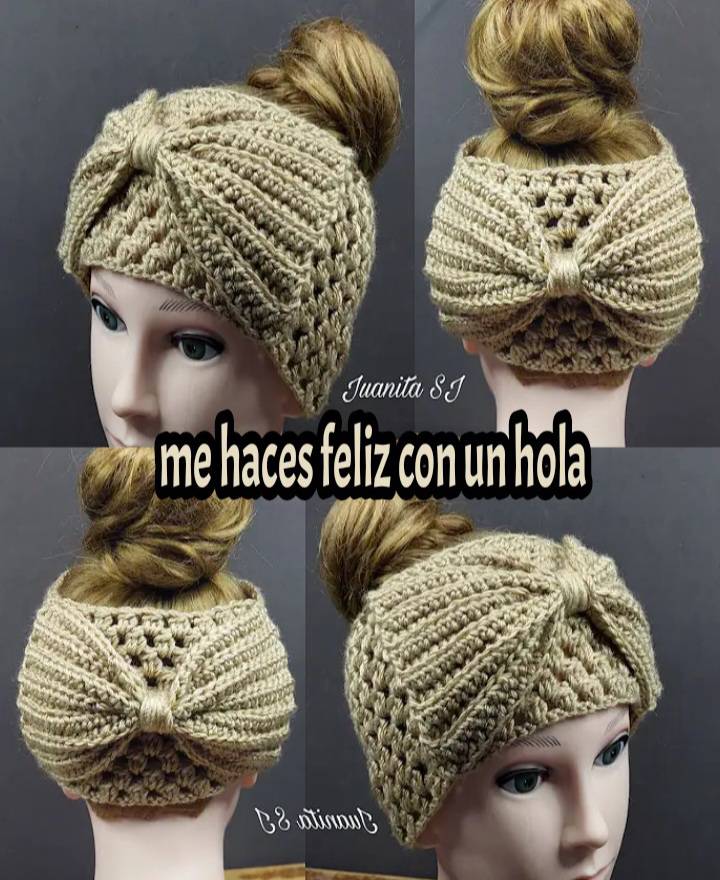
Learning how to crochet a turban or headband is a fun and practical project for crocheters of all skill levels. Whether you want to create cozy headwear for cold weather, a stylish accessory, or a unique gift, a crocheted turban with a big bow can make a bold fashion statement.
This step-by-step guide will walk you through the process of making a turban or headband that is both beautiful and comfortable to wear.
Crocheting a turban or headband allows you to explore various stitch patterns, textures, and color combinations. The turban with a big bow adds an extra decorative element that elevates the accessory, making it suitable for casual wear, special occasions, or as part of a coordinated outfit.
Unlike larger items like blankets or sweaters, a turban or headband can often be completed in a few hours, making it a satisfying project for both beginners and experienced crocheters.
To make your crochet turban or headband with a big bow, you will need the following materials. Start with yarn suitable for accessories. Medium-weight (worsted) acrylic or cotton yarn works well, offering comfort and durability.
A crochet hook matching your yarn weight is essential. Using the recommended hook size ensures even stitches, proper tension, and a polished final look.
You will also need scissors and a yarn needle. Scissors are used for cutting yarn, while a yarn needle helps weave in ends and attach the bow securely to the turban.
Optional materials include stitch markers for marking the center or beginning of rounds. They are helpful in maintaining symmetry and keeping track of your work.
Measuring tools, such as a tape measure or ruler, ensure the headband fits comfortably around the head. Sizes can be adjusted according to personal preference or intended recipient.
Finally, consider using a printed or digital guide or pattern to follow along. Patterns provide stitch counts, step sequences, and finishing instructions to simplify the process and improve accuracy.
Start by measuring the head circumference to determine the size of the turban or headband. This ensures a comfortable fit.
Next, create a foundation chain to match your measured length, adding a few extra chains for elasticity and stretch. Join the chain to form a ring if you are making a round headband.
Crochet the first row using your chosen stitch pattern, commonly single crochet or half-double crochet. Keep stitches even and tension consistent for a neat appearance.
Continue working in rows or rounds until the band reaches the desired width. Typically, a width of 4-6 inches works well for a classic turban or headband.
Once the base is complete, create the bow separately. The bow can be made using the same yarn, in a matching or contrasting color. Crochet a rectangle and cinch it in the middle with a piece of yarn to form the bow shape.
Finally, attach the bow to the center or side of the turban. Use a yarn needle to secure it firmly, making sure it is centered and stable. Weave in all loose ends for a clean finish.
A crochet turban or headband can be customized in many ways. Choose yarn colors that match your wardrobe or create bold contrasts for a statement accessory.
Experiment with stitch patterns for texture. Ribbed, basket weave, or puff stitches add depth and visual interest to your turban or headband.
Adjust the size to suit different head circumferences. Make the band wider or narrower depending on your style preferences.
Decorative elements, such as beads or buttons, can be added to the bow or band to enhance the accessory.
Try different yarn types for various effects. Soft, plush yarns create a cozy winter accessory, while lightweight cotton yarn is perfect for summer or mild weather.
Finally, consider creating matching sets by making multiple turbans or headbands in different colors, textures, or bow styles for versatile wardrobe options.
Creating a crochet turban or headband with a big bow allows for personalized fashion. You can control the colors, textures, and design to suit your style.
Handmade turbans and headbands are unique and make thoughtful gifts for friends and family.
Crocheting these accessories improves your crochet skills, especially in stitch consistency, shaping, and finishing techniques.
Making your own headwear is often more economical than buying store-bought options while also giving you complete creative freedom.
The process is relatively quick and satisfying, offering a sense of accomplishment upon completion.
Finally, handmade turbans or headbands are practical and functional, providing warmth, comfort, and style in a single accessory.After the initial chain, you will begin crocheting in rows or rounds, depending on your chosen pattern. The most common stitches used are single crochet, half double crochet, or double crochet.
Continue crocheting until you reach the desired length. Remember to check the fit by wrapping the piece around your head. It should be snug but not too tight to ensure comfort.
Once you have finished the base of the turban or headband, you will need to join the ends. This can be done with slip stitches or by sewing the ends together using a yarn needle.
What yarn works best for turbans and headbands?
Medium-weight acrylic or cotton yarn is ideal for comfort, durability, and ease of care.
Can beginners crochet a turban with a big bow?
Yes. With a step-by-step guide, even beginners can create a stylish and well-fitting turban.
How do I adjust the size of the headband?
Measure the head circumference and adjust the foundation chain accordingly. Also, adjust width and length based on personal preference.
How do I make the bow?
Crochet a rectangle, cinch it in the center with yarn, and attach it to the turban or headband.
Can I use different stitch patterns?
Yes. Experiment with ribbing, puff stitches, or basket weave for unique textures.
How do I secure the bow?
Use a yarn needle to attach the bow firmly to the band and weave in all loose ends for stability.
Is a crochet turban warm enough for winter?
Yes, especially if made with soft, plush, or chunky yarn. Lighter yarns are suitable for mild weather.
Can I wash a crocheted turban or headband?
Most acrylic or cotton yarns can be hand-washed or machine-washed on a gentle cycle. Always check the yarn label for care instructions.
Learning how to crochet a turban or headband – turban with a big bow is a rewarding and enjoyable project. With basic crochet skills, you can create a fashionable accessory that is both functional and stylish.
By following the step-by-step guide, using the right materials, and experimenting with colors and textures, you can make a personalized turban or headband perfect for yourself or as a gift. Handmade accessories provide a sense of accomplishment, allow for creative expression, and offer practical benefits such as warmth and comfort.
Creating your own crochet turbans and headbands encourages creativity and enhances your crochet skills. Share your creations, leave feedback, and continue exploring new variations of this versatile and beautiful accessory thank you very much.


